解析する信号の選択
信号アナライザー アプリは、MATLAB® ワークスペース内のベクトル、行列、MATLAB の timetable、timeseries オブジェクト、または labeledSignalSet オブジェクトを操作します。アプリを起動すると、左下隅のワークスペース ブラウザーにワークスペース内のすべての使用可能な信号が表示されます。詳細については、信号アナライザーでサポートされるデータ型を参照してください。
ワークスペース ブラウザーからの信号の選択
ワークスペース ブラウザーから信号を選択するには、信号の名前をクリックして左上隅の信号テーブルにドラッグします。信号をプロットするには、ディスプレイにドラッグします。信号テーブル内の信号名の横にあるチェック ボックスを選択すると、選択したディスプレイに信号がプロットされます。ワークスペース ブラウザーからディスプレイに信号を直接ドラッグすることもできます。ドラッグした信号は、ディスプレイ内にプロットされ、信号テーブルのリストに表示されます。
メモ
信号アナライザーは、行列、時系列、timetable、または 8000 チャネルを超えるラベル付き信号セットをサポートしていません。
信号テーブルでは、2 つの異なる信号選択方法があります。それぞれの方法は、一連の別々の処理へのアクセスです。
信号テーブルで [名前]、[INFO]、[時間]、または [開始時間] 列をクリックして信号を選択すると、[アナライザー] タブの操作すべてを実行できます。時間情報を変更して、信号を前処理、または複製することができます。信号をプロットして前処理する必要はありません。
信号名の左側にあるチェック ボックスをオンにすると、現在選択されているディスプレイに信号がプロットされ、[表示] タブの操作すべてを実行することができます。周波数領域または時間-周波数領域で信号を表示したり、カーソルを使用して信号を測定することができます。
メモ
100 列を超える信号をインポートしようとすると、アプリにより警告が表示されます。インポートしようとする行列が解析するマルチチャネル信号の転置である可能性があります。その場合、警告ダイアログ ボックスの [いいえ] をクリックしてワークスペース内の行列を転置します。列を個別の信号としてインポートする場合は、[はい] をクリックします。行列をディスプレイにドラッグして警告ダイアログ ボックスで [はい] をクリックすると、アプリは行列の最初の 10 列のみをプロットしますが、すべての列がインポートされます。10 列目より先の信号列をプロットするには、対象をディスプレイにドラッグします。あるいは、信号テーブル内で、プロットする信号名の横にあるチェック ボックスを選択します。
MATLAB ワークスペース内の信号を変更すると、ワークスペース ブラウザーは自動的に更新を行います。ただしアプリは、信号が再度、信号テーブルやディスプレイにドラッグされて再インポートされた後変更を認識します。
行列の列の追加や削除を行った場合は、信号が削除され、信号のすべてのプロットが消去されて、変更後の行列の次元を使用した新しい信号が作成されます。
階層構造にネストされたチャネルを含む行列、timetable、時系列、およびラベル付き信号セットは、明示的に階層を表示するツリー ビューに表示されます。
メモ
信号アナライザーは、チャネルが 1 つだけの場合でも、timetable をマルチチャネル信号として取り扱います。
例:
sgnという名前の 100 行 3 列の行列は、sgnとして信号テーブルに表示されます。ツリー ビューを展開すると、3 つの個別の列、ラベル付きsgn(:,1)、sgn(:,2)、およびsgn(:,3)を確認できます。
例: 4 つの変数で timetable を作成します。
"Temperature"には 2 つのチャネル、"WindSpeed"に 1 つのチャネル、"Electric"に 3 つのチャネル、および"Magnetic"に 1 つのチャネルがあります。信号テーブルに timetable をドラッグします。ツリー ビューを展開し、個々のチャネルを表示します。tmt = timetable(seconds(0:99)', ... randn(100,2),randn(100,1),randn(100,3),randn(100,1)); tmt.Properties.VariableNames = ... ["Temperature" "WindSpeed" "Electric" "Magnetic"];

信号テーブルにおける信号のフィルター
信号テーブル内で大量のデータを探索する場合、信号をフィルターすることができます。フィルター条件には、信号名またはその他の列に含まれる任意のテキストを使用できます。
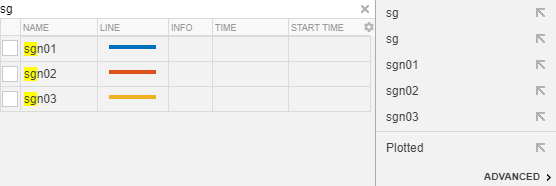
特定の名前をもつ信号を表示するには、[信号をフィルター] テキスト ボックスに検索フレーズを入力します。一致したテキストがフィルターの結果で強調表示されます。
仮に、3 つの sig 信号
sig01、sig02、sig03があり、3 つの sgn 信号sgn01、sgn02、sgn03があるとします。sgと入力して 3 つの sgn 信号を表示したり、2と入力してsig02とsgn02を表示したりできます。
時間情報に従って信号をフィルターすることもできます。この機能を使用するには、探索結果ボックス内部をクリックし、次に [詳細設定] をクリックします。時間情報の入力の詳細については、サンプル レートおよびその他の時間情報の編集を参照してください。
次のサンプル時間と開始時間をもつ 6 つの信号があるとします。

[詳細設定] メニューでは、
[名前]、[サンプル]、[開始時間]、あるいはサンプル レートまたはサンプル時間に関する[時間]で信号を探索できます。[時間]オプションを選択して20と入力すると、アプリは 200 Hz でサンプリングされた 4 つの信号を検出します。また、2 番目のテキスト ボックスで、[開始時間]オプションを選択して0と入力すると、アプリによってsgn01とsig01が検索されます。メモ
フィルターは値を数値ではなくテキストで一致させます。たとえば、
[開始時間]オプションを選択して00と入力した場合、そのフィルターでは結果が返されません。
フィルターは、後で使用するために保存して格納できます。探索結果ボックスの [詳細設定] メニューで、[クイック検索の設定] をクリックします。[検索に名前を付けて保存] ボックスに名前を入力して、[保存] をクリックします。
信号の削除、複製、および名前変更
信号アナライザーを使用すると、メインのアプリで信号の削除、複製、および名前変更を行うことができます。
信号を削除するには、信号テーブルで信号を選択し、キーボードの Del キーを押します。または、信号テーブルで信号を右クリックし、[削除] を選択します。[削除] ポップアップ ウィンドウで削除を確認します。
信号を複製するには、ツールストリップで [複製] をクリックするか、信号テーブルで信号を右クリックして [複製] を選択します。複製には、元の信号と同じ名前に _Copy が追加されます。
信号の名前を変更するには、信号テーブルで信号名をダブルクリックし、名前を変更します。あるいは、信号テーブルの信号を右クリックし、[名前の変更] を選択します。テキスト ボックスの外側をクリックするか、キーボードの Enter キーを押して変更を保存します。
メモ
マルチチャネル信号の個々のチャネルの名前を変更することはできません。