Getting Started with Mask R-CNN for Instance Segmentation
Instance segmentation is an enhanced type of object detection that generates a segmentation map for each detected instance of an object. Instance segmentation treats individual objects as distinct entities, regardless of the class of the objects. In contrast, semantic segmentation considers all objects of the same class as belonging to a single entity.
Mask R-CNN is a popular deep learning instance segmentation technique that performs pixel-level segmentation on detected objects [1]. The Mask R-CNN algorithm can accommodate multiple classes and overlapping objects.
You can create a pretrained Mask R-CNN network using the maskrcnn
object. The network is trained on the MS-COCO data set and can detect objects of 80
different classes. Perform instance segmentation using segmentObjects function with the maskrcnn object.
If you want to modify the network to detect additional classes, or to adjust other parameters of the network, then you can perform transfer learning. Transfer learning for Mask R-CNN generally follows these steps:
Configure a Mask R-CNN model for transfer learning using the
maskrcnnobject.Prepare training data.
Train the model using the
trainMaskRCNNfunction.Evaluate the Mask R-CNN model using the
evaluateInstanceSegmentationfunction.
For an example that shows how to train a Mask R-CNN, see Perform Instance Segmentation Using Mask R-CNN.
Design Mask R-CNN Model
To configure a Mask R-CNN network for transfer learning, specify the class names and
anchor boxes when you create a maskrcnn
object. You can optionally specify additional network properties including the network
input size and the ROI pooling sizes.
The Mask R-CNN network consists of two stages. The first stage is a region proposal network (RPN), which predicts object proposal bounding boxes based on anchor boxes. The second stage is an R-CNN detector that refines these proposals, classifies them, and computes the pixel-level segmentation for these proposals.

The Mask R-CNN model builds on the Faster R-CNN model. Mask R-CNN replaces the ROI max
pooling layer in Faster R-CNN with an roiAlignLayer that provides more accurate sub-pixel level ROI pooling.
The Mask R-CNN network also adds a mask branch for pixel level object segmentation. For
more information about the Faster R-CNN network, see Getting Started with R-CNN, Fast R-CNN, and Faster R-CNN.
This diagram shows a modified Faster R-CNN network on the left and a mask branch on the right.

Prepare Mask R-CNN Training Data
Load Data
To train a Mask R-CNN, you need the following data.
| Data | Description |
|---|---|
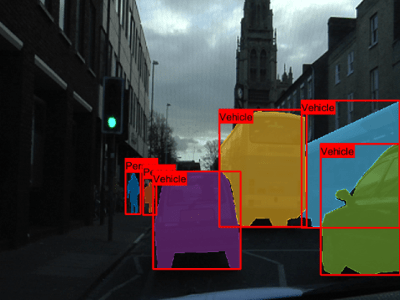
| RGB image | RGB images that serve as network inputs, specified as H-by-W-by-3 numeric arrays. For example, this sample RGB image is a modified image from the CamVid data set [2] that has been edited to remove personally identifiable information.
|
| Ground-truth bounding boxes | Bounding boxes for objects in the RGB images, specified as a NumObjects-by-4 matrix, with rows in the format [x y w h]). For example, the
bboxes = 394 442 36 101 436 457 32 88 619 293 209 281 460 441 210 234 862 375 190 314 816 271 235 305 |
| Instance labels | Label of each instance, specified as a NumObjects-by-1 string vector or a NumObjects-by-1 cell array of character vectors.) For example, the labels =
6×1 cell array
{'Person' }
{'Person' }
{'Vehicle'}
{'Vehicle'}
{'Vehicle'}
{'Vehicle'} |
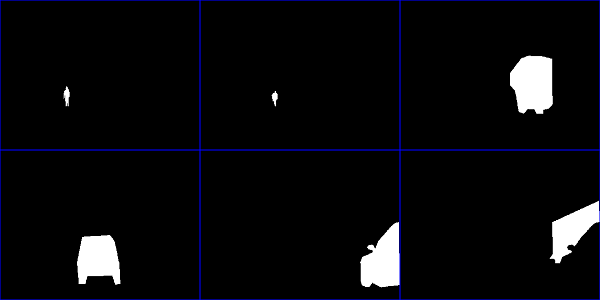
| Instance masks | Masks for instances of objects. Mask data comes in two formats:
For example, this montage shows the binary masks of six objects in the sample RGB image.
|

Postprocess groundTruth Object To Extract Mask R-CNN Instance Segmentation Training Data
To train a Mask R-CNN instance segmentation network, you can use the labeled
ground truth data exported from the Image
Labeler app stored in a groundTruth object.
Follow these steps to process the label data stored in a
groundTruth object and extract the mask stack data:
| Step | Description | Procedure |
|---|---|---|
1 — Display ground truth data | The exported ground truth object contains the data for five objects and three definitions. | Enter >> gTruth
gTruth =
groundTruth with properties:
DataSource: [1×1 groundTruthDataSource]
LabelDefinitions: [3×5 table]
LabelData: [1×3 table] |
2 — Get polygon data | The LabelData property groups the data by label
name. The | Type >> gTruth.LabelData
ans =
1×3 table
Car Bus Truck
__________ __________ __________
{3×1 cell} {1×1 cell} {1×1 cell} |
3 — Stack ground truth polygon data | The car and the truck are overlapping. This information (relative ordering of pixels) is lost in this format. Use the | Use the >> out = gatherLabelData(gTruth,[labelType.Polygon],'GroupLabelData','LabelType')
out =
1×1 cell array
{1×1 table}Show the contents of the table. >> out{1}.PolygonData
ans =
1×1 cell array
{5×2 cell} |
4 — View ground truth data by depth order | The contents of | Show the polygon data. >> out{1}.PolygonData{1}
ans =
5×2 cell array
{12×2 double} {'Bus'}
{ 6×2 double} {'Car'}
{ 7×2 double} {'Car'}
{13×2 double} {'Car'}
{ 9×2 double} {'Truck'} |
5 — Preallocate a mask stack for instance segmentation | Preallocate the mask stack with height and width equal to the image dimensions, and the channel depth the same as the number of polygons. |
polygons = out{1}.PolygonData{1}(:,1);
numPolygons = size(polygons,1);

imageSize = [645 916];
maskStack = false([imageSize(1:2) numPolygons]);
|
6 — Convert polygons to instance masks | Convert each polygon into a separate mask and insert it into the mask stack. |
for i = 1:numPolygons
    maskStack(:,:,i) = poly2mask(polygons{i}(:,1), ...
                       polygons{i}(:,2),imageSize(1),imageSize(2));
end
|
| 7 — Save the mask stack | Save the mask stack as a MAT file. |
save("maskData","maskStack") |
Create Datastore that Reads Training Data
Use a datastore to read data. The datastore must return data as a 1-by-4 cell array in the format {RGB images, bounding boxes, labels, masks}. You can create a datastore in this format using these steps:
Create an
imageDatastorethat returns RGB image data.rgbDatastore = imageDatastore(imageFolderPath);
Create a
boxLabelDatastorethat returns bounding box data and instance labels as a two-column cell array.labelDatastore = boxLabelDatastore(labelFolderPath);
Create an
imageDatastoreand specify a custom read function that returns mask data as a binary matrix.% For mask data stored as individual MAT files, define a custom read function function mask = customReadMaskFcn(filename) % Load the MAT file loadedData = load(filename); % Extract the mask data from the MAT file mask = loadedData.maskStack; end % Create an imageDatastore with the custom read function and specify the file extension ".mat" maskDatastore = imageDatastore(maskFolderPath,ReadFcn=customReadMaskFcn,FileExtensions=".mat");Combine the three datastores using the
combinefunction.trainingDatastore = combine(rgbDatastore,labelDatastore,maskDatastore);
The size of the images, bounding boxes, and masks must match the input size of the
network. If you need to resize the data, then you can use the imresize to resize the RGB images and masks, and the bboxresize function to resize the bounding boxes.
For more information, see Datastores for Deep Learning (Deep Learning Toolbox).
Visualize Training Data
To display the instance masks over the image, use the insertObjectMask. You can specify a colormap so that each instance
appears in a different color. This sample code shows how display the instance masks
in the masks variable over the RGB image in the
im variable using the lines colormap.
imOverlay = insertObjectMask(im,masks,Color=lines(numObjects));
imshow(imOverlay);

To show the bounding boxes with labels over the image, use the showShape function. This sample code shows how to show labeled
rectangular shapes with bounding box size and position data in the
bboxes variable and label data in the
labels variable.
imshow(imOverlay)
showShape("rectangle",bboxes,Label=labels,Color="red");
Train Mask R-CNN Model
Train the network by passing the configured maskrcnn object and the
training data to the trainMaskRCNN function. The function returns a trained
maskrcnn object.
Perform Instance Segmentation and Evaluate Results
Perform instance segmentation by passing the trained maskrcnn object
to the segmentObjects function. The function returns the object masks and
optionally returns labels, detection scores, and bounding boxes.
Evaluate the quality of the instance segmentation results using the evaluateInstanceSegmentation function. The function calculates metrics
such as the confusion matrix and average precision. The instanceSegmentationMetrics object stores the metrics.
References
[1] He, Kaiming, Georgia Gkioxari, Piotr Dollár, and Ross Girshick. "Mask R-CNN." ArXiv:1703.06870 [Cs], January 24, 2018. https://arxiv.org/pdf/1703.06870.
[2] Brostow, Gabriel J., Julien Fauqueur, and Roberto Cipolla. "Semantic Object Classes in Video: A High-Definition Ground Truth Database." Pattern Recognition Letters 30, no. 2 (January 2009): 88–97. https://doi.org/10.1016/j.patrec.2008.04.005.