YOLO v2 深層学習を使用したマルチクラス オブジェクト検出
この例では、カスタム データ セットに対してマルチクラス オブジェクト検出を実行する方法を示します。
概要
深層学習は、YOLO v2、YOLO v4、YOLOX、SSD、Faster R-CNN などのロバストなマルチクラス オブジェクト検出器の学習に使用できる強力な機械学習手法です。この例では、関数trainYOLOv2ObjectDetectorを使用して、YOLO v2 マルチクラス オブジェクト検出器に学習させます。学習済みのオブジェクト検出器は、複数の屋内オブジェクトの検出や識別を行うことができます。YOLOX、YOLO v4、SSD、および Faster R-CNN などの他のマルチクラス オブジェクト検出器の学習の詳細については、深層学習を使用したオブジェクト検出入門およびオブジェクト検出器の選択を参照してください。
この例では、最初に、事前学習済みの YOLO v2 オブジェクト検出器を使用してイメージ内の複数のオブジェクトを検出する方法を示します。次に、オプションでデータ セットをダウンロードし、転移学習を使用してカスタム データ セットで YOLO v2 に学習させることができます。
事前学習済みのオブジェクト検出器の読み込み
事前学習済みの YOLO v2 オブジェクト検出器をダウンロードし、ワークスペースに読み込みます。
pretrainedURL = "https://www.mathworks.com/supportfiles/vision/data/yolov2IndoorObjectDetector23b.zip";
pretrainedFolder = fullfile(tempdir,"pretrainedNetwork");
pretrainedNetworkZip = fullfile(pretrainedFolder,"yolov2IndoorObjectDetector23b.zip");

if ~exist(pretrainedNetworkZip,"file")
    mkdir(pretrainedFolder)
    disp("Downloading pretrained network (6 MB)...")
    websave(pretrainedNetworkZip,pretrainedURL)
end

unzip(pretrainedNetworkZip,pretrainedFolder)

trainedNetwork = fullfile(pretrainedFolder,"yolov2IndoorObjectDetector.mat");
trainedNetwork = load(trainedNetwork);
trainedDetector = trainedNetwork.detector;
複数の屋内オブジェクトの検出
ターゲット クラスのオブジェクトを含むテスト イメージを読み取り、そのイメージに対してオブジェクト検出器を実行し、検出結果の注釈が付けられたイメージを表示します。
I = imread("indoorTest.jpg");
[bbox,score,label] = detect(trainedDetector,I);

LabelScoreStr = compose("%s-%.2f",label,score);
annotatedImage = insertObjectAnnotation(I,"rectangle",bbox,LabelScoreStr,LineWidth=4,FontSize=24);
figure
imshow(annotatedImage)

学習用データの読み込み
この例では、Bishwo Adhikari [1] によって作成された屋内オブジェクト検出データセットを使用します。データ セットは、fire extinguisher (消火器)、chair (椅子)、clock (時計)、trash bin (ゴミ箱)、screen (画面)、および printer (プリンター) の 7 つのクラスを含む屋内シーンから収集された 2213 個のラベル付きイメージで構成されています。各イメージには、これらのクラスのラベル付きインスタンスが 1 つ以上含まれています。データ セットが既にダウンロードされているかどうかを確認し、ダウンロードされていない場合は、websave を使用してダウンロードします。
dsURL = "https://zenodo.org/record/2654485/files/Indoor%20Object%20Detection%20Dataset.zip?download=1";
outputFolder = fullfile(tempdir,"indoorObjectDetection");
imagesZip = fullfile(outputFolder,"indoor.zip");

if ~exist(imagesZip,"file")
    mkdir(outputFolder)
    disp("Downloading 401 MB Indoor Objects Dataset images...")
    websave(imagesZip,dsURL)
    unzip(imagesZip,fullfile(outputFolder))
end
データ セットのイメージを保存するための imageDatastore オブジェクトを作成します。
datapath = fullfile(outputFolder,"Indoor Object Detection Dataset");
imds = imageDatastore(datapath,IncludeSubfolders=true, FileExtensions=".jpg");
annotationsIndoor.mat ファイルには、データ内の各イメージの注釈と、学習セット、検証セット、テスト セットに使用するデータ セット イメージのインデックスを指定するベクトルが含まれています。ファイルをワークスペースに読み込み、変数 data から学習セット、検証セット、テスト セットに対応する注釈とインデックスを抽出します。6 個のイメージにはラベルが関連付けられていないため、インデックスは 2213 個のイメージではなく合計 2207 個のイメージを指定します。ラベルを含むイメージのインデックスを使用して、これらの 6 個のイメージをイメージ データストアと注釈データストアから削除します。
data = load("annotationsIndoor.mat");
blds = data.BBstore;
trainingIdx = data.trainingIdx;
validationIdx = data.validationIdx;
testIdx = data.testIdx;
cleanIdx = data.idxs;

% Remove the 6 images with no labels.
imds = subset(imds,cleanIdx);
blds = subset(blds,cleanIdx);
学習データの解析
データをより深く理解するために、オブジェクト クラスのラベルとサイズの分布を解析します。この解析は、学習データを準備する方法や、この特定のデータ セット用にオブジェクト検出器を構成する方法を決定するのに役立つため、非常に重要です。
クラス分布の解析
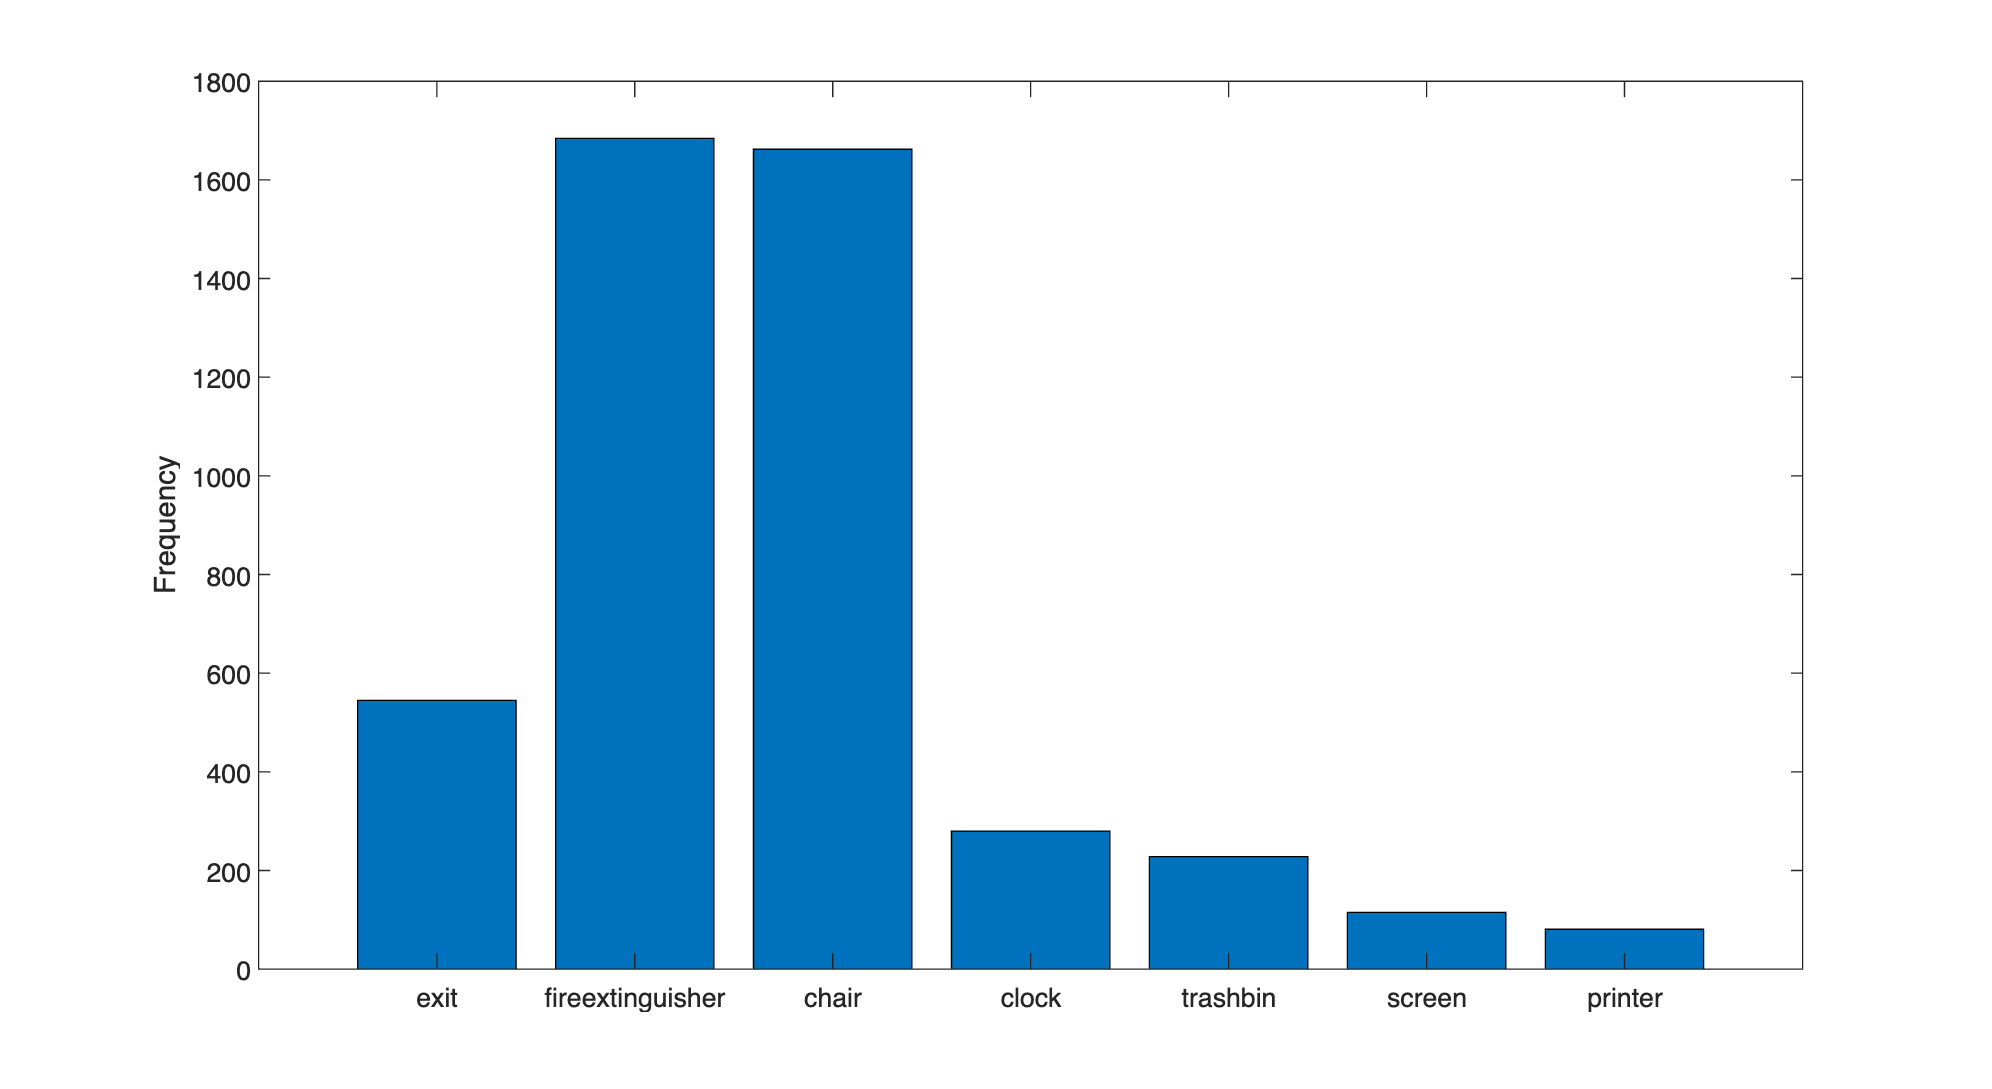
関数 countEachLabel を使用して、データ セット内の境界ボックス クラス ラベルの分布を測定します。
tbl = countEachLabel(blds)
tbl=7×3 table
         Label          Count    ImageCount
    ________________    _____    __________

    exit                 545        504
    fireextinguisher    1684        818
    chair               1662        850
    clock                280        277
    trashbin             228        170
    screen               115         94
    printer               81         81
カウントをクラスごとに可視化します。
bar(tbl.Label,tbl.Count)
ylabel("Frequency")
このデータ セット内のクラスは不均衡です。学習プロセスでは上位クラスに有利なバイアスがかかるため、こうした不均衡が学習プロセスに悪影響を及ぼす可能性があります。不均衡に対処するには、データを追加する、過小評価されているクラスをオーバーサンプリングする、損失関数を変更する、データ拡張を適用するなどの補完的な手法を 1 つ以上使用します。どのアプローチを使用する場合でも、データ セットに最適な解決策を決定するには経験的解析を実行しなければなりません。この例では、データ拡張を使用して学習プロセスにおけるバイアスを減らします。
オブジェクト サイズの解析およびオブジェクト検出器の選択
データ セット内のすべての境界ボックスとラベルを読み取り、境界ボックスの対角線の長さを計算します。
data = readall(blds);
bboxes = vertcat(data{:,1});
labels = vertcat(data{:,2});
diagonalLength = hypot(bboxes(:,3),bboxes(:,4));
オブジェクトの長さをクラス別にグループ化します。
G = findgroups(labels);
groupedDiagonalLength = splitapply(@(x){x},diagonalLength,G);
各クラスのオブジェクトの長さの分布を可視化します。
figure
classes = tbl.Label;
numClasses = numel(classes);
for i = 1:numClasses
    len = groupedDiagonalLength{i};
    x = repelem(i,numel(len),1);
    plot(x,len,"o")
    hold on
end
hold off
ylabel("Object extent (pixels)")

xticks(1:numClasses)
xticklabels(classes)

この可視化により、どのタイプのオブジェクト検出器を構成するかを決定するのに役立つ重要なデータ セット属性が示されます。
各クラス内のオブジェクト サイズのばらつき
クラス間のオブジェクト サイズのばらつき
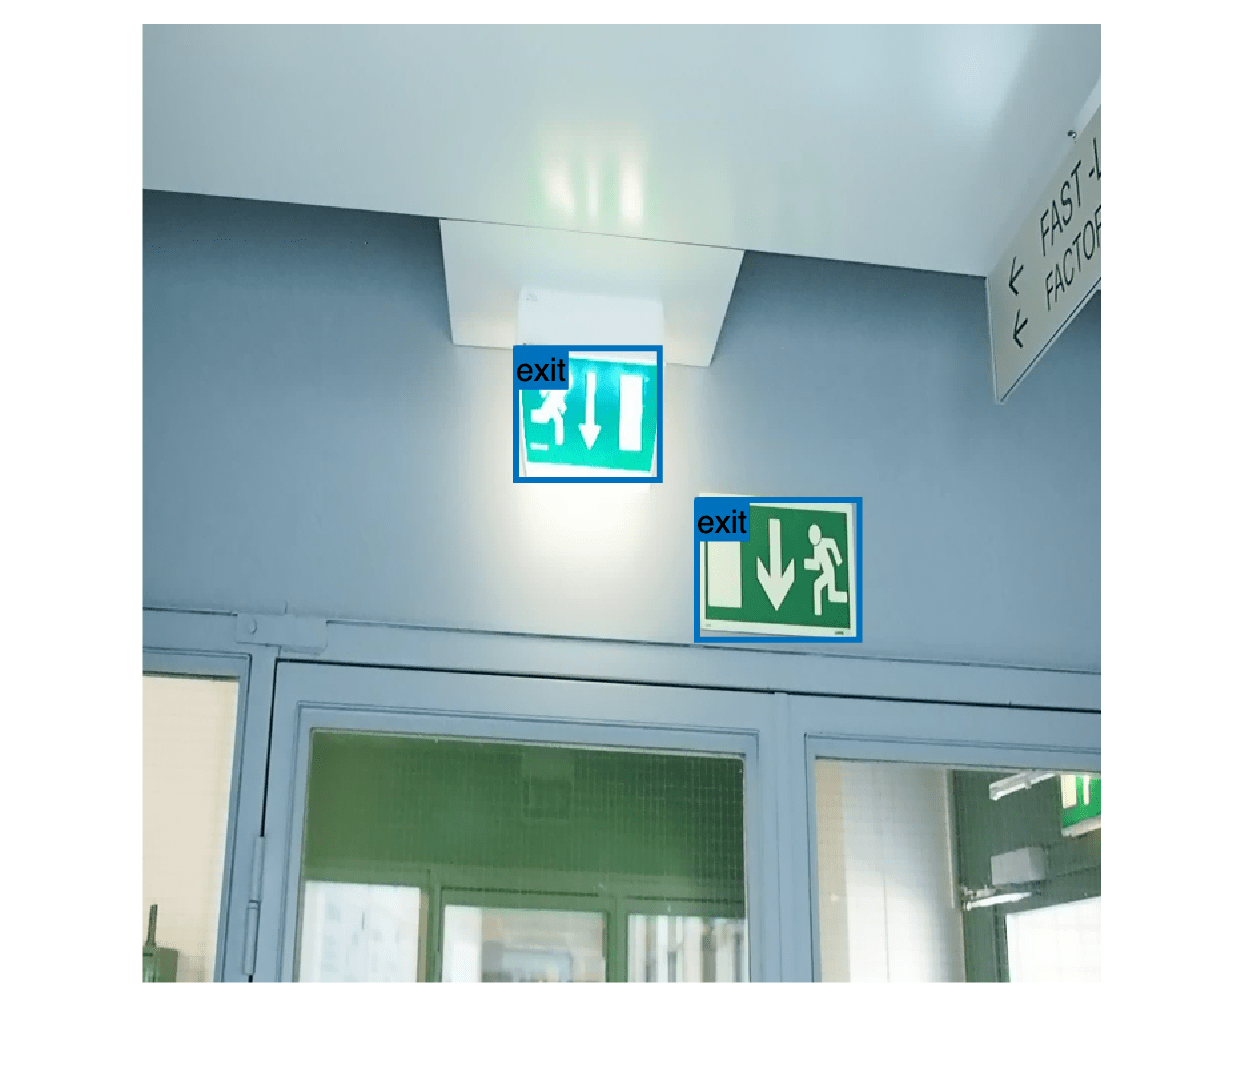
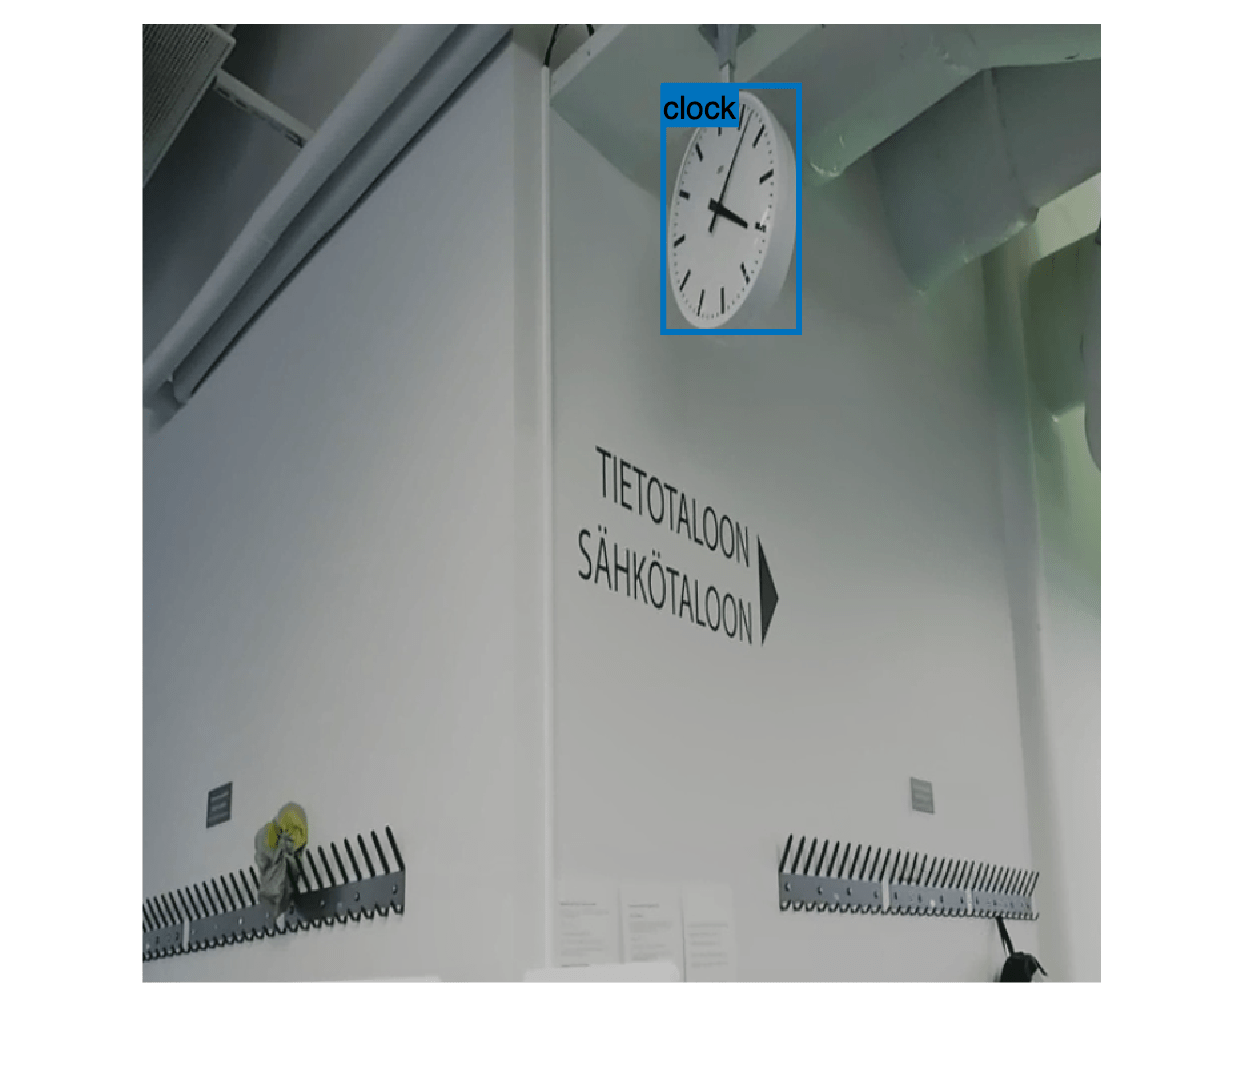
このデータ セットでは、クラス間のサイズの範囲にかなりのオーバーラップがあります。さらに、各クラス内でのサイズのばらつきはそれほど大きくありません。これは、単一のマルチクラス検出器に学習させて、さまざまなサイズのオブジェクトを処理できることを意味します。サイズ範囲がオーバーラップしていない場合、または各オブジェクト サイズの範囲が桁違いである場合は、異なるサイズ範囲に対して複数の検出器に学習させる方が実用的です。
サイズのばらつきに基づいて、どのオブジェクト検出器に学習させるかを決定できます。各クラス内のサイズのばらつきが小さい場合は、YOLO v2 などの単一スケールのオブジェクト検出器を使用します。各クラスに大きなばらつきがある場合は、YOLO v4 や SSD などのマルチスケールのオブジェクト検出器を選択します。このデータ セットのオブジェクト サイズは同じ桁にとどまっているため、まずは YOLO v2 を使用します。高度なマルチスケール検出器はより高いパフォーマンスが得られる可能性がありますが、学習には YOLO v2 よりも多くの時間とリソースが必要になる場合があります。単純なソリューションでパフォーマンス要件を満たせない場合、より高度な検出器を使用します。
サイズ分布情報を使用して、学習イメージのサイズを選択します。固定サイズにすることで、学習中にバッチ処理ができるようになります。GPU メモリなどの学習環境のリソース制約に基づき、学習イメージのサイズによって、バッチ サイズをどの程度の大きさにするかが決まります。特に GPU を使用する場合は、より大きなデータ バッチを処理することでスループットが向上し、学習時間が短縮されます。ただし、元のデータのサイズを非常に小さいサイズに変更した場合、学習イメージのサイズがオブジェクトの解像度に影響を与える可能性があります。
次のセクションでは、このデータ セットのサイズ解析情報を使用して YOLO v2 オブジェクト検出器を構成します。
YOLO v2 オブジェクト検出器アーキテクチャの定義
次の手順を使用して、YOLO v2 オブジェクト検出器を構成します。
転移学習用に事前学習済みの検出器を選択します。
学習イメージのサイズを選択します。
オブジェクトの位置とクラスの予測に使用するネットワークの特徴を選択します。
オブジェクト検出器の学習に使用する前処理済みデータからアンカー ボックスを推定します。
転移学習用に事前学習済みの Tiny YOLO v2 検出器を選択します。Tiny YOLO v2 は、大規模オブジェクト検出データ セットである COCO [2] で学習済みの軽量ネットワークです。事前学習済みのオブジェクト検出器を使用した転移学習では、ネットワークに最初から学習させる場合と比べて、学習時間が短縮されます。あるいは、より大規模な Darknet-19 YOLO v2 事前学習済み検出器を使用することもできますが、大規模なネットワークで実験する前に、より単純なネットワークから始めてパフォーマンスのベースラインを確立することを検討してください。Tiny または Darknet-19 YOLO v2 の事前学習済み検出器を使用するには、Computer Vision Toolbox™ Model for YOLO v2 Object Detection が必要です。
pretrainedDetector = yolov2ObjectDetector("tiny-yolov2-coco");次に、YOLO v2 の学習イメージのサイズを選択します。学習イメージのサイズを選択するときは、次のサイズ パラメーターを考慮します。
イメージ内のオブジェクト サイズの分布と、イメージのサイズ変更がオブジェクト サイズに与える影響。
選択したサイズでデータをバッチ処理するために必要な計算リソース。
ネットワークに必要な最小入力サイズ。
事前学習済みの Tiny YOLO v2 ネットワークの入力サイズを決定します。
pretrainedDetector.Network.Layers(1).InputSize
ans = 1×3

   416   416     3
屋内オブジェクト検出データセット内のイメージのサイズは [720 1024 3] です。オブジェクト解析によると、最小のオブジェクトは約 20×20 ピクセルです。
この例を実行する際の精度と計算コストのバランスを維持するため、サイズを [720 720 3] に指定します。このサイズにすることで、各イメージのサイズを変更しても、このデータ セット内のオブジェクトの空間解像度に大きな影響が及ばなくなります。この例を独自のデータ セットに適用する場合は、データに基づいて学習イメージのサイズを変更しなければなりません。最適な入力サイズを決定するには、経験的な解析が必要です。
inputSize = [720 720 3];
イメージと境界ボックスのデータストアを統合します。
ds = combine(imds,blds);
transform を使用して、イメージとそれに対応する境界ボックスのサイズを変更する前処理関数を適用します。この関数は境界ボックスをサニタイズして有効な形状に変換します。
preprocessedData = transform(ds,@(data)resizeImageAndLabel(data,inputSize));
前処理したイメージとその境界ボックス ラベルの 1 つを表示して、サイズ変更したイメージ内のオブジェクトの特徴がまだ視認できることを確認します。
data = preview(preprocessedData);
I = data{1};
bbox = data{2};
label = data{3};
imshow(I)
showShape("rectangle",bbox,Label=label)
YOLO v2 は、1 つのネットワーク層から抽出された特徴を使用してイメージ内のオブジェクトの位置とクラスを予測する、単一スケールの検出器です。特徴抽出層は、深層学習ベースのオブジェクト検出器の重要なハイパーパラメーターです。特徴抽出層を選択するときは、データ セット内のオブジェクト サイズの範囲に適した空間解像度で特徴を出力する層を選択します。
オブジェクト検出に使用されるほとんどのネットワークでは、データがネットワークを流れる際、特徴量が 2 のべき乗で空間的にダウンサンプリングされます。たとえば、ネットワークは、特定の入力サイズから開始して空間的に 4 分の 1、8 分の 1、16 分の 1、32 分の 1 にダウンサンプリングされた特徴マップを生成する層をもつことができます。データ セット内のオブジェクトのサイズが小さい場合 (たとえば、10×10 ピクセル未満)、16 分の 1 および 32 分の 1 にダウンサンプリングされた特徴マップの空間解像度は、オブジェクト位置を正確に推定するのに十分でない可能性があります。逆に、オブジェクトが大きい場合、4 分の 1 または 8 分の 1 にダウンサンプリングされた特徴マップは、それらのオブジェクトのグローバル コンテキストを十分に符号化できない可能性があります。
このデータ セットでは、16 分の 1 にダウンサンプリングされた特徴マップを出力する Tiny YOLO v2 ネットワークの "leaky_relu_5" 層を指定します。このダウンサンプリングの量は、空間分解能と抽出される特徴の強度との適切なトレードオフです (ネットワークでさらに抽出された特徴により、より強力なイメージの特徴が符号化されますが、空間分解能は低下します)。
featureLayer = "leaky_relu_5";analyzeNetwork (Deep Learning Toolbox)関数を使用して、Tiny YOLO v2 ネットワークを可視化し、16 分の 1 にダウンサンプリングされた特徴を出力する層の名前を決定できます。
次に、estimateAnchorBoxes を使用して、学習データからアンカー ボックスを推定します。前処理済みデータからアンカー ボックスを推定することで、選択した学習イメージのサイズに基づいて推定値を取得できます。学習データからのアンカー ボックスの推定の例に記載されている手順を使用して、データ セットに適したアンカー ボックスの数を決定できます。この手順に基づくと、5 つのアンカー ボックスが、計算コストと精度の間で適切なトレードオフになることがわかります。他のハイパーパラメーターと同様に、データのアンカー ボックスの数は、経験的な解析を使用して最適化しなければなりません。
numAnchors = 5;
aboxes = estimateAnchorBoxes(preprocessedData,numAnchors);
最後に、選択した学習イメージ サイズと推定されたアンカー ボックスを使用して、7 つのクラスで転移学習を行うように YOLO v2 ネットワークを構成します。
pretrainedNet = pretrainedDetector.Network;
classes = {'exit','fireextinguisher','chair','clock','trashbin','screen','printer'};
detector = yolov2ObjectDetector(pretrainedNet,classes,aboxes, ...
DetectionNetworkSource=featureLayer,InputSize= inputSize);analyzeNetwork (Deep Learning Toolbox)関数またはディープ ネットワーク デザイナー (Deep Learning Toolbox)アプリを使用してネットワークを可視化できます。
学習データの準備
再現性を得るために、rng を使用して乱数発生器をシード 0 で初期化し、関数 shuffle を使用してデータ セットをシャッフルします。
rng(0);
preprocessedData = shuffle(preprocessedData);
関数 subset を使用して、データ セットを学習、テスト、検証の各サブセットに分割します。
dsTrain = subset(preprocessedData,trainingIdx);
dsVal = subset(preprocessedData,validationIdx);
dsTest = subset(preprocessedData,testIdx);
データ拡張
データ拡張を使用して、学習の際に元のデータをランダムに変換することでネットワークの精度を向上させます。データ拡張では、ラベル付き学習サンプルの数を増やさずに、学習データをさらに多様化できます。transform を使用し、以下の手順で学習データを拡張します。
イメージおよび関連する境界ボックス ラベルを水平方向にランダムに反転。
イメージおよび関連する境界ボックス ラベルをランダムにスケーリング。
イメージの色にジッターを付加。
augmentedTrainingData = transform(dsTrain,@augmentData);
学習イメージとボックス ラベルのうちの 1 つを表示します。
data = read(augmentedTrainingData);
I = data{1};
bbox = data{2};
label = data{3};
imshow(I)
showShape("rectangle",bbox,Label=label)
YOLO v2 オブジェクト検出器の学習
trainingOptions (Deep Learning Toolbox)関数を使用してネットワークの学習オプションを指定します。
opts = trainingOptions("rmsprop", ...
        InitialLearnRate=0.001, ...
        MiniBatchSize=8, ...
        MaxEpochs=10, ...
        LearnRateSchedule="piecewise", ...
        LearnRateDropPeriod=5, ...
        VerboseFrequency=30, ...
        L2Regularization=0.001, ...
        ValidationData=dsVal, ...
        ValidationFrequency=50, ...
        OutputNetwork="best-validation-loss");
これらの学習オプションは、実験マネージャーを使用して選択されました。実験マネージャーを使用したハイパーパラメーター調整の詳細については、Train Object Detectors in Experiment Managerを参照してください。
関数trainYOLOv2ObjectDetectorを使用して YOLO v2 オブジェクト検出器に学習させるには、doTraining を true に設定します。
doTraining = false;
if doTraining
    [detector,info] = trainYOLOv2ObjectDetector(augmentedTrainingData,detector,opts);
else
    detector = trainedDetector;
end
この例は、24 GB のメモリを搭載した NVIDIA™ GeForce RTX 3090 Ti GPU で検証され、学習を完了するのに約 45 分かかりました。学習所要時間は使用するハードウェアによって異なります。GPU のメモリがこれより少ない場合、メモリ不足が発生する可能性があります。メモリの使用量を減らすには、trainingOptions (Deep Learning Toolbox)関数を使用するときに、MiniBatchSize に小さい値を指定します。
オブジェクト検出器の評価
テスト イメージで学習させたオブジェクト検出器を評価し、検出器のパフォーマンスを測定します。Computer Vision Toolbox™ には、平均適合率や適合率-再現率などの一般的なメトリクスを測定するためのオブジェクト検出器評価関数 (evaluateObjectDetection) が用意されており、さらに、メトリクスを計算するオーバーラップしきい値 (Intersection over Union (IoU) しきい値) を指定するオプションがあります。
detect オブジェクト関数を使用して、テスト データ セットに対して検出器を実行します。検出器の適合率を再現率の値の全範囲にわたって評価するには、できるだけ多くのオブジェクトが検出されるように、検出しきい値を低い値に設定します。
detectionThreshold = 0.01;
results = detect(detector,dsTest,MiniBatchSize=8,Threshold=detectionThreshold);
指定したオーバーラップしきい値におけるメトリクスの計算
evaluateObjectDetection 関数を使用して、指定したオーバーラップしきい値 (IoU しきい値) におけるオブジェクト検出メトリクスを計算します。オーバーラップしきい値は、予測境界ボックスが真陽性としてカウントされるために必要な、予測境界ボックスとグラウンド トゥルース境界ボックスの間のオーバーラップ量を定義します。たとえば、オーバーラップしきい値が 0.5 である場合、ボックス間のオーバーラップが 50% であれば正しい一致とみなされますが、オーバーラップしきい値が 0.9 である場合は条件がより厳しくなり、予測境界ボックスがグラウンド トゥルース境界ボックスとほぼ正確に一致しなければなりません。iouThresholds 変数を使用して、メトリクスを計算する 3 つのオーバーラップしきい値を指定します。
iouThresholds = [0.5 0.75 0.9];
metrics = evaluateObjectDetection(results,dsTest,iouThresholds);
オブジェクト検出メトリクスの要約の評価
summarizeオブジェクト関数を使用して、データセット全体のレベルおよび個々のクラスのレベルで要約された検出器のパフォーマンスを評価します。
[datasetSummary,classSummary] = summarize(metrics)
datasetSummary=1×5 table
    NumObjects    mAPOverlapAvg    mAP0.5     mAP0.75     mAP0.9
    __________    _____________    _______    _______    ________

       397           0.42971       0.77532    0.4759     0.037926
classSummary=7×5 table
                        NumObjects    APOverlapAvg     AP0.5     AP0.75      AP0.9
                        __________    ____________    _______    _______    ________

    exit                    42          0.54586       0.97619      0.631    0.030382
    fireextinguisher       123          0.62289       0.98041    0.80168    0.086584
    chair                  167          0.58042       0.93661    0.72323    0.081403
    clock                   26          0.54996       0.96154    0.62122    0.067113
    trashbin                20           0.3004       0.79942    0.10177           0
    screen                  12          0.14779       0.27671    0.16667           0
    printer                  7          0.26068       0.49634    0.28571           0
既定では、summarize オブジェクト関数はすべてのオーバーラップしきい値における要約されたデータ セットとクラス メトリクスを返します。IoU 値が高い検出は、平均適合率 (AP) 値または平均適合率の平均 (mAP) 値が低いことを意味します。AP メトリクスは、検出器が正しい分類を実行できること (適合率) と検出器がすべての関連オブジェクトを検出できること (再現率) を示す単一の数値です。mAP は、すべてのクラスに対して計算された AP の平均です。
データ セット レベルで検出器のパフォーマンスを評価するには、datasetSummary 出力の mAPOverlapAvg 列で返される、すべてのオーバーラップしきい値にわたって平均化された mAP を検討します。オーバーラップしきい値が 0.5 である場合、mAP は 0.77 になります。これは、検出器が誤った予測をあまり行わずに、ほとんどのオブジェクトを検出できることを示しています。0.75 や 0.9 などの、より高いオーバーラップしきい値では、予測されたボックスとグラウンド トゥルース ボックスとの間の一致条件がより厳しくなるため、mAP は低くなります。
同様に、クラス レベルで検出器のパフォーマンスを評価するには、classSummary 出力の mAPOverlapAvg 列で返される、すべての IoU しきい値にわたって平均化された mAP を検討します。
平均適合率の計算
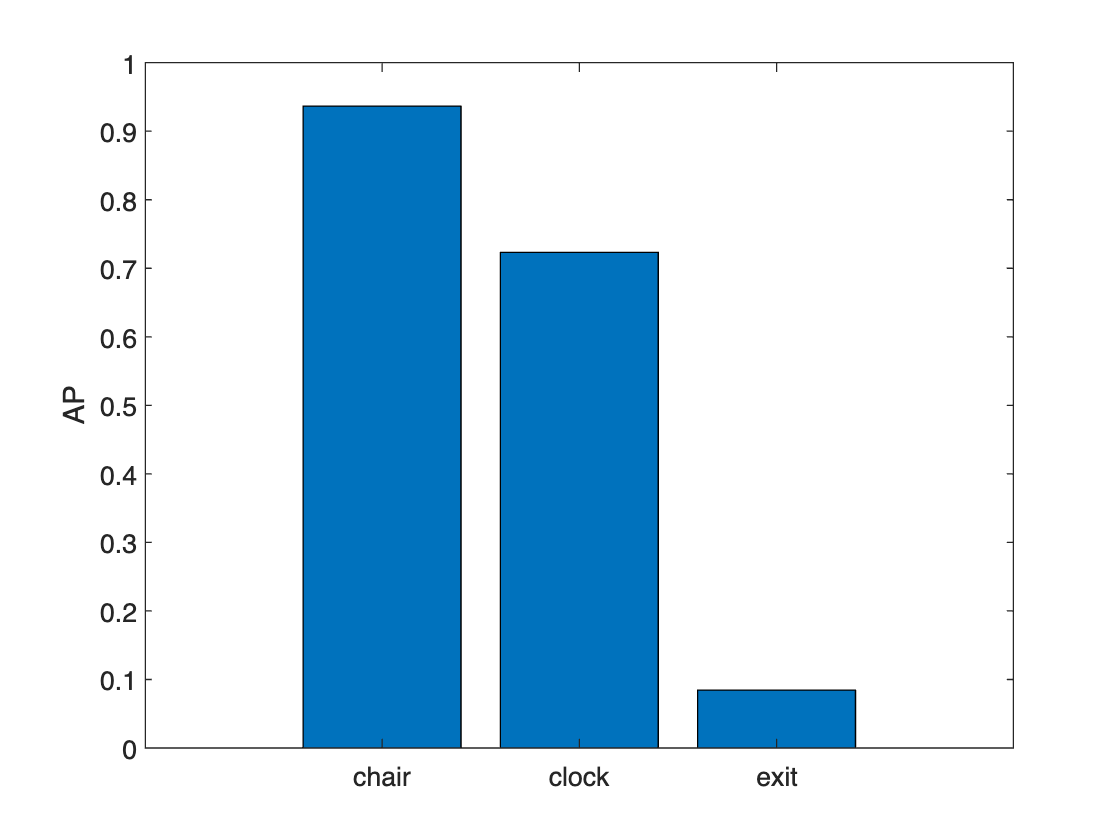
averagePrecisionオブジェクト関数を使用し、すべてのクラスについて、指定した各オーバーラップしきい値における AP を計算します。指定したしきい値における AP 値がデータ セット内のクラスごとにどのように変化するかを可視化するために、棒グラフをプロットします。
figure
classAP = averagePrecision(metrics);
bar(classAP)
xticklabels(metrics.ClassNames)
ylabel("AP")
legend(string(iouThresholds))
プロットは、学習データに含まれる他のクラスに比べてサンプル数が少ない 3 つのクラス ("printer"、"screen"、および "trash bin") では検出器のパフォーマンスが低かったことを示しています。高いオーバーラップしきい値では、検出器のパフォーマンスも低下しています。パフォーマンスを向上させるには、クラス分布の解析のセクションで特定されたクラスの不均衡の問題を検討します。クラスの不均衡に対処するには、その少数のクラスが含まれるイメージを追加するか、そのようなクラスが含まれるイメージを複製してデータ拡張を使用します。
適合率メトリクスと再現率メトリクスの計算
precisionRecallオブジェクト関数を使用して、適合率と再現率のメトリクスを計算します。適合率-再現率 (PR) 曲線と検出信頼度スコアを並べてプロットします。PR 曲線は、各クラスのさまざまな再現率レベルにおける検出器の適合率を示します。PR 曲線の隣に検出器スコアをプロットすることで、用途で求められる適合率と再現率を達成する検出しきい値を選択できます。
単一クラスの適合率と再現率
クラスを選択し、指定したオーバーラップしきい値におけるクラスの適合率と再現率のメトリクスを抽出して、PR 曲線をプロットします。
classes = metrics.ClassNames; class =classes(3); % Extract precision and recall values. [precision,recall,scores] = precisionRecall(metrics,ClassName=class); % Plot precision-recall curves. figure tiledlayout(1,3) nexttile plot(cat(1,recall{:})',cat(1,precision{:})') ylim([0 1]) xlim([0 1]) xlabel("Recall") ylabel("Precision") grid on axis square title(class + " Precision/Recall") legend(string(iouThresholds) + " IoU",Location="southoutside")
指定したオーバーラップしきい値における適合率と再現率の信頼度スコアを PR 曲線の右側にプロットします。
nexttile
plot(scores{:},cat(1,recall{:})')
ylim([0 1])
xlim([0 1])
ylabel("Recall")
xlabel("Score")
grid on
axis square
title(class + " Recall/Scores")
legend(string(iouThresholds) + " IoU",Location="southoutside")

nexttile
plot(scores{:},cat(1,precision{:})')
ylim([0 1])
xlim([0 1])
ylabel("Precision")
xlabel("Score")
grid on
axis square
title(class + " Precision/Scores")
legend(string(iouThresholds) + " IoU",Location="southoutside")
検出しきい値を微調整することで、適合率と再現率をトレードオフすることができます。"適合率/スコア" プロットと "再現率/スコア" プロットが示すように、検出スコアの値が増加すると、対応する適合率も増加しますが、再現率は減少します。
用途に最適な適合率-再現率特性が得られる検出しきい値を選択します。たとえば、オーバーラップしきい値が 0.5 である場合、検出しきい値を 0.4 に指定して、chair クラスの再現率のレベルが 0.9 で適合率が 0.9 となるように調整します。適合率と再現率の特性はクラスごとに異なる可能性があるため、オブジェクト検出器の最終的な検出しきい値を選択する前に、すべてのクラスの PR 曲線を解析します。
単一のオーバーラップしきい値における適合率と再現率
オーバーラップしきい値を選択し、選択した一連のクラスについて、指定したオーバーラップしきい値における適合率と再現率のメトリクスを抽出し、PR 曲線をプロットします。最終的な検出スコアしきい値を決定するには、これらのプロットを使用して、複数のクラスについて選択した検出スコアしきい値のパフォーマンスを解析します。
overlapThresholds = metrics.OverlapThreshold; iou =overlapThresholds(1); selectedClasses = ["chair","clock","trashbin"]; % Extract precision and recall values [precision,recall,scores] = precisionRecall(metrics,OverlapThreshold=iou,ClassName=selectedClasses); % Plot precision-recall curves. figure tiledlayout(1,3) nexttile % plot P-R curves for all classes at that IoU for c = 1:length(selectedClasses) plot(recall{c},precision{c}) hold on end ylim([0 1]) xlim([0 1]) xlabel("Recall") ylabel("Precision") grid on axis square title("Precision/Recall") legend(selectedClasses,Location="southoutside")
指定したクラスの適合率と再現率の信頼度スコアを PR 曲線の右側にプロットします。
nexttile
for c = 1:length(selectedClasses)
    plot(scores{c},recall{c})
    hold on
end
ylim([0 1])
xlim([0 1])
ylabel("Recall")
xlabel("Score")
grid on
axis square
title("Recall/Scores")
legend(selectedClasses,Location="southoutside")

nexttile
for c = 1:length(selectedClasses)
    plot(scores{c},precision{c})
    hold on
end
ylim([0 1])
xlim([0 1])
ylabel("Precision")
xlabel("Score")
grid on
axis square
title("Precision/Scores")
legend(selectedClasses,Location="southoutside")

この図は、それぞれの適合率と再現率の値における選択したクラスのパフォーマンスを示しています。これは、最小の再現率を 0.8 に維持しながら十分高い適合率が得られる検出器しきい値を決定するのに役立ちます。この例では、再現率/スコア プロットを見るとわかるように、検出スコアしきい値 0.5 は "chair" と "clock" のクラスには適していますが、"trash bin" クラスの再現率が目的の範囲を下回っています。しきい値を 0.4 に下げると、選択したクラスに対してこれらの条件を満たすことができます。
混同行列を使用した検出器のエラーの評価
混同行列を使用すると、検出エラーの詳細な内訳を確認できるため、さまざまなクラスにおけるオブジェクト検出器のパフォーマンスを定量化できます。confusionMatrixオブジェクト関数を使用して、選択した検出スコアしきい値における検出器の分類エラーのタイプを調査します。適合率-再現率の解析から決定した検出スコアしきい値を使用して、そのしきい値を下回る予測を破棄します。
iou =overlapThresholds(1); detectionThresh =
0.4; % Compute the confusion matrix at a specified score and IoU threshold [confMat,confusionClassNames] = confusionMatrix(metrics,scoreThreshold=detectionThresh,overlapThreshold=iou); % Display the confusion matrix as a confusion chart figure confusionchart(confMat{1},confusionClassNames)

混同チャートには、対角線以外の場所に誤分類エラーが表示されます。"unmatched" 行と "unmatched" 列の値は、指定したオーバーラップしきい値で正しく一致しなかった予測境界ボックスとグラウンド トゥルース境界ボックスに対応します。
上の図のようにプロットされた混同チャートの結果は、検出器が 2 つの前景クラスをまったく混同していないことを示しています。むしろ、検出エラーは、検出器がオブジェクトを検出できない場合 (偽陰性)、または存在しないオブジェクトを検出する場合 (偽陽性) に発生します。たとえば、"screen" クラスのオブジェクトは 10 個見落とされており、偽陰性が 10 個発生しています。"chair" クラスの場合、56 個の検出で椅子として分類されていますが、実際には背景領域であり、56 個の偽陽性が発生しています。
混同行列の結果はクラスごとの平均適合率に関する先ほどの解析結果と一致しており、他のクラスと比べて学習サンプルが少ない 3 つのクラス ("printer"、"screen"、および "trash bin") で検出器のパフォーマンスが低いことを示しています。
オブジェクトのサイズが検出器のパフォーマンスに与える影響の評価
metricsByAreaオブジェクト関数を使用して、オブジェクト サイズが検出器のパフォーマンスに及ぼす影響を調査します。この関数は、指定した範囲のオブジェクト サイズに対して検出器メトリクスを計算します。用途に応じて、サイズ範囲の事前定義セットに基づいてオブジェクト サイズの範囲を定義することも、この例のように推定されたアンカー ボックスを使用することもできます。このアンカー ボックス推定手法では、オブジェクトのサイズを自動的にクラスタリングし、入力データに基づいてサイズ範囲のセットを提供します。
検出器からアンカー ボックスを抽出し、それぞれの面積を計算し、面積を並べ替えます。
areas = prod(detector.AnchorBoxes,2);
areas = sort(areas);
計算した面積を使用して、面積の範囲の限界値を定義します。最後の範囲の上限は最大面積の 3 倍のサイズに設定しており、このデータ セット内のオブジェクトには十分です。
lowerLimit = [0; areas];
upperLimit = [areas; 3*areas(end)];
areaRanges = [lowerLimit upperLimit]
areaRanges = 6×2

           0        2774
        2774        9177
        9177       15916
       15916       47799
       47799      124716
      124716      374148
関数 metricsByArea を使用して、chair クラス用に定義したサイズ範囲全体にわたってオブジェクト検出メトリクスを評価します。他のクラス名を指定すると、それらのクラスのオブジェクト検出メトリクスを対話的に評価できます。
classes = string(detector.ClassNames);
areaMetrics = metricsByArea(metrics,areaRanges,ClassName= classes(1))
areaMetrics=6×6 table
           AreaRange            NumObjects    APOverlapAvg         AP            Precision           Recall
    ________________________    __________    ____________    ____________    _______________    _______________

             0          2774        15          0.48468       {3×1 double}    {3×2321 double}    {3×2321 double}
          2774          9177        18           0.5569       {3×1 double}    {3×652  double}    {3×652  double}
          9177         15916         5          0.64667       {3×1 double}    {3×123  double}    {3×123  double}
         15916         47799         4          0.66667       {3×1 double}    {3×159  double}    {3×159  double}
         47799    1.2472e+05         0                0       {3×1 double}    {3×30   double}    {3×30   double}
    1.2472e+05    3.7415e+05         0              NaN       {3×1 double}    {3×1    double}    {3×1    double}
NumObjects 列に、テスト データ セット内の面積範囲内にあるオブジェクトの数が表示されます。検出器は chair クラス全体で良好なパフォーマンスを示しているものの、他のサイズ範囲と比較して検出器の平均適合率が低いサイズ範囲があります。検出器がうまく機能していない範囲には、サンプルが 11 個しかありません。このサイズ範囲でのパフォーマンスを向上させるには、このサイズのサンプルを学習データにさらに追加するか、データ拡張を使用して一連のサイズ範囲全体にわたるさらに多くのサンプルを作成します。
検出器のパフォーマンスをさらに向上させる方法についてより深い洞察を得るために、他のクラスを調べることができます。
展開
検出器の学習と評価が完了したら、オプションで、GPU Coder™ を使用してコードを生成し、yolov2ObjectDetector を展開できます。詳細については、YOLO v2 を使用したオブジェクト検出のコードの生成 (GPU Coder)の例を参照してください。
まとめ
この例では、マルチクラス オブジェクト検出器の学習および評価を行う方法を示します。この例を独自のデータに適用する場合は、データ セット内のオブジェクト クラスとサイズ分布を注意深く評価してください。データによっては、最適な結果を得るために、異なるハイパーパラメーターを使用したり、YOLO v4 や YOLOX などの別のオブジェクト検出器を使用したりする必要があります。
サポート関数
function B = augmentData(A)
% Apply random horizontal flipping, and random X/Y scaling, and jitter image color.
% The function clips boxes scaled outside the bounds if the overlap is above 0.25.
B = cell(size(A));

I = A{1};
sz = size(I);
if numel(sz)==3 && sz(3) == 3
    I = jitterColorHSV(I, ...
        Contrast=0.2, ...
        Hue=0, ...
        Saturation=0.1, ...
        Brightness=0.2);
end

% Randomly flip and scale image.
tform = randomAffine2d(XReflection=true,Scale=[1 1.1]);
rout = affineOutputView(sz,tform,BoundsStyle="CenterOutput");
B{1} = imwarp(I,tform,OutputView=rout);

% Sanitize boxes, if needed. This helper function is attached to the example as a
% supporting file. Open the example in MATLAB to use this function.
A{2} = helperSanitizeBoxes(A{2});

% Apply same transform to boxes.
[B{2},indices] = bboxwarp(A{2},tform,rout,OverlapThreshold=0.25);
B{3} = A{3}(indices);

% Return original data only when all boxes have been removed by warping.
if isempty(indices)
    B = A;
end
end
function data = resizeImageAndLabel(data,targetSize)
% Resize the images, and scale the corresponding bounding boxes.

    scale = (targetSize(1:2))./size(data{1},[1 2]);
    data{1} = imresize(data{1},targetSize(1:2));
    data{2} = bboxresize(data{2},scale);

    data{2} = floor(data{2});
    imageSize = targetSize(1:2);
    boxes = data{2};
    % Set boxes with negative values to have value 1.
    boxes(boxes <= 0) = 1;

    % Validate if bounding box in within image boundary.
    boxes(:,3) = min(boxes(:,3),imageSize(2) - boxes(:,1) - 1);
    boxes(:,4) = min(boxes(:,4),imageSize(1) - boxes(:,2) - 1);

    data{2} = boxes;

end
参考文献
[1] Adhikari, Bishwo; Peltomaki, Jukka; Huttunen, Heikki. (2019).Indoor Object Detection Dataset [Data set]. 7th European Workshop on Visual Information Processing 2018 (EUVIP), Tampere, Finland.
[2] Lin, Tsung-Yi, Michael Maire, Serge Belongie, Lubomir Bourdev, Ross Girshick, James Hays, Pietro Perona, Deva Ramanan, C. Lawrence Zitnick, and Piotr Dollár. “Microsoft COCO: Common Objects in Context,” May 1, 2014. https://arxiv.org/abs/1405.0312v3.