プログラムによる注釈の作成と編集
注釈は、モデルにメモやコールアウトを追加するために使用できる視覚的要素です。テキストのみの注釈に加えて、以下を行う注釈を作成できます。
Web サイトを開く
MATLAB® コマンドを実行する
イメージを表示する
ブロック線図の領域を視覚的に区別する
以下の例では、プログラムによって注釈を作成、編集、削除する方法を示します。
注釈の作成
この例では、プログラムによって注釈を作成、変更、表示する方法について説明します。
新しいモデルを開きます。
open_system(new_system)
関数Simulink.Annotationを使用して、既定のプロパティで注釈を作成します。
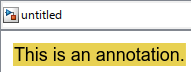
a = Simulink.Annotation(gcs,'This is an annotation.');![]()
注釈の作成後、ドット表記を使用してプロパティの値を設定します。たとえば、18 ポイントのフォントと黄色の背景を注釈に適用します。
a.FontSize = 18;
a.BackgroundColor = 'yellow';
新しい注釈を表示して、一時的に強調表示するには、関数 view を使用します。
view(a)
注釈の検出および変更
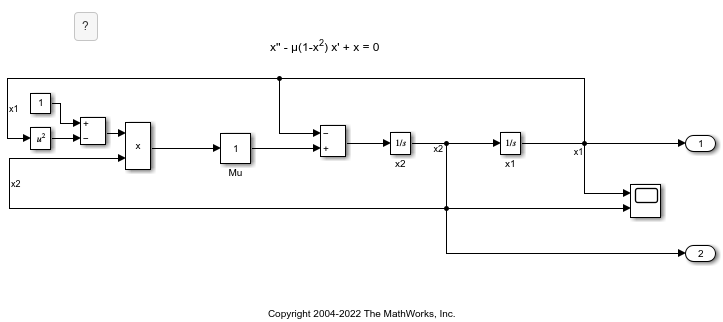
この例では、プログラムによって vdp モデル内の注釈を検出する方法および 1 つの注釈のプロパティを変更する方法を示します。
例を開きます。次に、vdp モデルを開きます。
open_system('vdp')
モデル内の注釈を見つけるには、関数find_systemを使用します。
h = find_system(gcs,'FindAll','on','Type','annotation');
注釈を特定するには、関数get_paramを使用して注釈内のテキストをクエリします。
get_param(h,'PlainText')ans = 3×1 cell
{'Copyright 2004-2024 The MathWorks, Inc.'}
{'Van der Pol Equation' }
{'x_1' =x_2↵↵x_2' =µ(1-x_1^2) x_2 - x_1' }
緑色の背景色を 'Van der Pol Equation' 注釈に適用するとします。
配列の対応するインデックスを指定することで、Simulink.Annotationオブジェクトを取得します。
an = get_param(h(2),'Object');ドット表記を使用して、BackgroundColor プロパティの値を設定します。
an.BackgroundColor = 'Green';
注釈の削除
この例では、vdp モデルで注釈をプログラムによって削除する方法を説明します。
例を開きます。次に、vdp モデルを開きます。
open_system('vdp')
モデル内の注釈のハンドルを取得するには、関数find_systemを使用します。
h = find_system(gcs,'FindAll','on','Type','annotation');
注釈を特定するには、注釈内のテキストをクエリします。
get_param(h,'PlainText')ans = 3×1 cell
{'Copyright 2004-2024 The MathWorks, Inc.'}
{'Van der Pol Equation' }
{'x_1' =x_2↵↵x_2' =µ(1-x_1^2) x_2 - x_1' }
モデルの上部にある注釈 'Van der Pol Equation' を削除するには、2 番目のハンドルに対応するSimulink.Annotationオブジェクトを取得します。
an = get_param(h(2),'Object');モデルから注釈を削除します。
delete(an)
モデル内の注釈のハンドルを取得します。次に、注釈内のテキストをクエリします。
h1 = find_system(gcs,'FindAll','on','Type','annotation');
get_param(h1,'PlainText')
ans = 2×1 cell
    {'Copyright 2004-2024 The MathWorks, Inc.'}
    {'x_1' =x_2↵↵x_2' =µ(1-x_1^2) x_2 - x_1'  }
'Van der Pol Equation' というテキストの注釈がモデルからなくなりました。
ハイパーリンクを含む注釈の作成
この例では、HTML 書式設定を使用してリッチテキストの注釈内のテキストにハイパーリンクを追加する方法を示します。
新しいモデルを開きます。
open_system(new_system)
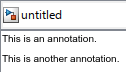
2 つの注釈を作成します。いずれかの注釈を移動させて、もう 1 つの注釈にオーバーラップしないようにします。
a1 = Simulink.Annotation(gcs,'This is an annotation.');
a2 = Simulink.Annotation(gcs,'This is another annotation.');
a2.Position = [0 20 28 34];
注釈内でハイパーリンクを作成するには、Interpreter を 'rich' に設定し、Text プロパティでハイパーリンクを定義します。
a1.Interpreter = 'rich';
a1.Text = 'Go to <a href="www.mathworks.com">www.mathworks.com</a>.';

MATLAB 関数をハイパーリンクに組み込むこともできます。
a2.Interpreter = 'rich';
a2.Text = '<a href="matlab:magic(4)">Generate magic square</a>.';

詳細については、関数を実行するハイパーリンクの作成を参照してください。
モデルへのイメージの追加
この例では、イメージのみの注釈をプログラムによって作成することで、モデルにロゴなどのイメージを追加する方法を示します。
例を開きます。次に、新しいモデルを開いて、それに注釈を作成します。
open_system(new_system)
a = Simulink.Annotation(gcs,'This is an annotation.');![]()
指定されたイメージのみを表示するように注釈を変更します。
img = fullfile(pwd,'drivingCar_24.png');
setImage(a,img)
領域の作成
この例では、プログラムによってモデル内に領域の注釈を作成する方法を示します。
例を開きます。次に、vdp モデルを開きます。
open_system('vdp')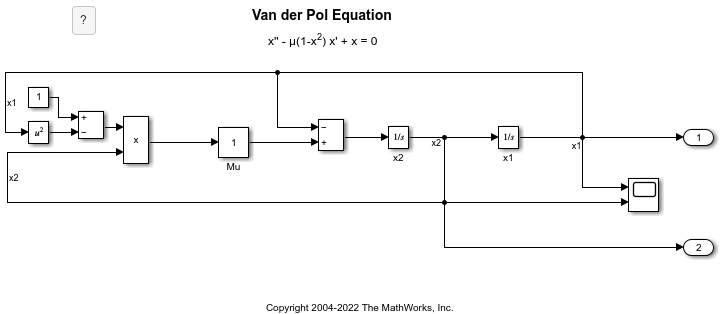
モデル内の一部のブロックが含まれる領域を作成するには、関数 get_param を使用して該当するブロックの位置を取得します。たとえば、x1 および x2 という名前のブロックの位置を取得します。
x1_pos = get_param('vdp/x1','Position');
x2_pos = get_param('vdp/x2','Position');
関数は、ピクセル単位の座標のベクトル [left top right bottom] として位置を返します。キャンバスのサイズ変更が行われるまでは、原点は Simulink® エディターのキャンバスの左上隅です。原点より右および下が正の値です。原点より左および上が負の値です。
x1 および x2 という名前のブロックのまわりに領域を作成するには、built-in/Area オプションを指定して関数 add_block を使用します。ブロックの位置に基づいて、領域のエッジの相対位置を指定します。
add_block('built-in/Area','vdp/This is an area',...
    'Position',[x2_pos(1)-20,x2_pos(2)-20,x1_pos(3)+20,x1_pos(4)+20])
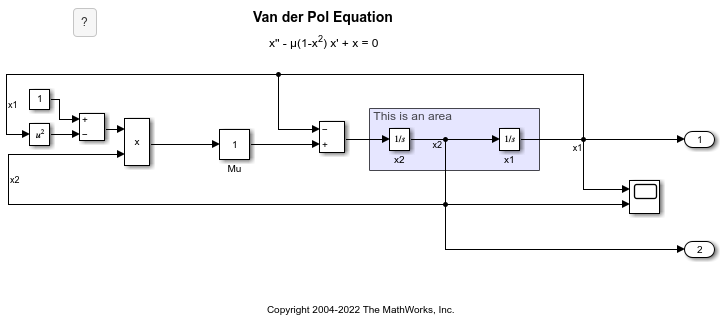
領域に x1 および x2 という名前のブロックが含まれています。領域の両側は、最も近いブロックのエッジから 20 ピクセル離れています。
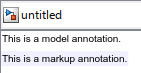
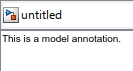
マークアップ注釈の作成と非表示
この例では、簡単に非表示にできるマークアップ注釈を作成する方法を示します。
新しいモデルを開きます。
open_system(new_system)
2 つの注釈を作成します。最初の注釈にオーバーラップしないように 2 番目の注釈を移動させます。
a1 = Simulink.Annotation(gcs,'This is a model annotation.');
a2 = Simulink.Annotation(gcs,'This is another model annotation.');
a2.Position = [0 20 28 34];
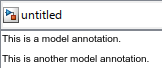
既定では、モデル内に表示されるモデル注釈を作成します。
2 番目の注釈をマークアップ注釈に変更します。
a2.MarkupType = 'markup';
a2.Text = 'This is a markup annotation.';
マークアップ注釈を非表示にするように現在のモデルを設定します。
set_param(gcs,'ShowMarkup','off');
ah = find_system(gcs,'FindAll','on','Type','annotation');
at = get_param(ah,'Text')
at = 2×1 cell
    {'This is a markup annotation.'}
    {'This is a model annotation.' }
非表示にされているマークアップ注釈に関係なく、両方の注釈が維持されます。
コールバック関数を実行する注釈の検出
現在実行中のコールバック関数が注釈によって実行された場合、getCallbackAnnotation を使用して関数を呼び出した注釈を特定します。関数によって対応する Annotation オブジェクトが返されます。この関数は、複数のコールバックを含んだ別個の MATLAB ファイルにコールバック関数を書き込む場合にも役立ちます。
参考
add_block | delete
(Annotation) | setImage
(Annotation) | view
(Annotation) | Simulink.Annotation