Track Changes to Requirements
When you create links between requirements and designs, tests, or other requirements, Requirements Toolbox™ detects when the linked requirements, linked lines of MATLAB® code, or Simulink® Test™ test cases change. When the software detects a change, it associates a change issue with the link. You can assess the impact of the change, clear the change issue, and leave a comment indicating any actions performed.
In this step of the tutorial, you add additional text to the help for the myAdd function, view the links that have change issues, investigate what changed, assess the impact of the change, and determine the actions needed to reconcile the changes.
Edit Function Help
Open the myAdd3 project, which is the same as the myAdd2 project, but has source control enabled.
openProject("MyAdd3");The comment on line 2 of myAdd provides help for the function.
help myAddmyAdd - Adds inputs u and v and outputs the result
Open the myAdd function.
open myAdd Add the function syntax to the help for the myAdd function by copying and pasting this code on line 3:
% y = myAdd(u,v)
Save the changes to myAdd. In the Editor tab, click Save.
View Change Issues
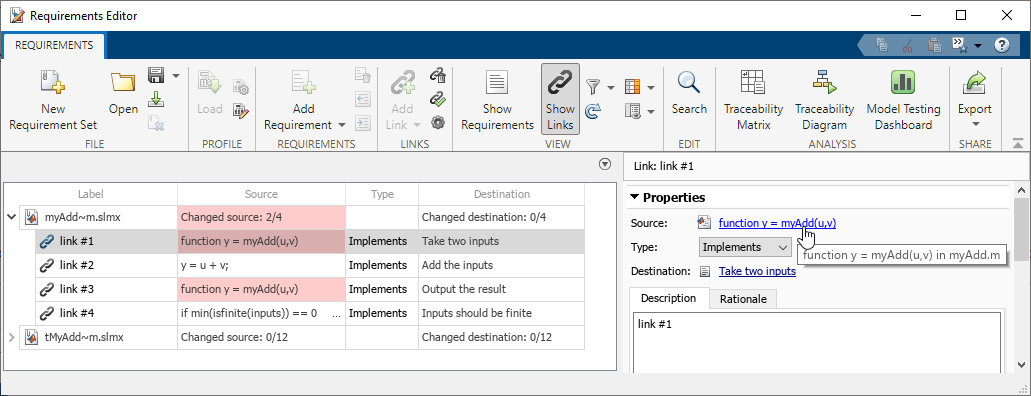
Open the Requirements Editor. In the Apps tab, under Verification, Validation, and Test, click Requirements Editor. Ensure that Requirements Toolbox is analyzing links for change issues and displaying change information. In the Requirements Editor, in the View section, click Information > Change Information. Then, click Refresh. View the links that have change issues by clicking Show Links.
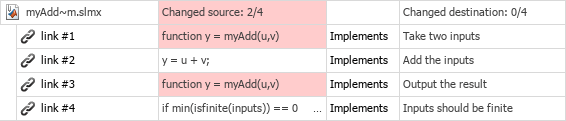
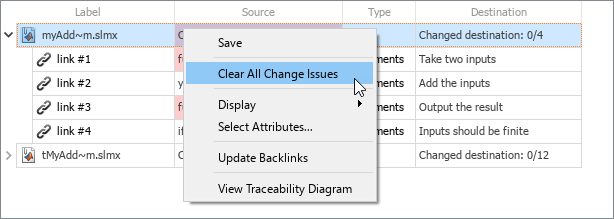
Red highlighting in the Requirements Editor indicates the links in the link set that have change issues. The row containing the link set indicates that the source changed for 2 of the 4 links.
Because links 1 and 3 link directly to the function declaration line in myAdd.m, Requirements Toolbox indicates that the links have change issues when any lines of code in the function change. Conversely, because links 2 and 4 link directly to lines of code within the function, those links only have change issues when those lines of code change.
Investigate Changes
Investigate the impact of the change by navigating to the changed source code from the link. In the Requirements Editor, select the first link. In the right pane, under Properties, navigate to the source of the link by clicking the hyperlink next to Source.
Navigating to the source artifact opens myAdd.m. You can investigate the changes by visually inspecting the source file. You can also investigate the change by creating a comparison report between the two versions of the file. In the Project tab, in the source folder, right-click myAdd.m and select Compare > Compare to Ancestor.
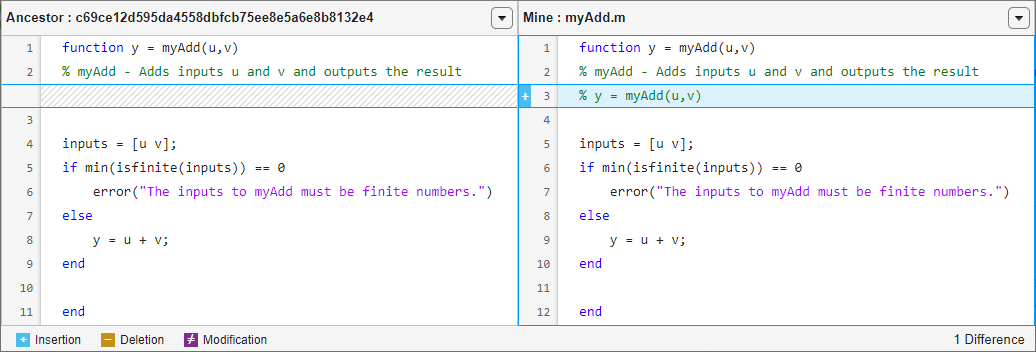
The comparison report indicates that the only change is the new help comment in line 3.
Assess Change Impact
Now that you understand the scope of the changes, you can assess the impact of the changes in your project. Visualize the impact of the changes by using a traceability diagram. In the Requirements Editor, select link #1. In the Analysis section, click Traceability Diagram.
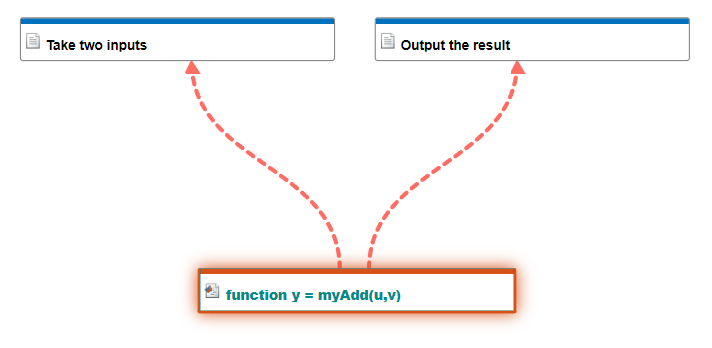
The Traceability Diagram window shows the traceability from the myAdd function. The red dashed edges represent links that have change issues. The arrows on the edges point from the myAdd function to the requirements, indicating that the changes propagate from the function to the requirements.
Determine Actions to Reconcile Changes
Now that you understand the scope of the changes and how the changes propagate within the project, you can determine the actions that you needed to reconcile the changes.
The comparison report shows that the change to myAdd.m was a comment-only change. Because the change has no impact on the requirements, you can clear the change issues without taking any further action. In the Requirements Editor, right-click the link set and select Clear All Change Issues.
A dialog box opens to enter a comment for the change. The software prepopulates the Comment field with %<updateInfo>, which automatically generates a comment from the change details. Below that line, enter Comment-only change.
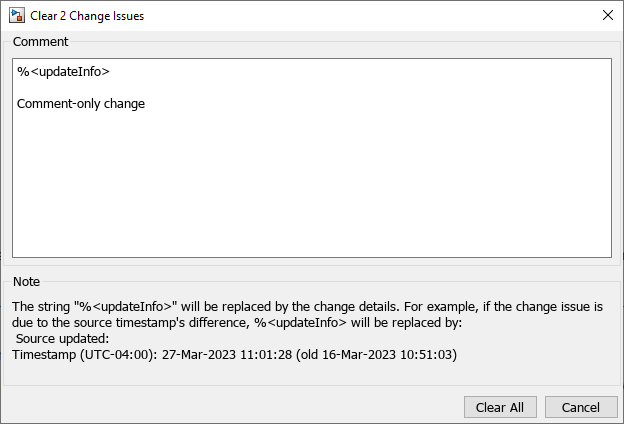
Clear the change issues by clicking Clear All.