複数イメージの表示
このページでは、複数の 2 次元イメージを同時に表示するためのオプションについて説明します。Image Processing Toolbox™ の表示機能の概要については、2 次元および 3 次元のイメージを表示する方法の選択を参照してください。
イメージの読み込み
3 つのイメージをワークスペースに読み取ります。
pears = imread("pears.png");
peppers = imread("peppers.png");
moon = imread("moon.tif");
イメージの個別の表示
関数imshowを使用して、イメージを 1 つずつ表示します。ライブ エディターでは、imshow の呼び出しごとに、イメージが個別の出力として表示されます。標準のコード スクリプトまたは MATLAB® コマンド ウィンドウでは、imshow を呼び出すたびに現在の Figure のイメージが置き換えられます。代わりに各イメージを独自の Figure に表示するには、imshow の呼び出しの間に、figure コマンドを使用して新しい Figure ウィンドウを作成します。
imshow(pears)

figure
imshow(peppers)

名前と値の引数を使用して、imshow がイメージを表示する方法をカスタマイズできます。たとえば、次のコードは、turbo カラーマップを使用して 50% の倍率で月のイメージを表示します。
figure
imshow(moon,Colormap=turbo,InitialMagnification=50)

イメージのペアの表示
関数imshowpairを使用して、2 つのイメージをオーバーレイまたはモンタージュとして表示します。
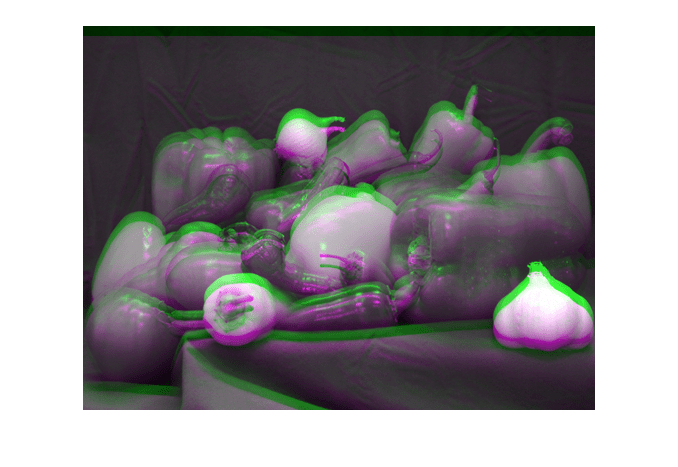
ピーマンのイメージのコピーを平行移動し、元のイメージと比較します。既定では、imshowpair はイメージをグレースケールに変換し、フォールスカラー オーバーレイとして表示します。
peppersTranslate = imtranslate(peppers,[0 10]);
imshowpair(peppers,peppersTranslate)

オプションで、イメージを表示するために使用する方法を 3 番目の入力引数として指定できます。たとえば、アルファ ブレンディングを使用してイメージを表示します。
imshowpair(peppers,peppersTranslate,"blend") 
その他のオプションとして、モンタージュ、チェッカーボード パターン、または差分イメージとしてイメージを表示するなどがあります。次のグラフィックスは、各オプションでイメージがどのように表示されるかを示しています。

ほとんどの場合、"montage" メソッドの出力は、関数 montage の出力と似ています。しかし、montage では、同じ表示範囲に対してすべてのイメージの強度を常に一緒に再スケーリングするのに対し、imshowpair では、名前と値の引数 Scaling を指定して、イメージの表示範囲を個別にスケーリングするか、一緒にスケーリングするか、またはスケーリングを適用しないかを選択することができます。詳細については、imshowpairおよびmontageのリファレンス ページを参照してください。
モンタージュとしての複数のイメージの表示
関数montageを使用して、複数のイメージを並べて表示します。
表示するイメージは、マルチフレーム配列、ファイル名のリスト、イメージ データストアなど、さまざまな方法で指定できます。イメージ ボリュームを入力として指定して、ボリューム スライスをモンタージュとして表示することもできます。この例のように、異なるサイズのイメージを表示するには、行列から成る cell 配列を指定します。既定では、montage は概ね正方形になるように行と列にイメージを配置します。関数は、元のアスペクト比を維持しながら、モンタージュに収まるように各イメージをスケーリングします。
imagelist = {pears moon peppers peppersTranslate};
figure
montage(imagelist)
名前と値の引数を使用して、表示するマルチフレーム配列内のイメージ、イメージ間のスペース、イメージ間の背景色などの特性をカスタマイズできます。たとえば、次のコードはイメージを白い背景で 1 行に表示します。
figure
montage(imagelist,Size=[1 NaN],BackgroundColor="white")
タイル レイアウトとしてのイメージの表示
関数tiledlayoutを使用して、複数のイメージを異なるタイトル、カラーマップ、カラー バーで表示します。
タイル レイアウトを作成するには、関数 tiledlayout を使用して、含める行と列の数を指定します。次に、関数 nexttile を呼び出して、レイアウトに axes オブジェクトを配置します。次に、imshow を呼び出して座標軸にイメージを表示します。オプションで、タイトルなどのタイルの詳細を指定することもできます。次のタイルに移動する準備ができたら、関数 nexttile を使用します。
figure
tiledlayout(2,2)

nexttile
imshow(pears)
title("Pears")

nexttile
imshow(peppers)
title("Peppers")

nexttile
imshow(moon)
title("Moon")

tiledlayout を使用すると、単一の Figure または 1 つのライブ エディター出力内で、複数のカラーマップを使用してグレースケール イメージを表示できます。
figure
tiledlayout(1,2);

nexttile
imshow(moon)
colorbar
title("Moon - Original")

nexttile
imshow(moon,turbo)
colorbar
title("Moon - Turbo")

また、tiledlayout を関数 linkaxes と共に使用して、ズームやパンに対してイメージを同期させることもできます。リンクするタイルに移動するために関数 nexttile を使用する場合は、そのタイルの axes オブジェクトを返す出力引数を含めます。次に、返されたタイルの axes を関数 linkaxes に指定してリンクします。
moonfilt = imgaussfilt(moon,2);

figure
tiledlayout(1,2)

ax1 = nexttile;
imshow(moon)
title("Original")

ax2 = nexttile;
imshow(moonfilt)
title("Filtered")

linkaxes([ax1 ax2])
両方のイメージの同じ部分領域にズームします。Figure ウィンドウの座標軸ツール バーを使用して、ズームまたはパンを対話的に行うこともできます。
xlim([100 150])
ylim([120 180])

ラベル イメージの表示
バイナリ、数値、categorical のラベル イメージの場合は関数labeloverlayを使用して、バイナリ ラベルのみの場合は関数imoverlayを使用して、ラベル イメージを表示できます。関数 labeloverlay と関数 imoverlay は、元のイメージの上にラベル イメージが融合したイメージを作成します。imshow や imshowpair などの任意の表示関数を使用して、融合したイメージを表示できます。
たとえば、watershed セグメント化を使用して、梨のイメージの数値ラベル イメージを作成します。
pearscomp = imcomplement(im2gray(pears));
pearsfilt = imhmin(pearscomp,30);
pearslabel = watershed(pearsfilt);
元のイメージにラベルを重ね合わせた融合イメージを作成します。
pearsoverlay = labeloverlay(pears,pearslabel);
融合したイメージを表示します。
figure
imshow(pearsoverlay)

しきい値を使用して、月のバイナリ マスクを作成します。
t = graythresh(moon);
BW = imbinarize(moon,t);
元のイメージにマスクを重ね合わせた融合イメージを作成します。
B = imoverlay(moon,BW);
元の月のイメージと融合したオーバーレイを並べて表示します。
figure
imshowpair(moon,B,"montage")
参考
imshow | imshowpair | montage | tiledlayout | labeloverlay | imoverlay