霧修正アルゴリズム用の GPU コードの生成
この例では、霧修正アルゴリズム用の CUDA® MEX 関数を生成する方法を示します。エントリポイント関数は、霧のかかったイメージを入力として受け取り、霧が取り除かれたイメージを生成します。
サードパーティの前提条件
必要
この例では CUDA MEX ファイルを生成するため、CUDA 対応の NVIDIA® GPU および互換性のあるドライバーが必要です。半精度コード生成の場合、GPU の Compute Capability は 6.0 以上でなければなりません。
オプション
スタティック ライブラリ、ダイナミック ライブラリ、または実行可能ファイルなどの MEX 以外のビルドについて、この例では以下の要件も適用されます。
NVIDIA Toolkit。
コンパイラおよびライブラリの環境変数。詳細については、サードパーティ ハードウェアと前提条件となる製品の設定を参照してください。
GPU 環境の検証
この例を実行するのに必要なコンパイラおよびライブラリが正しく設定されていることを検証するために、関数coder.checkGpuInstallを使用します。
envCfg = coder.gpuEnvConfig('host');
envCfg.BasicCodegen = 1;
envCfg.Quiet = 1;
coder.checkGpuInstall(envCfg);
fog_rectification エントリポイント関数
fog_rectification.m エントリポイント関数は、霧のかかったイメージを入力として受け取り、霧が取り除かれたイメージを返します。
type fog_rectificationfunction [out] = fog_rectification(input) %#codegen
%
% Copyright 2017-2023 The MathWorks, Inc.
coder.gpu.kernelfun;
% restoreOut is used to store the output of restoration
restoreOut = zeros(size(input),"double");
% Changing the precision level of input image to double
input = double(input)./255;
%% Dark channel Estimation from input
darkChannel = min(input,[],3);
% diff_im is used as input and output variable for anisotropic
% diffusion
diff_im = 0.9*darkChannel;
num_iter = 3;
% 2D convolution mask for Anisotropic diffusion
hN = [0.0625 0.1250 0.0625; 0.1250 0.2500 0.1250;
0.0625 0.1250 0.0625];
hN = double(hN);
%% Refine dark channel using Anisotropic diffusion.
for t = 1:num_iter
diff_im = conv2(diff_im,hN,"same");
end
%% Reduction with min
diff_im = min(darkChannel,diff_im);
diff_im = 0.6*diff_im ;
%% Parallel element-wise math to compute
% Restoration with inverse Koschmieder's law
factor = 1.0./(1.0-(diff_im));
restoreOut(:,:,1) = (input(:,:,1)-diff_im).*factor;
restoreOut(:,:,2) = (input(:,:,2)-diff_im).*factor;
restoreOut(:,:,3) = (input(:,:,3)-diff_im).*factor;
restoreOut = uint8(255.*restoreOut);
%%
% Stretching performs the histogram stretching of the image.
% im is the input color image and p is cdf limit.
% out is the contrast stretched image and cdf is the cumulative
% prob. density function and T is the stretching function.
% RGB to grayscale conversion
im_gray = im2gray(restoreOut);
[row,col] = size(im_gray);
% histogram calculation
[count,~] = imhist(im_gray);
prob = count'/(row*col);
% cumulative Sum calculation
cdf = cumsum(prob(:));
% Utilize gpucoder.reduce to find less than particular probability.
% This is equal to "i1 = length(find(cdf <= (p/100)));", but is
% more GPU friendly.
% lessThanP is the preprocess function that returns 1 if the input
% value from cdf is less than the defined threshold and returns 0
% otherwise. gpucoder.reduce then sums up the returned values to get
% the final count.
i1 = gpucoder.reduce(cdf,@plus,"preprocess", @lessThanP);
i2 = 255 - gpucoder.reduce(cdf,@plus,"preprocess", @greaterThanP);
o1 = floor(255*.10);
o2 = floor(255*.90);
t1 = (o1/i1)*[0:i1];
t2 = (((o2-o1)/(i2-i1))*[i1+1:i2])-(((o2-o1)/(i2-i1))*i1)+o1;
t3 = (((255-o2)/(255-i2))*[i2+1:255])-(((255-o2)/(255-i2))*i2)+o2;
T = (floor([t1 t2 t3]));
restoreOut(restoreOut == 0) = 1;
u1 = (restoreOut(:,:,1));
u2 = (restoreOut(:,:,2));
u3 = (restoreOut(:,:,3));
% replacing the value from look up table
out1 = T(u1);
out2 = T(u2);
out3 = T(u3);
out = zeros([size(out1),3], "uint8");
out(:,:,1) = uint8(out1);
out(:,:,2) = uint8(out2);
out(:,:,3) = uint8(out3);
end
function out = lessThanP(input)
p = 5/100;
out = uint32(0);
if input <= p
out = uint32(1);
end
end
function out = greaterThanP(input)
p = 5/100;
out = uint32(0);
if input >= 1 - p
out = uint32(1);
end
end
CUDA コードと MEX 関数の生成
コード生成の入力を設定し、GPU コード生成用の構成を作成します。
inputImage = imread('foggyInput.png');
cfg = coder.gpuConfig('mex');
cfg.GpuConfig.EnableMemoryManager = true;
コード生成の実行
codegenコマンドを使用して、MEX ファイル fog_rectification_mex を生成します。
codegen -args {inputImage} -config cfg fog_rectification
Code generation successful: View report
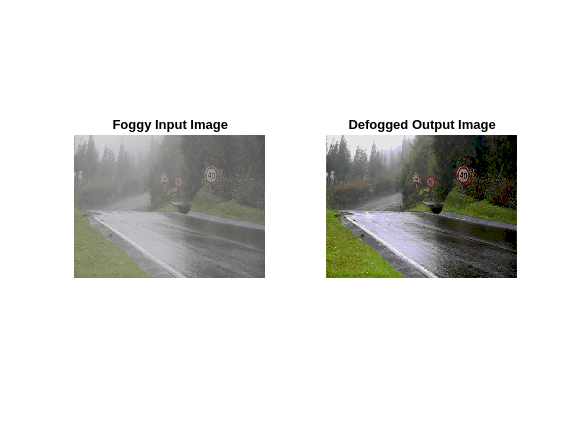
霧のかかったイメージを使用した MEX 関数の実行
生成された fog_rectification_mex を霧のかかった入力イメージを指定して実行し、霧のかかったイメージと霧が取り除かれたイメージをプロットします。
[outputImage] = fog_rectification_mex(inputImage);

% plot images
p1  = subplot(1, 2, 1);
p2 = subplot(1, 2, 2);
imshow(inputImage, 'Parent', p1);
imshow(outputImage, 'Parent', p2);
title(p1, 'Foggy Input Image');
title(p2, 'Defogged Output Image');
CPU と GPU ではアーキテクチャが異なるため、数値検証が常に一致するとは限りません。このシナリオは、single データ型を使用する場合、または MATLAB® コードで整数の型変換を実行する場合に当てはまります。この例において、エントリポイント関数 fog_rectification.m の整数の型変換は MATLAB シミュレーションとは異なる数値を生成します。
半精度
この例における計算は、エントリポイント関数 fog_rectification_half_precision.m を使用して、半精度浮動小数点数で行うこともできます。半精度データ型を含むコードの生成と実行には、CUDA Compute Capability 6.0 以上が必要です。コード構成オブジェクトの ComputeCapability プロパティを '6.0' に設定します。半精度の場合、CUDA コードを生成するためのメモリ割り当て (malloc) モードは 'Discrete' に設定しなければなりません。
inputImageHalf = half(imread('foggyInput.png'));
cfg = coder.gpuConfig('mex');
cfg.GpuConfig.EnableMemoryManager = true;
cfg.GpuConfig.ComputeCapability = '6.0';
cfg.GpuConfig.MallocMode = 'Discrete';
codegen -args {inputImageHalf} -config cfg fog_rectification_half_precision
Code generation successful: View report
霧のかかったイメージを使用した半精度 MEX 関数の実行
生成された fog_rectification_half_precision_mex を霧のかかった入力イメージを指定して実行し、霧のかかったイメージと霧が取り除かれたイメージをプロットします。
[outputImageHalf] = fog_rectification_half_precision_mex(inputImageHalf);

% plot images
p1  = subplot(1, 2, 1);
p2 = subplot(1, 2, 2);
imshow(inputImage, 'Parent', p1);
imshow(outputImageHalf, 'Parent', p2);
title(p1, 'Foggy Input Image');
title(p2, 'Defogged Output Image (Half)');

参考
関数
codegen|coder.gpu.kernel|coder.gpu.kernelfun|gpucoder.matrixMatrixKernel|coder.gpu.constantMemory|stencilfun|coder.checkGpuInstall