このページは前リリースの情報です。該当の英語のページはこのリリースで削除されています。
サポートされていない Keras 層の関数層への置き換え
この例では、事前学習済みの Keras ネットワークから層をインポートし、サポートされていない層を関数層に置き換え、予測の準備が整ったネットワークをこれらの層から組み立てる方法を説明します。
Keras ネットワークのインポート
Keras ネットワーク モデルから層をインポートします。"digitsNet.h5" のネットワークは数字のイメージを分類します。
filename = "digitsNet.h5";
layers = importKerasLayers(filename,ImportWeights=true)
Warning: Unable to import layer. Keras layer 'Activation' with the specified settings is not supported. The problem was: Activation type 'softsign' is not supported.
Warning: Unable to import layer. Keras layer 'Activation' with the specified settings is not supported. The problem was: Activation type 'softsign' is not supported.
Warning: Unable to import some Keras layers, because they are not supported by the Deep Learning Toolbox. They have been replaced by placeholder layers. To find these layers, call the function findPlaceholderLayers on the returned object.
layers =
  13x1 Layer array with layers:

     1   'ImageInputLayer'               Image Input             28x28x1 images
     2   'conv2d'                        2-D Convolution         8 3x3x1 convolutions with stride [1  1] and padding [0  0  0  0]
     3   'conv2d_softsign'               Activation              Placeholder for 'Activation' Keras layer
     4   'max_pooling2d'                 2-D Max Pooling         2x2 max pooling with stride [2  2] and padding [0  0  0  0]
     5   'conv2d_1'                      2-D Convolution         16 3x3x8 convolutions with stride [1  1] and padding [0  0  0  0]
     6   'conv2d_1_softsign'             Activation              Placeholder for 'Activation' Keras layer
     7   'max_pooling2d_1'               2-D Max Pooling         2x2 max pooling with stride [2  2] and padding [0  0  0  0]
     8   'flatten'                       Keras Flatten           Flatten activations into 1-D assuming C-style (row-major) order
     9   'dense'                         Fully Connected         100 fully connected layer
    10   'dense_relu'                    ReLU                    ReLU
    11   'dense_1'                       Fully Connected         10 fully connected layer
    12   'dense_1_softmax'               Softmax                 softmax
    13   'ClassificationLayer_dense_1'   Classification Output   crossentropyex
Keras ネットワークには、Deep Learning Toolbox ではサポートされていない層がいくつか含まれています。関数 importKerasLayers は警告を表示して、サポートされていない層をプレースホルダー層に置き換えます。
プレースホルダー層の置き換え
プレースホルダー層を置き換えるには、まず、置き換える層の名前を特定します。関数 findPlaceholderLayers を使用してプレースホルダー層を見つけます。
placeholderLayers = findPlaceholderLayers(layers)
placeholderLayers =
  2x1 PlaceholderLayer array with layers:

     1   'conv2d_softsign'     Activation   Placeholder for 'Activation' Keras layer
     2   'conv2d_1_softsign'   Activation   Placeholder for 'Activation' Keras layer
プレースホルダー層を、例の最後にリストされている関数 softsign で指定された関数を使用する関数層に置き換えます。
この例にサポート ファイルとして添付されている関数 softsign で指定された関数を使用する関数層を作成します。この関数にアクセスするには、この例をライブ スクリプトとして開きます。層の説明を "softsign" に設定します。
layer = functionLayer(@softsign,Description="softsign");関数 replaceLayer を使用して、層を置き換えます。関数 replaceLayer を使用するには、最初に層配列を層グラフに変換します。
lgraph = layerGraph(layers);
lgraph = replaceLayer(lgraph,"conv2d_softsign",layer);
lgraph = replaceLayer(lgraph,"conv2d_1_softsign",layer);
クラス名の指定
インポートした分類層にクラスが含まれていない場合、予測の前にこれらを指定しなければなりません。クラスを指定しない場合、クラスは 1、2、...、N に自動的に設定されます。ここで、N はクラスの数です。
層グラフの Layers プロパティを表示して、分類層のインデックスを見つけます。
lgraph.Layers
ans =
  13x1 Layer array with layers:

     1   'ImageInputLayer'               Image Input             28x28x1 images
     2   'conv2d'                        2-D Convolution         8 3x3x1 convolutions with stride [1  1] and padding [0  0  0  0]
     3   'layer'                         Function                softsign
     4   'max_pooling2d'                 2-D Max Pooling         2x2 max pooling with stride [2  2] and padding [0  0  0  0]
     5   'conv2d_1'                      2-D Convolution         16 3x3x8 convolutions with stride [1  1] and padding [0  0  0  0]
     6   'layer_1'                       Function                softsign
     7   'max_pooling2d_1'               2-D Max Pooling         2x2 max pooling with stride [2  2] and padding [0  0  0  0]
     8   'flatten'                       Keras Flatten           Flatten activations into 1-D assuming C-style (row-major) order
     9   'dense'                         Fully Connected         100 fully connected layer
    10   'dense_relu'                    ReLU                    ReLU
    11   'dense_1'                       Fully Connected         10 fully connected layer
    12   'dense_1_softmax'               Softmax                 softmax
    13   'ClassificationLayer_dense_1'   Classification Output   crossentropyex
分類層の名前は 'ClassificationLayer_dense_1' です。分類層を表示して、Classes プロパティを確認します。
cLayer = lgraph.Layers(end)
cLayer =
  ClassificationOutputLayer with properties:

            Name: 'ClassificationLayer_dense_1'
         Classes: 'auto'
    ClassWeights: 'none'
      OutputSize: 'auto'

   Hyperparameters
    LossFunction: 'crossentropyex'
この層の Classes プロパティは "auto" であるため、クラスを手動で指定しなければなりません。クラスを 0、1、...、9 に設定してから、インポートした分類層を新しい層に置き換えます。
cLayer.Classes = string(0:9);
lgraph = replaceLayer(lgraph,"ClassificationLayer_dense_1",cLayer);
ネットワークの組み立て
assembleNetwork を使用して層グラフを組み立てます。この関数は、予測に使用する準備が整った DAGNetwork オブジェクトを返します。
net = assembleNetwork(lgraph)
net =
  DAGNetwork with properties:

         Layers: [13x1 nnet.cnn.layer.Layer]
    Connections: [12x2 table]
     InputNames: {'ImageInputLayer'}
    OutputNames: {'ClassificationLayer_dense_1'}
ネットワークのテスト
テスト データ セットを使用して、ネットワークによる予測を行います。
[XTest,YTest] = digitTest4DArrayData;
YPred = classify(net,XTest);
精度を表示します。
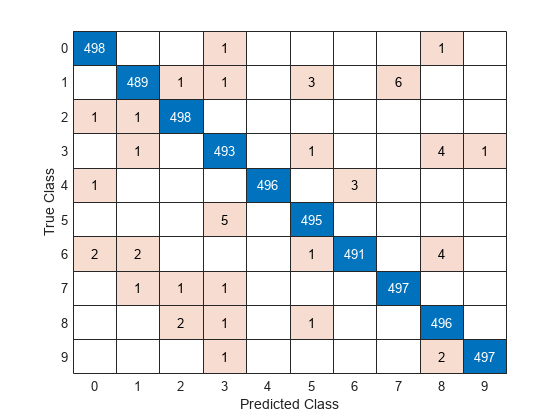
mean(YPred == YTest)
ans = 0.9900
混同行列で予測を可視化します。
confusionchart(YTest,YPred)
参考
importKerasNetwork | assembleNetwork | replaceLayer | importKerasLayers | trainNetwork | layerGraph | DAGNetwork | findPlaceholderLayers
関連するトピック
You can also select a web site from the following list:
Americas
- América Latina (Español)
- Canada (English)
- United States (English)
Europe
- Belgium (English)
- Denmark (English)
- Deutschland (Deutsch)
- España (Español)
- Finland (English)
- France (Français)
- Ireland (English)
- Italia (Italiano)
- Luxembourg (English)
- Netherlands (English)
- Norway (English)
- Österreich (Deutsch)
- Portugal (English)
- Sweden (English)
- Switzerland
- United Kingdom (English)