モデル設計ダッシュボードとモデル テスト ダッシュボードを使用するためのプロジェクトの作成
この例では、モデル設計ダッシュボードとモデル テスト ダッシュボードを使用してモデルを解析するためのプロジェクトの作成方法を示します。プロジェクト フォルダーと参照プロジェクト フォルダーにより、ダッシュボードのメトリクスで解析するアーティファクトのスコープが定義されます。
モデル設計ダッシュボード — このダッシュボードは、モデル メトリクス データを収集してプロジェクト内のモデルの品質を評価するために使用します。
モデル テスト ダッシュボード — このダッシュボードは、モデルと生成コードの検証ステータスと品質を評価するために使用します。
プロジェクトの作成
モデルと依存ファイルを整理するプロジェクトを作成します。Simulink® モデルまたは System Composer™ モデルからプロジェクトを直接作成するには、[シミュレーション] タブで [新規] 、 [プロジェクト] 、 [このモデルからの新規プロジェクト] を選択し、[OK] をクリックします。必要なファイルが Simulink で自動的に特定され、モデルとファイルがプロジェクト フォルダー内に配置されます。詳細については、モデルからのプロジェクトの作成を参照してください。

プロジェクトでファイルと設定を管理できますが、プロジェクトをダッシュボードで使用するために、プロジェクトにファイルを明示的に追加したり、ソース管理を使用したり、特定のプロジェクト ラベルを追加したりする必要はありません。プロジェクトを作成すると、プロジェクトとファイルに関する情報を格納する .prj ファイルと resources/project フォルダー構造が MATLAB® で作成されます。そのプロジェクト情報と構造を使用して、ダッシュボードで設計に関連するアーティファクトが特定されて解析されます。既定では、複数の XML ファイルを使用してプロジェクトの定義が格納されます。プロジェクト定義ファイルの詳細、およびプロジェクト定義ファイルの管理を変更する方法の詳細については、プロジェクト定義ファイルを参照してください。
ダッシュボードを開く
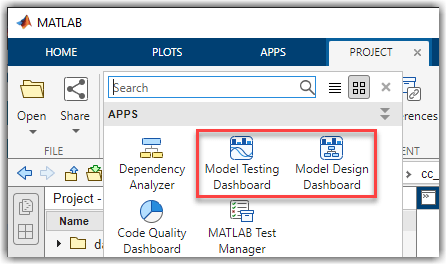
ダッシュボードを開くには、プロジェクトを開き、[プロジェクト] タブの [ツール] セクションで [モデル テスト ダッシュボード] または [モデル設計ダッシュボード] のいずれかをクリックします。

各種のダッシュボードの詳細については、ダッシュボードを使用したプロジェクトの解析を参照してください。
アーティファクトのトレースの有効化
プロジェクトで初めてダッシュボードを開くと、[アーティファクトのトレースの有効化] ダイアログ ボックスが開き、プロジェクトに対してアーティファクトのトレースを有効にするように求められます。アーティファクトのトレースにより、プロジェクトの変更を監視するデジタル スレッドをダッシュボードで作成できるようになり、変更によってメトリクス結果が無効になる場合に特定できます。ダッシュボードでファイルを監視し、古くなったメトリクス結果を検出する方法の詳細については、デジタル スレッドを使用したアーティファクト トレーサビリティの監視と古くなった結果の検出を参照してください。
[有効にして続行] をクリックしてプロジェクトのデジタル スレッドを作成します。[有効にして続行] をクリックすることは、[デジタル スレッド設定] ダイアログ ボックスで [ツールの出力を追跡] 設定を選択することと同じであることに注意してください。
[有効にして続行] をクリックすると、ダッシュボードで以下が行われます。
デジタル スレッド設定を更新して [ツールの出力を追跡] 設定をオンにする。
初回セットアップと初期プロジェクト解析を実行することで、ソフトウェア ユニットおよびコンポーネントを特定し、それらのユニットおよびコンポーネントまでプロジェクト アーティファクトをトレースして、アーティファクト間のトレーサビリティ関係を解析する。
現在選択されているソフトウェア ユニットまたはコンポーネントのメトリクス結果を収集する。
2 つのファイルを含む
derivedフォルダーを作成する:artifacts.dmr— プロジェクトの解析時にデジタル スレッドで収集されるプロジェクト解析データのキャッシュされたバージョンを格納。resultservice.dmr— メトリクス結果を格納。
初回セットアップと初期プロジェクト解析の完了後、ダッシュボードを使用してメトリクス結果を調査できます。詳細については、ダッシュボードを使用したプロジェクトの解析を参照してください。
プロジェクトとダッシュボードのオプションの設定
ダッシュボードを使用するために必要なのは、プロジェクトを作成して開くことだけです。ただし、必要に応じてプロジェクト設定やダッシュボード設定を変更し、ダッシュボードに表示する内容を再構成することもできます。プロジェクトのカスタマイズ方法と使用方法に関する一般的な情報については、プロジェクトの設定を参照してください。
さまざまなソフトウェア ユニットおよびコンポーネントの指定
[プロジェクト] パネルには、現在のプロジェクトのアーティファクトのうち、現在選択されているダッシュボードと互換性があるアーティファクトが表示されます。たとえば、プロジェクト内のユニットのモデル テスト ダッシュボードを開いたり、プロジェクト内のユニットまたはコンポーネントのモデル保守性ダッシュボードを開いたりできます。
"ユニット" とはソフトウェア アーキテクチャ内の機能エンティティであり、個別に、または大規模なシステム テストの一部として実行およびテストできます。"コンポーネント" は複数のテスト可能なユニットを統合するエンティティです。
既定では、ダッシュボードはプロジェクト フォルダー内のすべてのモデルを解析し、それぞれを次のように見なします。
Simulink モデルはユニット。
System Composer アーキテクチャ モデルはコンポーネント。
プロジェクト内のユニットとコンポーネントは、トレース ビューを使用して確認できます。詳細については、Explore Traceability Information Using Trace Viewsを参照してください。
ソフトウェア アーキテクチャ内の別のモデルをユニットまたはコンポーネントとして指定する場合は、エンティティにプロジェクト ラベルを追加し、そのラベルを認識するようにダッシュボードのオプションを構成できます。詳細については、階層内のモデルをコンポーネントまたはユニットとして分類を参照してください。
プロジェクト ファイルの管理とソース管理
プロジェクトでは、既定では複数のプロジェクト ファイルを使用しますが、代わりに単一のプロジェクト ファイルを使用するようにプロジェクト定義ファイルの管理を変更できます。単一のプロジェクト ファイルを使用した方が高速ですが、ソース管理には推奨されません。詳細については、プロジェクト定義ファイルを参照してください。
ダッシュボードを使用するためにソース管理を使用する必要はありませんが、プロジェクトをソース管理システムで使用する場合は必ず次のようにしてください。
プロジェクト ファイル (
.prj) とresources/projectフォルダーは、モデルや他の必要なファイルと共にソース アーティファクトとして扱う。derivedフォルダー、artifacts.dmrファイル、およびresultservice.dmrは、派生アーティファクトとして扱う。派生アーティファクトはソース管理にチェックインしないでください。詳細については、ソース管理対象プロジェクトの派生ファイルの使用を参照してください。
プロジェクトとソース管理の連携に関する一般的な情報については、MATLAB プロジェクトでのソース管理の使用を参照してください。