Create a Simple Form-Based Setup
This example creates a forms-based setup that generates a report on a set of magic
squares (see the magic function).
Create a Word Template
Copy the Report Explorer Default Word Template
Templates that you use in the Report Explorer must be copies of the Report Explorer default template or based on a copy.
Start Report Explorer:
report
In Report Explorer, select Tools > Edit Document Conversion Template.
From the list of templates, select
Default Word
                                Template
. In the dialog box, click Copy template.Save the template on the MATLAB® path and name it
magic-square.dotx.In the list of templates, the new template appears as
Copy of
                                Default Word Template
. Select it and set these properties:Template id:
magic-squareDisplay name:
Magic SquareDescription:
Defines the
                                            form for my magic square report
Open the template in Microsoft® Word. With the template selected, in the dialog box, click Open template.
Prepare to Work with Holes in Word
To work with holes in a Word template, display the Word Developer ribbon if it is not displayed. Then, in the Developer ribbon, turn on design mode. To help you to create content in the right place, display paragraph marks.
In your Word template, select File > Options.
In the Word Options dialog box, select Customize Ribbon.
From the Customize the Ribbon list, under Main Tabs, select the Developer check box, and click OK.
On the Developer ribbon, toggle Design Mode on.
On the Home ribbon, click the Show/Hide Paragraph Marks button
 .
.
Create Sections and Set Default Headers and Footers
The default template uses a different first page header and footer for the default page layout. For this example, your template must contain only a default page header and footer. Edit the headers and footers so that the template contains only default page layouts.
With your cursor in the first page, create a section break. From the Layout ribbon, select Breaks > Next Page.
On the new page, double-click the page header. In the Header & Footer Tools ribbon, toggle Link to Previous off.
Click the footer. Toggle Link to Previous off. Click Close Header and Footer.
With your cursor in the second page, create a section break using Layout > Breaks > Next Page.
In the third page, in the header and the footer, toggle Link to Previous off.
Format Page Numbers
The first section is the title page and does not use a page number. The second section contains the table of contents and uses lowercase roman numerals, starting with page i. The third section is the main content of your report and uses Arabic numerals, starting with page 1.
In the footer of the first page, delete the page number.
In the footer of the second page, right-click the page number and select Format Page Numbers. Set Number format to lowercase roman numerals. Set Start at to
1.Center the number in the footer.
In the footer of the last page, right-click the page number and select Format Page Numbers. Set Number format to Arabic numerals. Set Start at to
1.Center the number in the footer.
Click Close Header and Footer.
Add Boilerplate Text and Hole to Title Page
Design a title page that includes boilerplate text and one hole. The boilerplate text is the report title, and the hole is for the date.
On the first page, before the section break, enter the title text:
My Magic Square Report
Apply the Word
Titlestyle.In a new paragraph, add an inline hole, and give it the title
Date.With your cursor in the paragraph, add a space and put the text cursor in front of it. This technique ensures that you are creating an inline hole and not a block hole.
On the Developer ribbon, in the Controls group, click the Rich Text Content Control button.
On the Developer ribbon, click Properties. Set Title to
Dateand Tag toHole. Click OK.To show the purpose of the hole, enter
Datein the hole.Delete the space that follows the hole.
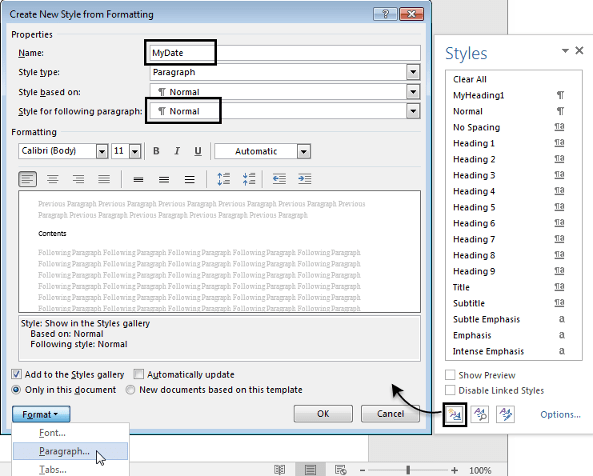
Create a Word style named
MyDatebased onNormal.
In the Paragraph properties, change these values:
Space before to
60Alignment to
Centered
Apply the
MyDatestyle to the paragraph that contains theDatehole.
Add the Table of Contents
In the second section (the second page), add the table of contents header and field. The TOC contains chapter names and page numbers. The field is a table of contents placeholder that is populated with the chapter names and page numbers when the report is generated.
Before the section break on the second page, add the heading for the table of contents. Type
Contentsand apply the style TOC Heading.Add a Normal paragraph after the heading and insert the table of contents field. On the Insert ribbon, select Quick Parts > Field. From the list, select
TOCand click OK. Respond to the message that appears.
Add Chapters Hole
The third section of your report is for the main content of the report. Create a block hole and your own heading style to apply to paragraphs in your report setup.
Insert a block hole and name it
Chapters.Select the paragraph marker. Then, on the Developer ribbon, click the Rich Text Content Control button.
With your cursor in the rich text control, on the Developer ribbon, click Properties. Set Title to
Chaptersand Tag toHole. Click OK.Type
Chaptersin the hole to indicate the purpose of the hole.
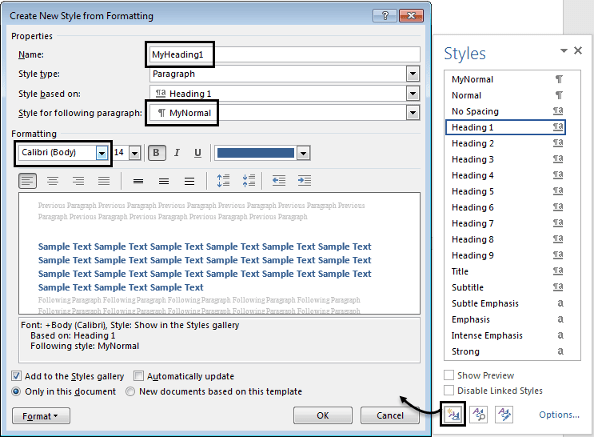
Create a style MyHeading1 based on Heading 1.

Change the font to Calibri.
In the Paragraph formatting, on the Indents and Spacing tab, change Spacing After to
20.On the Line and Page Breaks tab, select the Page Break Before check box.
Save and Close the Template
Clean up the template for report generation, and then save and close it.
Remove any empty paragraphs.
Turn off paragraph marks.
Save and close the template.
Create the Report Setup File
Create a form-based setup file. In Report Explorer, select File > New Form.
In the Report Form Options, under Report Output Type and Templates, change File format to
Wordand change the template name to your custom template,Magic Square.When you select your custom template, the holes and layouts from your template populate the setup. This setup contains these holes:
A block hole for the start of the document (first section), named
#start#. This hole contains aDOCX Page Layoutcomponent. Default page header and footer components appear as children of the layout component.An inline hole named
Date.A block hole for the start of the second section, named
#sect2#, and a block hole for the start of the third section, named#sect3#.Each section hole contains a page layout component. Each page layout component contains a
Page HeaderandPage Footercomponent to pick up the page number information you specified in the template.A block hole named
Chapters.
Add a
Textcomponent as a child of the Date inline hole. To insert the current date in the hole, enter this expression in the text box of theTextcomponent. This expression returns the value of the MATLABdatecommand:%<date>Create an
Evalcomponent as a child of the ChaptersTemplate Holecomponent in your report. In the component’s dialog box, clear the Insert MATLAB expression in report and Display command window output in report check boxes. Copy this code into the Expression to evaluate in the base workspace box:% This M-code sets up two variables % that define how the report runs. % mgicSizeVector is a list of MxM % Magic Square sizes to insert into % the report. Magic squares cannot % be 2x2. magicSizeVector=[4 8 16 32]; % largestDisplayedArray sets the % limit of array size to insert % in the report with the % Insert Variable component. largestDisplayedArray=15;
Create a
For Loopcomponent after theEvalcomponent in your report setup. Set the loop’s End value tolength(magicSizeVector). Set Variable name toMAGIC_SQUARE_INDEX.Add an
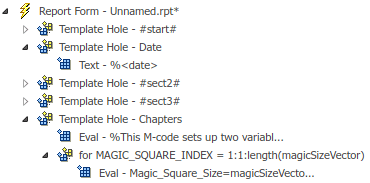
Evalcomponent as the first child of the for loop. In the component dialog box, set Expression to evaluate toMagic_Square_Size=magicSizeVector(MAGIC_SQUARE_INDEX);. Clear the Insert MATLAB expression in report and Display command window output in report check boxes.The figure shows your report setup so far:

Create a
Paragraphcomponent as a child of theforcomponent. In the dialog box, change the paragraph text Style Name toSpecifyand enterMyHeading1. This setting formats the chapter headings generated by the for loop with the MyHeading1 style you created in your template.Create an
Insert
                            Variable
component as a child of theParagraphcomponent. Set Variable name toMagic_Square_Size.Create an
Evalcomponent after theVariablecomponent. Clear the Insert MATLAB expression in report and Display command window output in report check boxes. Set Expression to evaluate to:% This m-script produces a magic % square of size Magic_Square_Size % and creates an image of that square. mySquare=magic(Magic_Square_Size); clf imagesc(mySquare); title(sprintf("Magic Square N=%i",Magic_Square_Size)) set(gca,"Ydir","normal"); axis equal;
Create a
Logical Ifcomponent after theEvalcomponent. In the component dialog box, set Test expression toMagic_Square_Size<=largestDisplayedArray. Move theLogical Ifcomponent so that it is a sibling of theParagraphcomponent.Create a
Logical Thencomponent as a child of theLogical Ifcomponent. Create anInsert Variablecomponent as a child of theLogical Thencomponent. In the dialog box, set Variable name tomySquare.Create a
Logical Elsecomponent following theLogical Thencomponent. Create aFigure Loopcomponent as a child of theLogical Elsecomponent.Create a
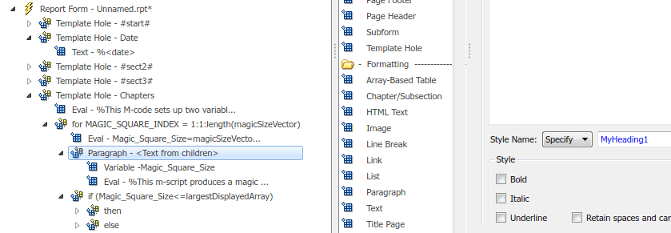
Figure Snapshotcomponent as a child of theFigure Loopcomponent. In the Figure Snapshot dialog box, set the paper orientation to portrait. Set Image size toCustom: [5 4] inches.The figure shows the structure of the report setup and the setting for the
Paragraphcomponent.
Generate the Report
Select the Report Form component and select File > Report.
See Also
Template Hole | Paragraph | DOCX Page Layout | Page Footer | Evaluate MATLAB Expression | For Loop | Logical If | Logical Else | Logical Then