Aerial Imagery Tool
Import and configure aerial imagery files
Description
The Aerial Imagery Tool enables you to import and configure aerial
imagery files. RoadRunner imports geolocated aerial imagery for visual reference and for mapping textures
onto surfaces. You can import geolocated imagery from a variety of common file formats such as
GeoTIFF (.tif, .tiff) and JPEG 2000
(.jp2). These images contain the necessary map projection information to
accurately position them on the surface of the Earth. You can also use this tool to import and
adjust nongeoreferenced imagery, such as JPG files. For more information about supported file
formats, see Aerial Image
Assets.
To provide full coverage of an area, you can import multiple images of it, in which case some of the imported maps might overlap in certain regions. You can adjust the priorities of the images to determine which one takes priority in overlapping areas.
If you do not have geolocated scene imagery, you can obtain geographic information system (GIS) data compatible with RoadRunner from various sources. For more information on where to obtain RoadRunner-compatible GIS data, see Download GIS Data for Use in RoadRunner.
Open the Aerial Imagery Tool
On the RoadRunner toolbar, click the Aerial Imagery Tool button:
![]()
Examples
Click the Aerial Imagery Tool button.
In the Library Browser, navigate to the directory containing the aerial image file you want to import. For more information about supported aerial image file formats, see Aerial Image Assets.
Right-click the asset and verify that the Default Type is set to Aerial Image.
Drag the asset from the Library Browser to the scene canvas.
Note
If you have not set the geographic position for the scene, RoadRunner sets the scene center to the latitudinal and longitudinal center of the image. You can change the scene center using the World Settings Tool.
If you have already set the geographic position of the scene, but the imported image is outside of the maximum range of the scene, an error dialog box appears and RoadRunner cancels the import.
To correctly display satellite imagery, RoadRunner must know how to position the image on the Earth. For best accuracy, obtain satellite imagery that contains geolocation information by using a format such as GeoTIFF or JPEG 2000. For links and examples about obtaining GIS data compatible with RoadRunner, see Download GIS Data for Use in RoadRunner. If your imagery does not have geolocation information, you can manually set geolocation information using the following steps.
If you already know the specific projection to use (that is, you have a
proj-stringor WKT projection string), you can associate it with the file:Click the Aerial Imagery Tool button.
In the Library Browser, navigate to the directory containing the image file you want to import.
Right-click the file asset and verify that the Default Type is set to Aerial Image.
In the Attributes pane, click the Set Custom Projection button.
In the Custom Projection dialog box, specify WKT/Proj String as your proj-string or WKT projection string.
Click OK.
Scale the image by adjusting the Resolution to match the meters per pixel of the image.
Drag the image asset from the Library Browser into the scene canvas.
If you do not know the projection, you can experimentally try different projection values on the image file. These instructions apply a Transverse Mercator projection to the file.
This process enables you to use arbitrary images, such as a screenshot from a separate application. However, the result is not as accurate as a known projection or georeferenced image.
Click the Aerial Imagery Tool button.
In the Library Browser, navigate to the directory containing the image file you want to import.
Right-click the file asset and make sure that the Default Type is set to Aerial Image.
In the Attributes pane, click the Set Custom Projection button.
In the Custom Projection dialog box, specify Lat and Long as the latitude and longitude, respectively, of the center point of your image.

Click Use Transverse Mercator At. Then, click OK.
Scale the image by adjusting the Resolution to match the meters per pixel of the image.
Drag the image asset from the Library Browser into the scene canvas.
Click the Aerial Imagery Tool button.
Select the aerial image you want to delete in the scene canvas. RoadRunner highlights the selected image with a red bounding box.
Press Delete, or select Edit > Delete from the menu bar.
Click the Aerial Imagery Tool button.
In the Attributes pane, in the Global Aerial Imagery Settings section, adjust the Meters Per Texel value to change the resolution of the aerial imagery in the scene.
Click the Aerial Imagery Tool button.
Select the aerial image you want to edit.
In the Attributes pane, adjust the aerial image attributes as desired.
Note
When multiple aerial images overlap at a location, RoadRunner must decide which one to use. To resolve overlaps by adjusting the priority of an aerial image, select it and click Push to bottom or Bring to top in the Attributes pane.
By default, RoadRunner displays an aerial imagery for only visual reference. You can optionally apply the aerial imagery to terrain surfaces by creating a new material and applying it to the surfaces.
To create a new material, follow these steps:
Click the Aerial Imagery Tool button.
In the Attributes pane, in the Global Aerial Imagery Settings section, select Generate Material.
This action generates a new image file,
Overlay.pngand a new material file,Overlay.rrmtlin the current directory of the Library Browser. RoadRunner must create a new image because the original aerial imagery might be in an incompatible projection or consists of multiple separate images. In the latter case, the Generate Material operation combines the multiple aerial images into one final image that you can map orthographically to the terrain surface.
To assign the material to one or more surfaces, follow these steps:
Click the Surface Tool button.
Assign your material to a surface by dragging the material file from the Library Browser to the surface in the scene canvas.
In the menu bar, select View > Aerial Imagery, or press F4.
Parameters
When you import an aerial imagery file by using the Aerial Imagery Tool button, the Attributes pane displays the Global Aerial Imagery Settings and Aerial Image attribute categories.
The Global Aerial Imagery Settings attribute category contains these attributes:
| Attribute | Description |
|---|---|
| Offset | The value by which to move the imported vector aerial image relative to the
scene origin (0, 0, 0), in meters. Use the X and
Y offset values to move the imported image along the
Default:
|
| Opacity | Opacity value of the aerial image in the scene editing canvas, specified as a scalar in the range [0, 1]. A value of 0 is fully transparent, while a value of 1 is fully opaque. Default:
|
| Meters Per Texels | Resolution of the imported aerial image file in meters per texel. Use this attribute to control the sampling rate of the imported imagery. Increase this value to enable you to view larger areas at the expense of lower image quality. Default:
|
| Generate Material | Use this attribute to assign an aerial imagery material to a surface. By default, RoadRunner displays aerial imagery for only visual reference. You can optionally apply the aerial imagery to terrain surfaces by creating a new material and applying it to the surfaces. For an example, see Assign Aerial Imagery Material to Surface. |
The Aerial Image attribute category contains these attributes:
| Attribute | Description |
|---|---|
| Priority | When you import multiple overlapping aerial images, you can adjust the priority of each image to determine which one applies in overlapping areas. Use the Push to bottom and Bring to top buttons to reduce or increase priority, respectively, for the selected image. |
| Assets | Displays the filename of the imported aerial image file. |
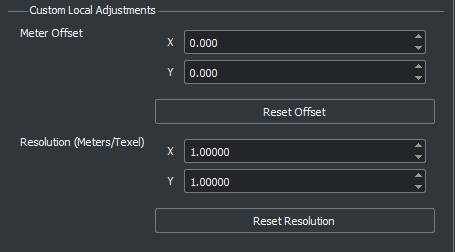
| Custom Local Adjustments | Specifies options to override the information of an imported aerial image file and assign custom offset and resolution to the texels of the image.
|
More About
Version History
Introduced in R2020a