roadBoundaries
道路の境界を取得
説明
例
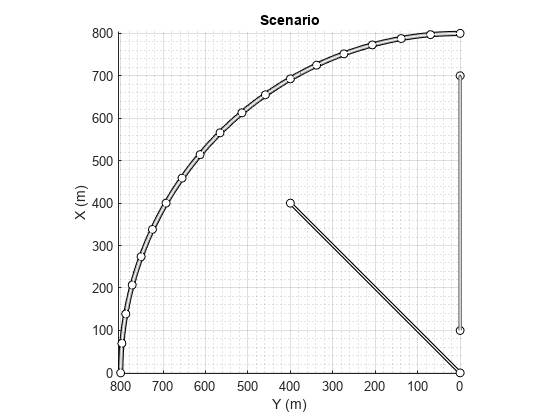
1 つの曲線道路、2 つの直線道路、2 つのアクター (車と自転車) が含まれたドライビング シナリオを作成します。どちらのアクターも 60 秒間道路に沿って移動します。
ドライビング シナリオ オブジェクトを作成します。
scenario = drivingScenario('SampleTime',0.1','StopTime',60);
半径 800 メートルの円弧に従う道路中心点を使用して、曲線道路を作成します。円弧は 0 度から開始して 90 度で終了し、5 度のインクリメントでサンプリングされます。
angs = [0:5:90]';
R = 800;
roadcenters = R*[cosd(angs) sind(angs) zeros(size(angs))];
roadwidth = 10;
cr = road(scenario,roadcenters,roadwidth);
両端の道路中央点を使用して、既定の幅をもつ 2 本の直線道路を追加します。最初の直線道路の両エッジに障壁を追加します。
roadcenters = [700 0 0; 100 0 0];
sr1 = road(scenario,roadcenters);
barrier(scenario,sr1)
barrier(scenario,sr1,'RoadEdge','left')
roadcenters = [400 400 0; 0 0 0];
road(scenario,roadcenters);
道路の境界を取得します。
rbdry = roadBoundaries(scenario);
車と自転車をシナリオに追加します。1 つ目の直線道路の最初の位置に車を配置します。
car = vehicle(scenario,'ClassID',1,'Position',[700 0 0], ...
    'Length',3,'Width',2,'Height',1.6);
道路を進んだ先に自転車を配置します。
bicycle = actor(scenario,'ClassID',3,'Position',[706 376 0]', ...
    'Length',2,'Width',0.45,'Height',1.5);
シナリオをプロットします。
plot(scenario,'Centerline','on','RoadCenters','on');
title('Scenario');
アクターの姿勢とプロファイルを表示します。
allActorPoses = actorPoses(scenario)
allActorPoses=242×1 struct array with fields:
    ActorID
    Position
    Velocity
    Roll
    Pitch
    Yaw
    AngularVelocity
allActorProfiles = actorProfiles(scenario)
allActorProfiles=242×1 struct array with fields:
    ActorID
    ClassID
    Length
    Width
    Height
    OriginOffset
    MeshVertices
    MeshFaces
    RCSPattern
    RCSAzimuthAngles
    RCSElevationAngles
このシナリオには障壁があり、各障壁セグメントがアクターと見なされているため、関数 actorPoses および関数 actorProfiles は、すべての静止アクターと非静止アクターの姿勢を返します。車両や二輪車など非静止アクターの姿勢とプロファイルのみを取得するには、まず scenario.Actors.ActorID プロパティを使用して、それらの対応するアクター ID を取得します。
movableActorIDs = [scenario.Actors.ActorID];
次に、それらの ID を使用して、非静止アクターの姿勢とプロファイルのみをフィルター処理します。
movableActorPoseIndices = ismember([allActorPoses.ActorID],movableActorIDs);

movableActorPoses = allActorPoses(movableActorPoseIndices)
movableActorPoses=2×1 struct array with fields:
    ActorID
    Position
    Velocity
    Roll
    Pitch
    Yaw
    AngularVelocity
movableActorProfiles = allActorProfiles(movableActorPoseIndices)
movableActorProfiles=2×1 struct array with fields:
    ActorID
    ClassID
    Length
    Width
    Height
    OriginOffset
    MeshVertices
    MeshFaces
    RCSPattern
    RCSAzimuthAngles
    RCSElevationAngles
シナリオのワールド座標で指定された 8 の字形の道路を含むドライビング シナリオを作成します。シナリオのワールド座標を、自車座標系に変換します。
空のドライビング シナリオを作成します。
scenario = drivingScenario;
8 の字形の道路をシナリオに追加します。シナリオを表示します。
roadCenters = [0  0  1
             20 -20  1
             20  20  1
            -20 -20  1
            -20  20  1
              0   0  1];

roadWidth = 3;
bankAngle = [0 15 15 -15 -15 0];
road(scenario,roadCenters,roadWidth,bankAngle);
plot(scenario)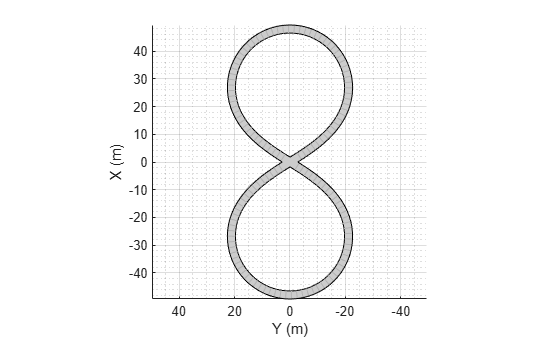
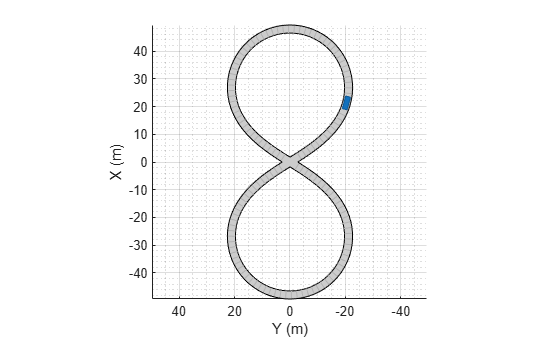
自車をシナリオに追加します。車両をワールド座標 (20, -20) に配置して、向きを -15 度のヨー角に設定します。
ego = actor(scenario,'ClassID',1,'Position',[20 -20 0],'Yaw',-15);
Warning: Class ID 1 is not supported for an actor. The drivingScenario object created a vehicle instead. ClassID of actor must be one of these values: 3 (Bicycle), 4 (Pedestrian), 5 (Jersey Barrier), or 6 (Guardrail).
関数 roadBoundaries を使用して、道路の境界を自車座標で取得します。自車を入力引数として指定します。
rbEgo1 = roadBoundaries(ego);
結果を鳥瞰図プロット上に表示します。
bep = birdsEyePlot;
lbp = laneBoundaryPlotter(bep,'DisplayName','Road');
plotLaneBoundary(lbp,rbEgo1)

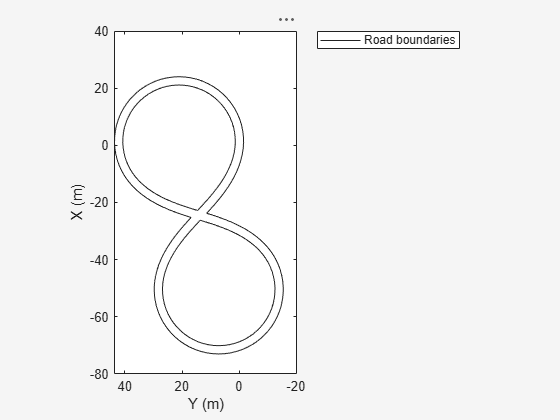
関数 roadBoundaries を使用して、道路の境界をワールド座標で取得します。シナリオを入力引数として指定します。
rbScenario = roadBoundaries(scenario);
関数 driving.scenario.roadBoundariesToEgo を使用して、道路の境界を自車座標で取得します。
rbEgo2 = driving.scenario.roadBoundariesToEgo(rbScenario,ego);
道路の境界を鳥瞰図プロット上に表示します。
bep = birdsEyePlot;
lbp = laneBoundaryPlotter(bep,'DisplayName','Road boundaries');
plotLaneBoundary(lbp,{rbEgo2})
入力引数
出力引数
道路の境界。cell 配列として返されます。cell 配列内の各 cell には、シナリオ内の道路の境界を表す実数値の N 行 3 列の行列が含まれています。ここで N は道路の境界の数です。行列の各行は、道路境界の頂点の (x, y, z) 座標に対応します。
入力引数がドライビング シナリオである場合、道路の座標はドライビング シナリオのワールド座標を基準とします。入力引数がアクターである場合、道路の座標はアクターの座標系を基準とします。
次の図は、さまざまな道路のタイプについて、rbdry に含まれる道路の境界の数を示しています。
| 単一の道路 — 道路の境界が 1 つ | 交差点 — 道路の境界が 1 つ |
|---|---|
|
|
|


| ラウンドアバウト — 道路の境界が 2 つ | 8 の字形 — 道路の境界が 3 つ |
|---|---|
|
|
|


バージョン履歴
R2017a で導入