このページの内容は最新ではありません。最新版の英語を参照するには、ここをクリックします。
Organize Variant Control Macros in Same Header File
This example explains how to aggregate multiple variant control macros (#define preprocessor directives) into a single generated header file to simplify the management of complex systems with multiple interacting variant conditions. Furthermore, you can use the custom storage classes to specify the header file name associated with the variant control variables. By applying the custom storage class, the header file name is automatically set for all parameter objects that represent the variant control variables. This approach eliminates the need to manually update the header file name for each parameter object, ensuring that any changes made to the header file name are reflected across all objects using the custom storage class.
Prerequisites
We recommend completing the Variant Subsystem を使用した個別の階層でのバリエーションの実装 example to learn more about how to use variant blocks in Simulink.
Explore the Model
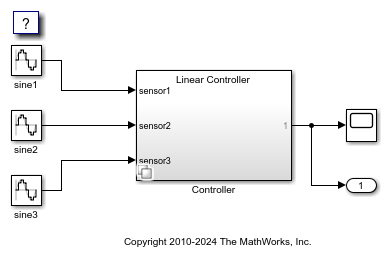
Open the slexVariantSubsystems model.
The slexVariantSubsystems model contains a Variant Subsystem block named Controller. The Controller block encapsulates two different implementations, Linear Controller and Nonlinear Controller, as variant choices. To specify appropriate variant conditions in the variant choices, run the prepare_preproc_subsys file.
model = "slexVariantSubsystems";
open_system(model);
prepare_preproc_subsys;
1. Navigate inside the Controller block to view its choices.
2. Right-click the variant badge on the Controller block and select Block Parameters (Subsystem).
3. Specify the Variant activation time of the Controller block as code compile.
set_param("slexVariantSubsystems/Controller", "VariantActivationTime", "code compile");
4. Observe that the variant choices in the Controller block are associated with variant controls that are represented by the Simulink.VariantExpressionVSS_LINEAR_CONTROLLER and VSS_NONLINEAR_CONTROLLER. The VSS_LINEAR_CONTROLLER object contains the control expression MODE_A == 0 || MODE_B == 0 and VSS_NONLINEAR_CONTROLLER contains the control expression MODE_A == 1 && MODE_B == 1. The control expressions are displayed in the Condition column of the Controller Block Parameters dialog box.
set_param("slexVariantSubsystems/Controller/Linear Controller", "VariantControl", "VSS_LINEAR_CONTROLLER")
set_param("slexVariantSubsystems/Controller/Nonlinear Controller", "VariantControl", "VSS_NONLINEAR_CONTROLLER")
Here, the variant control variables MODE_A and MODE_B are Simulink.Parameter1. The parameter objects use the custom storage class Define and are configured to appear in the generated code as C-code macros in a separate header file macros.h.
The variant control variables defined as Simulink.Parameter objects can have any of the storage classes listed in Storage Classes for Different Variant Activation Times.
MODE_A = Simulink.Parameter;
MODE_A.Value = 1;
MODE_A.DataType = "int32";
MODE_A.CoderInfo.StorageClass = "Custom";
MODE_A.CoderInfo.CustomStorageClass = "Define";
MODE_A.CoderInfo.CustomAttributes.HeaderFile = "macros.h";

MODE_B = Simulink.Parameter;
MODE_B.Value = 1;
MODE_B.DataType = "int32";
MODE_B.CoderInfo.StorageClass = "Custom";
MODE_B.CoderInfo.CustomStorageClass = "Define";
MODE_B.CoderInfo.CustomAttributes.HeaderFile = "macros.h";

VSS_LINEAR_CONTROLLER = Simulink.Variant;
VSS_LINEAR_CONTROLLER.Condition = "MODE_A == 0 || MODE_B == 0";
VSS_NONLINEAR_CONTROLLER = Simulink.Variant;
VSS_NONLINEAR_CONTROLLER.Condition = "MODE_A == 1 && MODE_B == 1";
Change Name of Generated Header File
To change the name of the generated header file from macros.h to variant_controls.h, perform these steps:
1. On the Modeling tab, select Model Explorer.
2. In the Model Hierarchy pane, select Simulink Root > Base Workspace. The Contents pane displays all the objects in the base workspace.
3. Select MODE_A, and then in the Simulink.Parameter:MODE_A pane, select the Code Generation tab.
4. In the HeaderFile parameter, specify variant_controls.h as the name of the file.
5. Repeat the steps to change the name of the generated header file for MODE_B to variant_controls.h.
Alternatively, you can change the file name programmatically, by using this command. For more information, see Simulink.CoderInfo.
MODE_A.CoderInfo.CustomAttributes.HeaderFile = 'variant_controls.h';
MODE_B.CoderInfo.CustomAttributes.HeaderFile = 'variant_controls.h';
6. To generate code, in the Apps tab of the toolstrip, navigate to Embedded Coder. In the C code tab, select Build > Generate code. Alternatively, enter this command in the Command Window.
slbuild(model);
cfile=fullfile(pwd, "slexVariantSubsystems_ert_rtw", "slexVariantSubsystems.c");
coder.example.extractLines(cfile, "/* Model step", "/* Model initialize", 1, 0);
### Searching for referenced models in model 'slexVariantSubsystems'.
### Total of 1 models to build.
### Starting build procedure for: slexVariantSubsystems
### Successful completion of build procedure for: slexVariantSubsystems

Build Summary

Top model targets:

Model                  Build Reason                                         Status                        Build Duration
========================================================================================================================
slexVariantSubsystems  Information cache folder or artifacts were missing.  Code generated and compiled.  0h 0m 24.823s

1 of 1 models built (0 models already up to date)
Build duration: 0h 0m 26.966s

/* Model step function */
void slexVariantSubsystems_step(void)
{

#if VSS_LINEAR_CONTROLLER

  real_T denAccum;

#endif

  real_T lastSin_g_tmp;
  real_T lastSin_i_tmp;
  real_T lastSin_tmp;
  real_T rtb_sine1;
  real_T rtb_sine1_tmp;
  real_T rtb_sine3;
  real_T rtb_sine3_tmp;
  real_T sine2;
  real_T sine2_tmp;

  /* Sin: '<Root>/sine1' */
  if (slexVariantSubsystems_DW.systemEnable != 0) {
    lastSin_tmp = 1.0471975511965976 *
      ((slexVariantSubsystems_M->Timing.clockTick0) * 0.01);
    slexVariantSubsystems_DW.lastSin = sin(lastSin_tmp);
    slexVariantSubsystems_DW.lastCos = cos(lastSin_tmp);
    slexVariantSubsystems_DW.systemEnable = 0;
  }

  lastSin_tmp = slexVariantSubsystems_DW.lastSin * 0.99994516936551214;
  rtb_sine1_tmp = slexVariantSubsystems_DW.lastCos * 0.99994516936551214;
  rtb_sine1 = ((slexVariantSubsystems_DW.lastCos * -0.010471784116245792 +
                lastSin_tmp) * 0.99994516936551214 + (rtb_sine1_tmp -
    slexVariantSubsystems_DW.lastSin * -0.010471784116245792) *
               0.010471784116245792) * 0.1;

  /* End of Sin: '<Root>/sine1' */

  /* Sin: '<Root>/sine2' */
  if (slexVariantSubsystems_DW.systemEnable_e != 0) {
    lastSin_g_tmp = ((slexVariantSubsystems_M->Timing.clockTick0) * 0.01);
    slexVariantSubsystems_DW.lastSin_g = sin(lastSin_g_tmp);
    slexVariantSubsystems_DW.lastCos_n = cos(lastSin_g_tmp);
    slexVariantSubsystems_DW.systemEnable_e = 0;
  }

  lastSin_g_tmp = slexVariantSubsystems_DW.lastSin_g * 0.99995000041666526;
  sine2_tmp = slexVariantSubsystems_DW.lastCos_n * 0.99995000041666526;

  /* Sin: '<Root>/sine2' */
  sine2 = ((slexVariantSubsystems_DW.lastCos_n * -0.0099998333341666645 +
            lastSin_g_tmp) * 0.99995000041666526 + (sine2_tmp -
            slexVariantSubsystems_DW.lastSin_g * -0.0099998333341666645) *
           0.0099998333341666645) * 2.0;

  /* Sin: '<Root>/sine3' */
  if (slexVariantSubsystems_DW.systemEnable_b != 0) {
    lastSin_i_tmp = 0.52359877559829882 *
      ((slexVariantSubsystems_M->Timing.clockTick0) * 0.01);
    slexVariantSubsystems_DW.lastSin_i = sin(lastSin_i_tmp);
    slexVariantSubsystems_DW.lastCos_i = cos(lastSin_i_tmp);
    slexVariantSubsystems_DW.systemEnable_b = 0;
  }

  lastSin_i_tmp = slexVariantSubsystems_DW.lastSin_i * 0.99998629224742674;
  rtb_sine3_tmp = slexVariantSubsystems_DW.lastCos_i * 0.99998629224742674;
  rtb_sine3 = ((slexVariantSubsystems_DW.lastCos_i * -0.00523596383141958 +
                lastSin_i_tmp) * 0.99998629224742674 + (rtb_sine3_tmp -
    slexVariantSubsystems_DW.lastSin_i * -0.00523596383141958) *
               0.00523596383141958) * 0.3;

  /* End of Sin: '<Root>/sine3' */

  /* Outputs for Atomic SubSystem: '<Root>/Controller' */
#if VSS_LINEAR_CONTROLLER

  /* Outputs for Atomic SubSystem: '<S1>/Linear Controller' */
  /* Update for DiscreteTransferFcn: '<S2>/Discrete Transfer Fcn' */
  denAccum = (sine2 - 0.09 *
              slexVariantSubsystems_DW.DiscreteTransferFcn_states[0]) - 0.5 *
    slexVariantSubsystems_DW.DiscreteTransferFcn_states[1];

  /* VariantMerge generated from: '<S1>/Out1' incorporates:
   *  DiscreteTransferFcn: '<S2>/Discrete Transfer Fcn'
   *  Sum: '<S2>/Add'
   */
  slexVariantSubsystems_Y.Out1 = ((0.7 *
    slexVariantSubsystems_DW.DiscreteTransferFcn_states[1] +
    slexVariantSubsystems_DW.DiscreteTransferFcn_states[0]) + rtb_sine1) +
    rtb_sine3;

  /* Update for DiscreteTransferFcn: '<S2>/Discrete Transfer Fcn' */
  slexVariantSubsystems_DW.DiscreteTransferFcn_states[1] =
    slexVariantSubsystems_DW.DiscreteTransferFcn_states[0];
  slexVariantSubsystems_DW.DiscreteTransferFcn_states[0] = denAccum;

  /* End of Outputs for SubSystem: '<S1>/Linear Controller' */
  /* End of Outputs for SubSystem: '<Root>/Controller' */
#elif VSS_NONLINEAR_CONTROLLER

  /* Outputs for Atomic SubSystem: '<S1>/Nonlinear Controller' */
  /* VariantMerge generated from: '<S1>/Out1' incorporates:
   *  Lookup_n-D: '<S3>/1-D Lookup Table'
   *  Sin: '<Root>/sine2'
   *  Sum: '<S3>/Add'
   */
  slexVariantSubsystems_Y.Out1 = (rtb_sine1 + look1_binlxpw(sine2,
    slexVariantSubsystems_ConstP.uDLookupTable_bp01Data,
    slexVariantSubsystems_ConstP.uDLookupTable_tableData, 10U)) + rtb_sine3;

  /* End of Outputs for SubSystem: '<S1>/Nonlinear Controller' */
#endif

  /* Update for Sin: '<Root>/sine1' */
  rtb_sine1 = slexVariantSubsystems_DW.lastSin;
  slexVariantSubsystems_DW.lastSin = slexVariantSubsystems_DW.lastCos *
    0.010471784116245792 + lastSin_tmp;
  slexVariantSubsystems_DW.lastCos = rtb_sine1_tmp - rtb_sine1 *
    0.010471784116245792;

  /* Update for Sin: '<Root>/sine2' */
  rtb_sine1 = slexVariantSubsystems_DW.lastSin_g;
  slexVariantSubsystems_DW.lastSin_g = slexVariantSubsystems_DW.lastCos_n *
    0.0099998333341666645 + lastSin_g_tmp;
  slexVariantSubsystems_DW.lastCos_n = sine2_tmp - rtb_sine1 *
    0.0099998333341666645;

  /* Update for Sin: '<Root>/sine3' */
  rtb_sine1 = slexVariantSubsystems_DW.lastSin_i;
  slexVariantSubsystems_DW.lastSin_i = slexVariantSubsystems_DW.lastCos_i *
    0.00523596383141958 + lastSin_i_tmp;
  slexVariantSubsystems_DW.lastCos_i = rtb_sine3_tmp - rtb_sine1 *
    0.00523596383141958;

  /* Update absolute time for base rate */
  /* The "clockTick0" counts the number of times the code of this task has
   * been executed. The resolution of this integer timer is 0.01, which is the step size
   * of the task. Size of "clockTick0" ensures timer will not overflow during the
   * application lifespan selected.
   */
  slexVariantSubsystems_M->Timing.clockTick0++;
}
Observe that the variant control variables MODE_A and MODE_B appear as C-code macros in the header file variant_controls.h.
cfile=fullfile(pwd, "slexVariantSubsystems_ert_rtw", "variant_controls.h");
coder.example.extractLines(cfile, "/* Exported data define */", " /* variant_controls_h_ */", 1, 1);
/* Exported data define */

/* Definition for custom storage class: Define */
#define MODE_A                         1                         /* Referenced by:
                                                                  * '<S1>/Linear Controller'
                                                                  * '<S1>/Nonlinear Controller'
                                                                  */
#define MODE_B                         1                         /* Referenced by:
                                                                  * '<S1>/Linear Controller'
                                                                  * '<S1>/Nonlinear Controller'
                                                                  */
#endif                                 /* variant_controls_h_ */
Reduce Maintenance Effort by Creating Custom Storage Class
To change the name of a header file that is associated with multiple parameter objects, you must change the configuration of each parameter object individually. While the Model Data Editor allows for batch editing, this does not extend to new variant control variables (parameter objects) that you add. You must specify the header file name individually. Additionally, the Model Data Editor displays parameter objects for only a single model at a time.
A more efficient approach is to create a custom storage class. With the custom storage class, you are required to specify the header file name within the custom storage class definition only once. Consequently, this header file name automatically applies to all parameter objects linked to the custom storage class.
To create a custom storage class, perform these steps:
1. Copy the demodata package into your current folder as +myPackage.
copyfile("demodata","+myPackage","f")
2. Navigate inside the +myPackage folder and open Parameter.m.
3. Uncomment the methods section that defines the method setupCoderInfo. In the call to the function useLocalCustomStorageClasses, replace 'packageName' with 'myPackage'.
  methods
    function setupCoderInfo(h)
      % Use custom storage classes from this package
      useLocalCustomStorageClasses(h, 'myPackage');
    end
  end % methods
4. Save and close the file.
5. Open the Custom Storage Class Designer.
cscdesigner("myPackage")
6. Select the custom storage class Define.
7. Click Copy. A new custom storage class, Define_1, appears. Select this new custom storage class.
8. Set Name to VariantControlVar.
9. Set Header file to Specify. In the text box, enter variant_controls.h and save the changes.
10. At the command prompt, replace the Simulink.Parameter objects MODE_A and MODE_B with the myPackage.Parameter object. Apply the new custom storage class VariantControlVar.
MODE_A = myPackage.Parameter;
MODE_A.Value = 1;
MODE_A.DataType = "int32";
MODE_A.CoderInfo.StorageClass = "Custom";
MODE_A.CoderInfo.CustomStorageClass = "VariantControlVar";

MODE_B = myPackage.Parameter;
MODE_B.Value = 1;
MODE_B.DataType = "int32";
MODE_B.CoderInfo.StorageClass = "Custom";
MODE_B.CoderInfo.CustomStorageClass = "VariantControlVar";
11. Create a new parameter object MODE_C representing a variant control variable using the custom storage class VariantControlVar.
MODE_C.Value = 1;
MODE_C.DataType = "int32";
MODE_C.CoderInfo.StorageClass = "Custom";
MODE_C.CoderInfo.CustomStorageClass = "VariantControlVar";
Instead of modifying each parameter object individually, you can change the header file name for all of them once using the Custom Storage Class Designer.
参考
カスタム ストレージ クラス デザイナーを使用したストレージ クラスの作成 (Embedded Coder) | Choose Storage Class for Controlling Data Representation in Generated Code