Function Wizard のインストールと使用
MATLAB® Compiler™ に付属の Function Wizard アドインが提供するコントロール パネルを Microsoft® Excel® で使用して、MATLAB Compiler の 1 つ以上の Excel アドインを使用するカスタム Excel マクロを作成します。生成されるマクロは Microsoft Visual Basic® for Applications (VBA) コードで構成され、このコードを変更してさらにカスタマイズできます。ウィザードを使用するにあたって、VBA プログラミングの知識は不要です。
Function Wizard を使用すると、コンパイル済みの MATLAB 関数からワークシートへのデータの配置と出力を指定する Excel マクロを作成できます。コンパイルされた MATLAB モデルに Excel ワークシートの値を渡してから、モデルの出力をワークシートのセルまたはセル範囲に返します。Function Wizard を使用して、構造体配列の引数や複数の出力をもつ MATLAB 関数を処理します。
Function Wizard を使用した Excel マクロの作成に関する詳細な例については、複数の MATLAB 関数を使用するマクロの作成を参照してください。
Function Wizard のインストール
MATLAB Compiler で生成されたアドインをインストールする場合と同じ方法で、Excel に Function Wizard をインストールします。手順については、Excel アドインのインストールを参照してください。
Function Wizard のアドイン ファイルは matlabroot\toolbox\matlabxl\matlabxl\win64\FunctionWizard.xlaC:\Program Files\MATLAB\R2025b\toolbox\matlabxl\matlabxl\win64\FunctionWizard.xla をインストールします。このファイルには、[ホーム] タブに [Function Wizard] アドイン ボタンを追加するマクロが含まれています。
Function Wizard の起動
メモ
Function Wizard アドインを使用するには、まず MATLAB ユーティリティ ライブラリを登録する必要があります。詳細については、MATLAB ユーティリティ ライブラリの登録を参照してください。
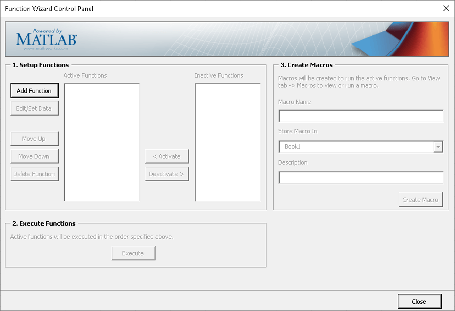
[ホーム] タブの [Function Wizard] アドイン ボタンをクリックして、Function Wizard を起動します。ウィザードが初期化されると、コントロール パネルが開きます。
Function Wizard Control Panel
メモ
[Function Wizard Control Panel] を閉じても、Excel セッションで追加した MATLAB の関数または引数は削除されません。ただし、Excel を閉じると Function Wizard がリセットされます。
実行する関数の定義
Function Wizard を使用して、実行する MATLAB 関数を追加します。
[Function Wizard Control Panel] の [Setup Functions] エリアで [Add Function] をクリックします。[MATLAB Components] ダイアログ ボックスが開きます。
[Available Components] エリアのドロップダウン ボックスからコンポーネントの名前を選択します。
メモ
使用するコンポーネントがリストされていない場合は、その DLL が登録されていることを確認します。詳細については、アドインと COM コンポーネントの登録を参照してください。
[Functions for Class
classname] から実行する関数を選択します。[Add Function] をクリックします。[Function Properties] ダイアログ ボックスが開きます。
ヒント
[Function Properties] ダイアログ ボックスの [Function Syntax and Help] エリアに、MATLAB 関数内の最初のヘルプ テキスト行が表示されます。この説明は、MATLAB 関数に馴染みのないエンド ユーザーに役立つことがあります。
入力引数の定義
メモ
Function Wizard は現在、MATLAB の sparse または complex のデータ型をサポートしていません。
[Function Properties] ダイアログ ボックスから、MATLAB 関数の入力引数のプロパティを定義します。
[Input] タブで、[Set Input Data] をクリックします。[Input Data for
x] ダイアログ ボックスが開きます。ここで、xは入力変数の名前です。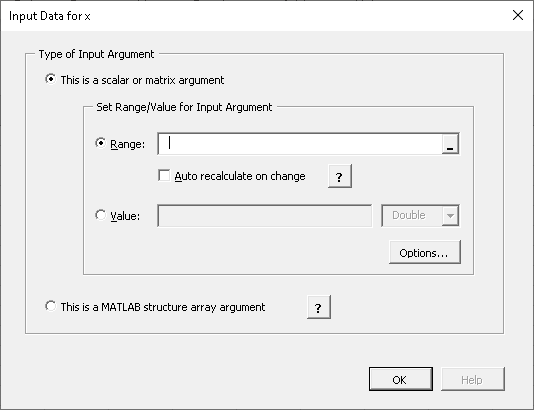
入力引数のタイプを選択します。
[Range] はワークシートのセル範囲を参照します。テキスト ボックス、または右側にあるセル選択のボタンをクリックしてから、入力データを含むセルをワークシートから選択します。
スプレッドシートのデータが変わるたびに自動的に再計算するには、[Auto recalculate on change] オプションをオンにします。
注意
矢印キーを使用して範囲を選択しないでください。矢印キーを使用して範囲を選択する必要がある場合は、Microsoft のサイトhttps://mskb.pkisolutions.com/kb/291110から必要な修正を適用してください。
[Value] はテキスト ボックスに指定した値を参照します。入力データとして使用する値を入力し、ドロップダウン リストからデータ型を選択します。
引数が "構造体配列" ("struct") を参照している場合は、[This is a MATLAB structure array argument] を選択して [OK] をクリックします。[Input Data for Structure Array Argument
x] ダイアログ ボックスが開きます。
Function Wizard は、入力と出力の両方について、1 次元と 2 次元の構造体配列をサポートしています。
struct 配列引数をもつ関数をデプロイする場合は、どの引数が構造体配列であるかをエンド ユーザーに通知し、構造体配列のフィールド名をリストします。
[Structure Array Organization] エリアで、[Element by Element Organization] または [Plane Organization] を選択します。詳細については、データを構造体配列へ整理する方法を参照してください。
各 struct 配列引数にフィールドを追加するには、[Add Field] をクリックします。[Field for Structure Array Argument] ダイアログ ボックスが開きます。

[Name] フィールドで、構造体配列のフィールド名を定義します。指定する名前は、MATLAB 関数内の構造体配列のフィールド名と厳密に一致しなければなりません。
[Range] フィールドに、構造体配列のフィールドの範囲を指定します。
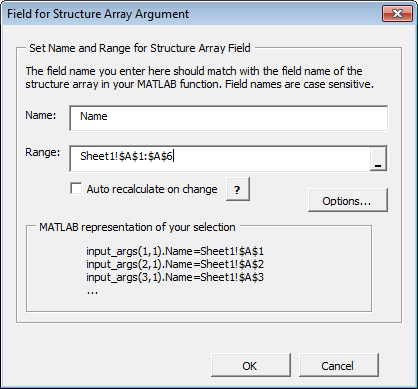
[OK] をクリックしてフィールドを追加します。
構造体配列の各フィールドについて、上記の手順を繰り返します。
この入力データについて、日付の形式や空のセルの処理方法を指定するには、[Input Data for
x] ダイアログ ボックスの [Options] をクリックします。[Input Conversion Options] ダイアログ ボックスが開きます。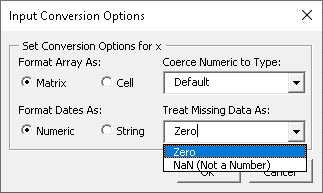
[Coerce Numeric to Type] ドロップダウン リストから、数値データの変換を制御するデータ型を選択します。
[Treat Missing Data As] ドロップダウン リストから、[Zero] または [NaN (Not a Number)] のいずれかを指定します。
[OK] をクリックして入力引数を追加します。
関数の各入力引数について、手順を繰り返します。
出力引数の定義
[Function Properties] ダイアログ ボックスで、MATLAB 関数の出力引数のプロパティを定義します。
[Output] タブで、[Set Output Data] をクリックします。[Output Data for
y] ダイアログ ボックスが表示されます。ここで、yは出力変数の名前です。
ヒント
また、MATLAB Compiler が出力データを自動的にサイズ変更 ([Auto Resize])、転置 ([Transpose])、あるいは日付形式で出力 ([Output as date]) するように指定できます。
[Range] フィールドに、出力引数の型をセル範囲または MATLAB 構造体配列のいずれかとして指定します。
構造体配列の引数の使用に関する詳細については、入力引数の定義を参照してください。
Excel による出力セル数の動的な選択を有効にするには、[Auto Resize] をオンにします (まだオンになっていない場合。)
[Output Data for
y] ダイアログ ボックスで [Done] をクリックして、出力引数を追加します。
MATLAB 関数の各出力引数について、手順を繰り返します。
メモ
複数の出力をもつ関数を取り扱う場合は、各引数について個別の出力範囲を定義します。
マクロのテストと保存
MATLAB 関数への引数の追加が完了したら、[Function Properties] ダイアログ ボックスで [Done] をクリックします。[Function Wizard Control Panel] の [Active Functions] リストに関数が表示されます。リストから関数を選択して [Edit/Set Data] をクリックすることにより、いつでも関数の引数を編集できます。
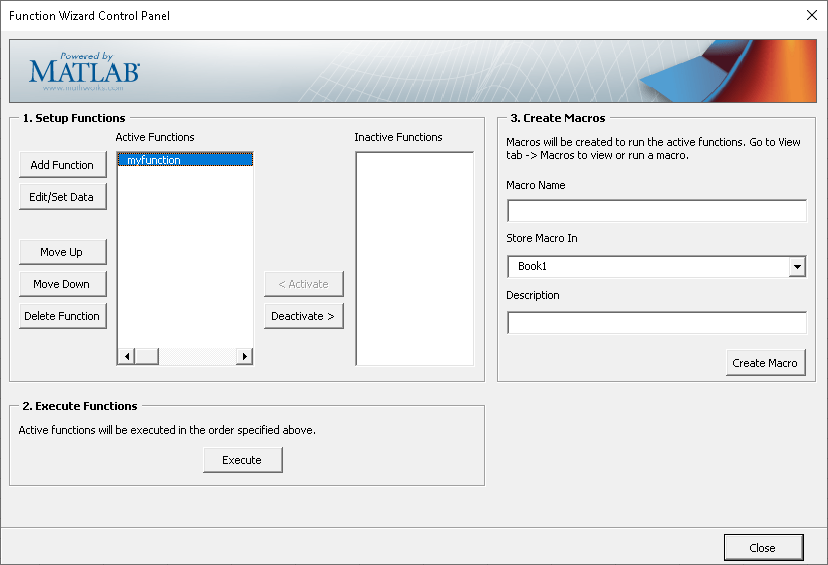
マクロをテストするには、[Execute Functions] エリアの [Execute] をクリックします。現在の Excel シートで、出力引数として定義されたセル範囲に関数の出力が自動的に入力されます。
マクロを保存するには、次を行います。
[Function Wizard Control Panel] の [Create Macros] エリアにある [Macro Name] フィールドにマクロの名前を入力します。
[Store Macro In] ドロップダウン リストから、マクロを保存するワークブックを選択します。
[Description] フィールドにマクロの機能の簡単な説明を入力します。
[Create Macro] をクリックします。
マクロが作成され、ターゲットの Excel ワークブックに保存されます。
Excel でのマクロの実行
Microsoft Excel でマクロを実行します。
ヒント
Microsoft Excel でマクロを実行する前に、適切なセキュリティ設定を有効にしなければならない場合があります。マクロの権限と関連するエラー メッセージの詳細については、エラーと解決策を参照してください。
Microsoft Excel で、[ビュー]、[マクロ]、[マクロの表示] をクリックします。
[マクロ名] ドロップダウン リストからマクロを選択します。
[実行] をクリックします。出力引数として定義されたセル範囲に、関数の出力が自動的に入力されます。
Microsoft Visual Basic コードへのアクセス (オプション)
マクロ内の Visual Basic コードへのアクセスやその変更を行うには、次を行います。
Excel の [開発] タブで、[Visual Basic] をクリックするか、ALT + F11 キーを押して [Visual Basic エディター] を開きます。古いバージョンの Excel では、これは [ツール] 、 [マクロ] 、 [Visual Basic エディター] にある可能性があります。
[プロジェクト - VBAProject] ウィンドウで、
VBAProject (Book1)をダブルクリックして展開します。Modulesフォルダーを展開し、Matlab Macrosモジュールをダブルクリックします。このプロジェクトのコードを含む Visual Basic コード ウィンドウが開きます。
ボタンへのマクロのマッピング (オプション)
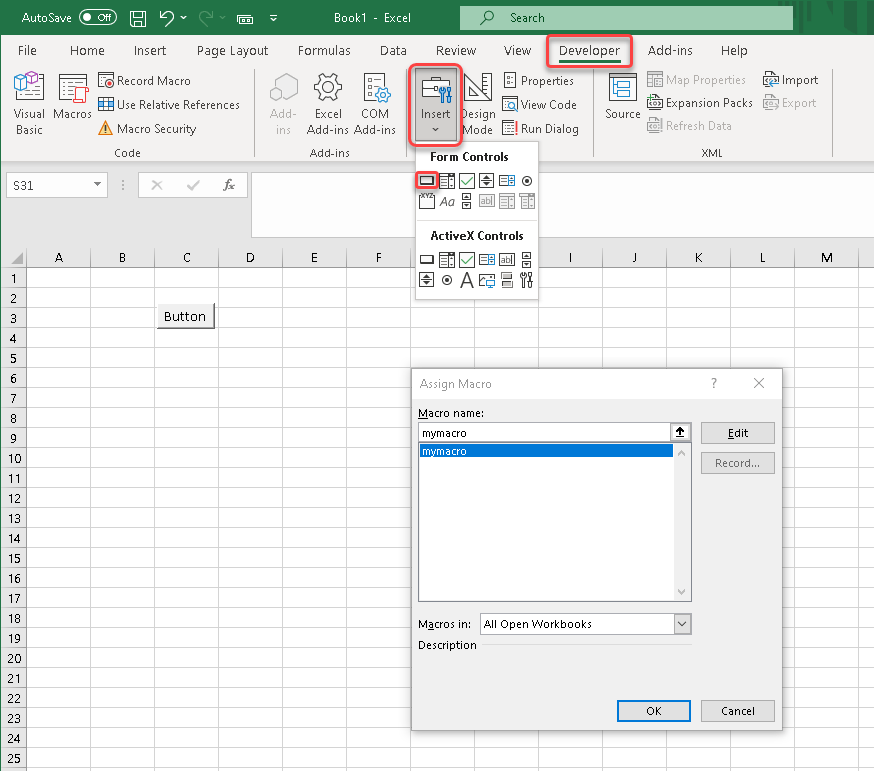
ボタンをクリックしたときにマクロを実行するフォーム コントロール ボタンを作成するには、次を行います。
Excel の [開発] タブで、[挿入] をクリックします。
[フォーム コントロール] メニューから、[ボタン (フォーム コントロール)] アイコンを選択します。
ヒント
[フォーム コントロール] メニューにマウスを合わせると、さまざまなコントロールのラベルを表示できます。
[マクロの登録] ダイアログ ボックスでボタンを割り当てるマクロを選択し、[OK] をクリックします。
