スキッドパッド テストの生成
この例では、Formula Student、Formula SAE、その他の組織が主催している国際的な学生コンペティションのイベントと同様の、スキッドパッド テストのシミュレーションを行う方法を説明します。これらのイベントでは、学生チームは各自が設計した車両の作成、操縦、プレゼンテーションを行います。
この例では、車両は停止状態から始動し、その後に次を行います。
加速してコースに進入する
時計回りに 2 ラップを完走する
ステアリング方向を反転する
反時計回りに 2 ラップを完走する
コースから出て、ブレーキをかけて停止する

モデルを開く
このスキッドパッド モデルには、参照パス、ドライバー、車両、および可視化支援が含まれています。モデルを開くには、次のコマンドを使用します。
open_system('vdynblksskidpad');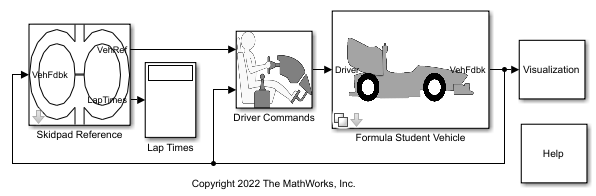
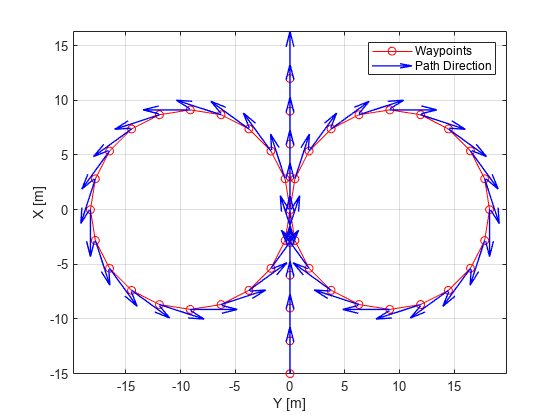
モデルのワークスペース変数 TrackPoints には、参照姿勢の定義に使用する参照ウェイポイントが含まれます。これらを編集したり、独自のウェイポイントに置き換えたりすることができます。ウェイポイントをプロットするには、次のコードを使用します。
mdlWks = get_param('vdynblksskidpad','ModelWorkspace');
TrackPoints = evalin(mdlWks,'TrackPoints');
figure;
plot(TrackPoints(:,2),TrackPoints(:,1),'ro-');
hold on;
arrowLen = 1.5;
quiver(TrackPoints(:,2),TrackPoints(:,1), ...
    arrowLen*sin(TrackPoints(:,3)),arrowLen*cos(TrackPoints(:,3)), ...
    'b','LineWidth',1,'MaxHeadSize',arrowLen);
box on;
grid on;
xlabel('Y [m]');
ylabel('X [m]');
axis equal;
legend('Waypoints','Path Direction');
既定の車両パスは、コースの中心線に従います。車両は複数のラップを完走するため、いくつかの "X"、"Y" の点が重複します。Skidpad Reference サブシステムにあるブロックを使用して、ラップ数やスケーリングなどの係数を変更できます。また、パス ポイントを使用して実験を行い、ラップ タイムを改善することもできます。
モデルのシミュレーション
モデルを実行して、コースを完走する車両を観測するには、次のコマンドを使用します。
sim('vdynblksskidpad');既定では、シミュレーション中に、車両の参照パスとシミュレートされるパスを示す上面図と加速度図が開き、更新されます。ラップ タイムが推定され、Display ブロックによりモデルの最上位に順番に表示されます。
車両タイプとパワートレインの変更
次のいずれかのバリアント サブシステムを使用するように Formula Student Vehicle ブロックを構成します。
Simulink Physics
Game Engine Physics
いずれかのバリアント サブシステムを選択するには、Formula Student Vehicle ブロックをダブルクリックして [Vehicle Type] ドロップダウン リストから選択するか、set_param 関数を使用してプログラムで車両タイプを設定します。
Simulink Physics
Simulink Physics バリアントでは、パワートレインと最終駆動のバリアント サブシステムをもつ 7DOF の車両を使用します。既定では、パワートレインのバリアント サブシステムは理想的な内燃エンジンを使用するように構成され、最終駆動のバリアント サブシステムは後輪駆動を使用するように構成されています。powertrainType と finalDriveType を設定して構成を切り替えることができます。トルク ベクタリングを備えた理想的なインホイール電気自動車に切り替えるには、powertrainType を EV、finalDriveType を Direct に設定します。この構成では、マッピングされた電気モーターとギアボックスのセットがモデルで使用されます。
powertrainType ='EV4EM' finalDriveType =
'Direct' set_param('vdynblksskidpad/Formula Student Vehicle/Simulink Physics - 7DOF/Powertrain & Driveline/Powertrain','LabelModeActiveChoice',powertrainType); set_param('vdynblksskidpad/Formula Student Vehicle/Simulink Physics - 7DOF/Powertrain & Driveline/Final Drive','LabelModeActiveChoice',finalDriveType); if strcmp(powertrainType,'EV') set_param('vdynblksskidpad/Driver Commands/Linear Predictive Driver','shftType','Reverse, Neutral, Drive') else set_param('vdynblksskidpad/Driver Commands/Linear Predictive Driver','shftType','Scheduled') end
シミュレーションを実行します。
ev4EM = sim('vdynblksskidpad');Simulink データ インスペクターで、それぞれのモーターの電流を時間の関数としてプロットできるほか、出力のトルクと回転数 (RPM 単位) もプロットできます。
plot(find(ev4EM.logsout,"BattCurr"));
plot(find(ev4EM.logsout,"MtrTrq"));
plot(find(ev4EM.logsout,"<MtrSpd>"));
Game Engine Physics
Game Engine Physics バリアント サブシステムでは、内燃エンジンについては類似のパラメーターがありますが、シミュレーション 3D インターフェイスを使用して、事前定義された車両テンプレートの動的応答を構成して解きます。2 つの設定ではタイヤ モデルとソルバー エンジンが異なるため、結果に差異があることが予測されます。モデル化と可視化での優先事項に基づき設定を選択します。
vehType を Game Engine Physics に設定して、ゲーム エンジンの車両を使用するようにモデルを構成します。
vehType = 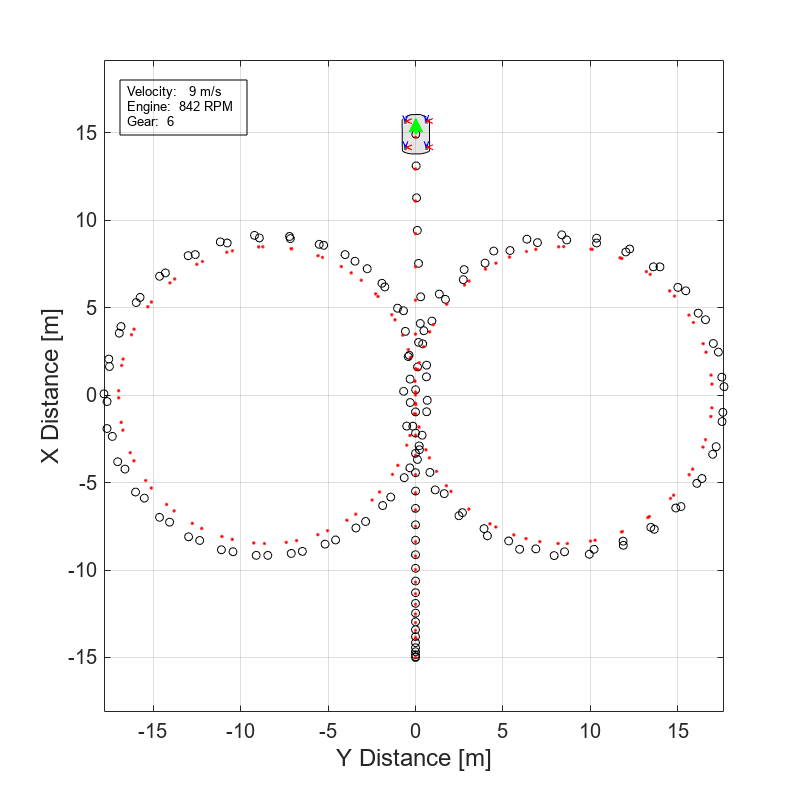 "Game Engine Physics"
3D 可視化の有効化
3D 可視化環境でモデルを実行する前に、Unreal Engine シミュレーション環境の要件と制限を確認します。
3D 可視化を有効にするには、次のコマンドを使用します。
set_param('vdynblksskidpad/Visualization/3D Visualization', ...
    'engine3D','Enabled - Simulink 3D Vehicle');
コーンとスキッドパッド車線境界線テクスチャを追加します。
set_param('vdynblksskidpad/Visualization/3D Visualization','conesOn','on');
タイヤの力、車両、および動力伝達装置の注釈を含めます。
set_param('vdynblksskidpad/Visualization/3D Visualization','annotOn','on');
シミュレーションを実行します。
sim('vdynblksskidpad');3D 可視化エンジンを使用する場合、Simulink 3D Animation でコーンを配置して、スキッドパッド コースをより細かく定義できます。Simulation 3D Actor ブロックの初期化スクリプトにより、コーンの配置を調整できます。詳細については、Place Cones on Formula Student Skidpad Track Using Simulation 3D Animation Functionsを参照してください。
参考
Simulation 3D Physics Vehicle | Simulation 3D Actor (Simulink 3D Animation)