自動マルチ GPU のサポートを使用したネットワークの学習
この例では、自動並列サポートを使用した深層学習のために、ローカル マシンで複数の GPU を使用する方法を説明します。
多くの場合、深層学習ネットワークの学習には数時間または数日かかります。並列計算を使用すると、複数の GPU を使用して学習を高速化できます。並列学習のオプションの詳細については、Scale Up Deep Learning in Parallel, on GPUs, and in the Cloudを参照してください。
要件
この例を実行する前に、CIFAR-10 データ セットをローカル マシンにダウンロードしなければなりません。CIFAR-10 データ セットをダウンロードするには、この例にサポート ファイルとして添付されている関数 downloadCIFARToFolders を使用します。このファイルにアクセスするには、例をライブ スクリプトとして開きます。以下のコードは、データ セットを現在のディレクトリにダウンロードします。CIFAR-10 のローカル コピーを既にもっている場合は、この節をスキップできます。
directory = pwd;
[locationCifar10Train,locationCifar10Test] = downloadCIFARToFolders(directory);
Downloading CIFAR-10 data set...done.
Copying CIFAR-10 to folders...done.
データ セットの読み込み
imageDatastore オブジェクトを使用して、学習データ セットとテスト データ セットを読み込み、クラスの名前を抽出します。以下のコードで、データストアの場所がローカル マシンの CIFAR-10 を指していることを確認します。
imdsTrain = imageDatastore(locationCifar10Train, ...
 IncludeSubfolders=true, ...
 LabelSource="foldernames");

imdsTest = imageDatastore(locationCifar10Test, ...
 IncludeSubfolders=true, ...
 LabelSource="foldernames");

classNames = categories(imdsTrain.Labels);
拡張イメージ データを使用してネットワークに学習させるために、augmentedImageDatastore オブジェクトを作成します。ランダムな平行移動と水平方向の反転を使用します。データ拡張は、ネットワークで過適合が発生したり、学習イメージの正確な詳細が記憶されたりすることを防止するのに役立ちます。
imageSize = [32 32 3];
pixelRange = [-4 4];
imageAugmenter = imageDataAugmenter( ...
    RandXReflection=true, ...
    RandXTranslation=pixelRange, ...
    RandYTranslation=pixelRange);
augmentedImdsTrain = augmentedImageDatastore(imageSize,imdsTrain, ...
    DataAugmentation=imageAugmenter);
ネットワーク アーキテクチャと学習オプションの定義
CIFAR-10 データ セット用のネットワーク アーキテクチャを定義します。コードを簡略化するために、入力を畳み込む畳み込みブロックを使用します。プーリング層は空間次元をダウンサンプリングします。
blockDepth = 4; % blockDepth controls the depth of a convolutional block.
netWidth = 32; % netWidth controls the number of filters in a convolutional block.

layers = [
    imageInputLayer(imageSize)

    convolutionalBlock(netWidth,blockDepth)
    maxPooling2dLayer(2,Stride=2)
    convolutionalBlock(2*netWidth,blockDepth)
    maxPooling2dLayer(2,Stride=2)
    convolutionalBlock(4*netWidth,blockDepth)
    averagePooling2dLayer(8)

    fullyConnectedLayer(10)
    softmaxLayer];
学習オプションを指定します。
実行環境を "
multi-gpu"に設定し、複数の GPU を使用してネットワークに学習させます。複数の GPU を使用する場合、利用可能な計算リソースを増やします。GPU の数でミニバッチ サイズをスケールアップし、各 GPU での作業負荷を一定に維持します。この例では、GPU の数は 2 です。ミニバッチ サイズに応じて学習率をスケーリングします。GPU での学習には、Parallel Computing Toolbox™ ライセンスとサポートされている GPU デバイスが必要です。サポートされているデバイスの詳細については、GPU 計算の要件 (Parallel Computing Toolbox)を参照してください。学習率のスケジュールを使用して、学習の進行に応じて学習率を下げます。
学習の進行状況プロットをオンにして、学習中に、可視化されたフィードバックを取得します。
numGPUs = gpuDeviceCount("available")numGPUs = 4
miniBatchSize = 256*numGPUs;
initialLearnRate = 1e-1*miniBatchSize/256;

options = trainingOptions("sgdm", ...
    ExecutionEnvironment="multi-gpu", ... % Turn on automatic multi-gpu support.
    InitialLearnRate=initialLearnRate, ... % Set the initial learning rate.
    MiniBatchSize=miniBatchSize, ... % Set the MiniBatchSize.
    Verbose=false, ... % Do not send command line output.
    Plots="training-progress", ... % Turn on the training progress plot.
    Metrics="accuracy", ...
    L2Regularization=1e-10, ...
    MaxEpochs=60, ...
    Shuffle="every-epoch", ...
    ValidationData=imdsTest, ...
    ValidationFrequency=floor(4*numel(imdsTrain.Files)/miniBatchSize), ...
    LearnRateSchedule="piecewise", ...
    LearnRateDropFactor=0.1, ...
    LearnRateDropPeriod=50);
ネットワークの学習
関数trainnetを使用してニューラル ネットワークに学習させます。分類には、クロスエントロピー損失を使用します。
net = trainnet(augmentedImdsTrain,layers,"crossentropy",options);Starting parallel pool (parpool) using the 'Processes' profile ... Connected to parallel pool with 4 workers.

自動マルチ GPU のサポートにより、複数の GPU を利用してネットワークの学習を高速化できます。以下のプロットは、4 つの NVIDIA© TITAN Xp GPU が搭載された Linux マシンにおいて、GPU の数が増えるにつれて全体的な学習時間が短縮される様子を示しています。

ネットワークのテスト
テスト イメージを分類します。複数の GPU を使用して予測を行うには、データを分割し、並列で予測を行います。
テスト データ セットに含まれている観測値の合計数を判定します。
numObservations = numel(imdsTest.Files);
この例では、学習時に開いた並列プールを使用できます。並列プールが開いていない場合は、GPU の数と同じ数のワーカーをもつ並列プールを開きます。
parpool("Processes",numGPUs);
parfor (Parallel Computing Toolbox)を使用して、イメージの分類を並列で実行します。parfor ループは for ループに似ていますが、ループの反復処理は、並列プール内のワーカー上で並列実行されます。parfor ループの内部は次のようになります。
subset関数を使用して、テスト データのサブセットを選択します。サブセットに対して
minibatchpredict関数を使用し、予測を行います。関数minibatchpredictは利用可能な GPU がある場合に自動的にそれを使用します。そうでない場合、関数は CPU を使用します。scores2label関数を使用して、予測スコアをラベルに変換します。
parfor idx = 1:numGPUs
	startIdx = ceil((idx-1)*numObservations/numGPUs) + 1;
    endIdx = ceil(idx*numObservations/numGPUs);
    subdsTest = subset(imdsTest,startIdx:endIdx);

    scoresTest = minibatchpredict(net,subdsTest,MiniBatchSize=miniBatchSize);
    YTest{idx} = scores2label(scoresTest,classNames);
end
予測を single 型の配列に収集します。
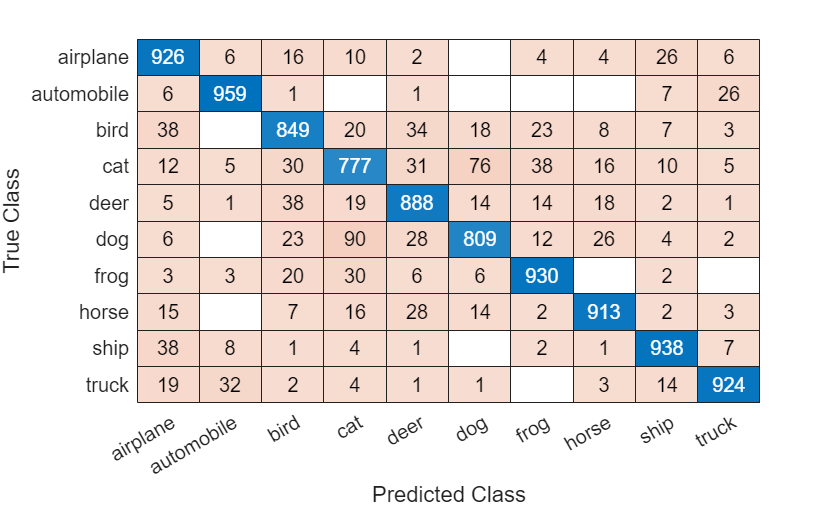
YTest = cat(1,YTest{:});ネットワークの精度を判定し、混同チャートをプロットします。
accuracy = sum(YTest==imdsTest.Labels)/numel(imdsTest.Labels)
accuracy =
0.8853
confusionchart(imdsTest.Labels,YTest)
補助関数の定義
ネットワーク アーキテクチャで畳み込みブロックを作成する関数を定義します。
function layers = convolutionalBlock(numFilters,numConvLayers)
    layers = [
        convolution2dLayer(3,numFilters,Padding="same")
        batchNormalizationLayer
        reluLayer];

    layers = repmat(layers,numConvLayers,1);
end
参考
trainnet | trainingOptions | dlnetwork | imageDatastore