Apply Stereotypes to Extend Model Elements
Use profiles to add properties to components, ports, and connectors in System Composer™. Import an existing profile, apply stereotypes, and add property values.
In this topic, you will learn how to:
Import profiles into a model or a dictionary.
Apply a stereotype to a model element and add property values.
Remove stereotypes using the Property Inspector.
For information about profile terminology, see Extend System Composer Language Elements Using Profiles.
Import Profiles
The Profile
Editor is independent from the model that opens it, so you must explicitly
import a new profile into a model. First save the profile with an
.xml extension. Then navigate to Modeling > Profiles > Apply To
![]() . Select the profile to import. An architecture model
can have multiple profiles.
. Select the profile to import. An architecture model
can have multiple profiles.
Alternatively, open the Profile Editor by navigating to Modeling > Profile Editor. You can import a profile into any open dictionaries, referenced dictionaries, or models.

To import profiles into Simulink® models linked to a reference component, open the Profile Editor and select the linked model from Apply To.
Note
You can apply stereotypes and assign interfaces to ports for a System Composer component linked to a Simulink behavior model or subsystem through a Reference Component block. You must import the profile into the model or subsystem before applying a stereotype to the component. You must import a data dictionary into the model or subsystem before assigning interfaces to ports.
To manage your imported profiles, open the Manage
Profiles tool by navigating to Modeling > Profiles > Manage
![]() .
.

Click the Manage Stereotype Order button to change the priority order of stereotypes on imported profiles. For more information, see Change Stereotype Order Using Manage Profiles Tool.
Apply Stereotypes
Apply stereotypes to architecture model elements using the Property Inspector or the Apply Stereotypes dialog box. You can also quick-insert a new component with the stereotype applied. For information about applying stereotypes to functions in software architectures, see Define and Apply Stereotypes to Functions.
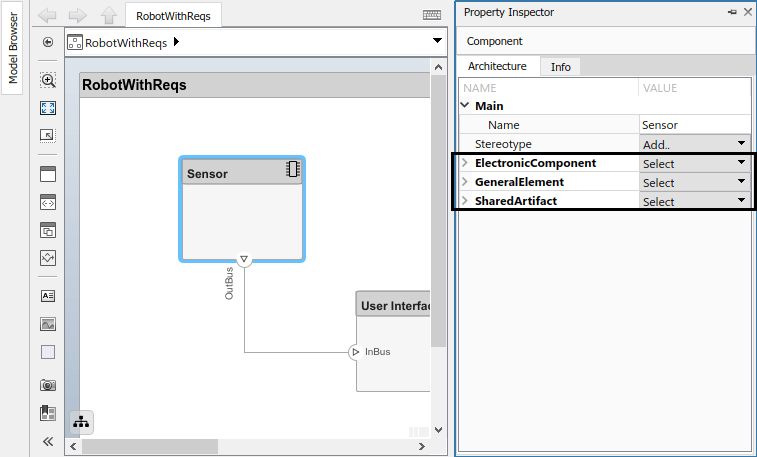
Apply Stereotype Using Property Inspector
Once the profile is available in the model, open the Property Inspector by navigating to Modeling > Property Inspector. Select a model element.

Select the stereotype from the Stereotype list. Only the stereotypes that apply to the current element type (for example, a port) are available for selection. If no stereotype exists, you can use the <new / edit> option to open the Profile Editor and create one.

When you apply a stereotype to an element, a new set of properties appears in the Property Inspector under the name of the stereotype. To edit the properties, expand this set.

You can set multiple stereotypes for each element.
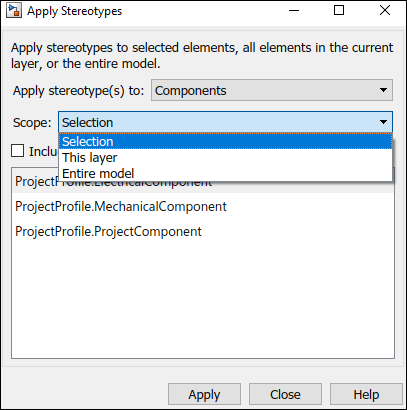
Batch-Apply Stereotypes
You can also apply component, port, connector, and interface stereotypes to all
applicable elements at the same architecture level. Navigate to Modeling > Apply Stereotypes. In the Apply Stereotypes dialog box, from Apply
stereotype(s) to, select Top-level
architecture, All elements,
Components, Ports,
Connectors, or Interfaces.
Note
The Interfaces option is available only if you
have defined interfaces in the Interface Editor. For more information, see Create Interfaces.

You can also apply stereotypes by selecting a single model element. From
Scope, select Selection,
This layer, or Entire
model.
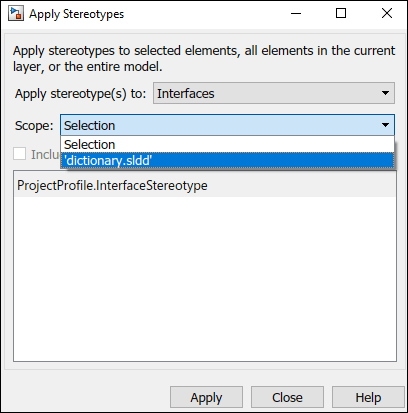
You can also apply stereotypes to data interfaces or value types. When interfaces
are locally defined and you select one or more interfaces in the Interface Editor, the options for Scope are
Selection and Local
interfaces.

When interfaces are stored and shared across a data dictionary and you select one
or more interfaces in the Interface Editor, the options for Scope are
Selection, the name of the dictionary and the
referenced dictionary currently in use.
Note
For the stereotypes to display for interfaces in a dictionary or referenced dictionary, in the Apply Stereotypes dialog box, you must import the profile into the dictionary.
Quick-Insert New Component with Stereotype Applied
You can also create a new component with an applied stereotype by using the
quick-insert menu accessed by double-clicking anywhere on the model canvas. Select
the stereotype as a fully qualified name, for example,
Profile.Stereotype. A component with that stereotype is
created.

Change Stereotypes
To change stereotypes applied to model elements on the model canvas, first create a hierarchy of stereotypes. Assign a Base Stereotype value in the Profile Editor for a given stereotype to inherit all properties from the base stereotype. For more information about base stereotypes, see Extend Stereotypes. Expand your hierarchy as needed to add detail to your system description.
Use the System Composer model canvas context menu and Property Inspector to change stereotypes, without changing shared property values. You can move one level up and down the stereotype hierarchy defined in the Profile Editor. For more information about changing stereotypes, see Change Stereotypes Based on Stereotype Hierarchy in Portable Blender Architecture.
You can also use the changeStereotype function to change stereotypes you assign to model
elements by any number of levels up and down the hierarchy.
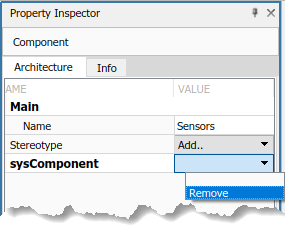
Remove Stereotypes
If you no longer need a stereotype for an element, you can remove it using the Property Inspector. Next to the stereotype, click Select, then select Remove.
Note
When your profile is not synchronized with your Reference Component block, you might be prompted to fix it in the Diagnostic Viewer. This option removes stereotypes that do not match the definition in the reference component.
See Also
Tools
- Profile Editor | Manage Profiles | Requirements Manager (Requirements Toolbox)