Use Back-to-Back Test to Verify Generated Code from an Earlier Release
If you generate code for an atomic subsystem and verify it by using software-in-the-loop (SIL) or processor-in-the-loop (PIL) simulation in an earlier release, you can verify that the model works as expected in the current release by using the verified code and running a back-to-back test. Back-to-back tests, also known as equivalence tests, show that two implementations or environments produce functionally identical outputs when subjected to the same input conditions.
Note
You cannot use generated code for test harnesses for whole models or Model blocks.
You can use generated code from only the previous eight releases. Trying to use generated code from earlier releases produces an error.
You must have an Embedded Coder® license to use generated code from an earlier release.
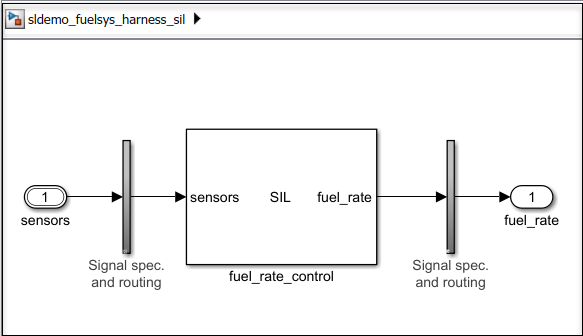
Create Test Harness for SIL or PIL Simulation Mode
To use generated code from an earlier release, create a test harness for SIL or PIL verification mode:
Right-click the atomic subsystem in your model for which you generated code in the earlier release.
Add the Simulink® Test™ app options to the context menu by pointing to Select Apps and clicking the Simulink Test button
 .
.In the Simulink Test section of the context menu, click the Add Test Harness button
 .
.In the Create Test Harness dialog box, specify a name for the harness.
In the Advanced Properties tab, set the harness as a SIL or PIL harness:
Change Verification Mode to
Software-in-the-Loop (SIL)orProcessor-in-the-Loop (PIL).Select Use existing generated code to create SIL/PIL block.
In the Build folder box, enter the full path to the folder that contains the generated code from the earlier release. For example, if the system target file for the generated code is
ert.tlc, enter the folder name that ends with "_ert_rtw".
Click OK.
Select the output signal for the subsystem in the test harness. Point to the ellipsis to open the action bar and select Log Selected Signal.
Close the harness.
To programmatically create a SIL or PIL test harness that uses the previously
generated code, use the ExistingBuildFolder property of
sltest.harness.create or sltest.harness.set to
specify the location of the generated code.
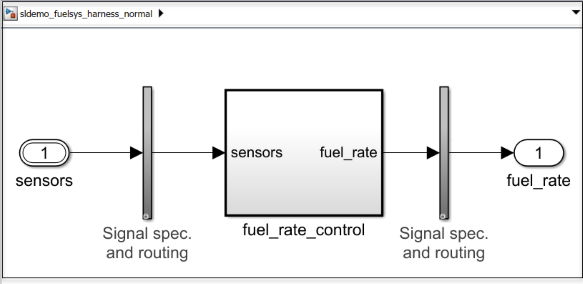
Create Test Harness for Normal Simulation Mode
To test the behavior of the atomic subsystem in the current release, create a test harness for normal simulation mode:
Right-click the atomic subsystem in your model for which you generated code in the earlier release. Then, in the Simulink Test section, click the Add Test Harness button
.In the Create Test Harness dialog box, specify a name for the harness.
Click OK.
Select the output signal for the subsystem in the test harness. Point to the ellipsis to open the action bar and select Log Selected Signal.
Close the harness.
Create Back-to-Back Test Case
To verify that the model in the current release continues to work as expected, create a back-to-back test that compares the normal mode simulation in the current release and the SIL or PIL mode simulation from the earlier release:
Open the Test Manager.
sltest.testmanager.view
Click New > Test File. Name the test file
Back-to-Back Test.Delete
New Test Case 1.Select
New Test Suite 1and click New > Test Case > Equivalence Test.Change the name of
New Test Case 1toSIL equivalence test case.In the Simulation 1 section, under System Under Test:
Specify the name of the model.
Under Test Harness, specify the test harness for normal simulation.
Under Simulation Settings and Release Overrides, specify the Start Time and Stop Time. Leave Select releases for simulation as
Current.
In the Simulation 2 section, under System Under Test:
Specify the name of the model.
Under Test Harness, specify the test harness that uses the generated code.
Under Simulation Settings and Release Overrides, specify the Start Time and Stop Time. Leave Select releases for simulation as
Current.
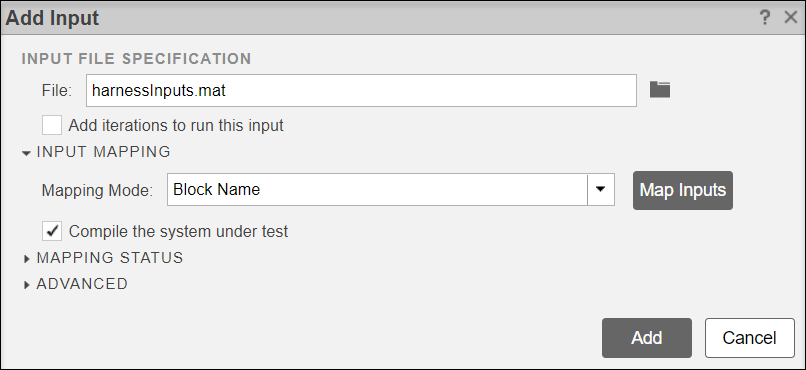
In both the Simulation 1 and Simulation 2 sections, in the Inputs sections, specify the inputs that you used to verify the system in the previous release. For example, if you saved the inputs in a MAT file:
Under the External Inputs table, click Add.
In the Add Input dialog box, specify the name of the file.
Click Map Inputs, then click Add.
Run Test and Analyze Results
To verify that the results in the current release match the results produced by the code generated in the earlier release, run the back-to-back test by clicking Run. To view the output and analyze the test results, in the Results and Artifacts pane, expand Equivalence Criteria Result.

The upper plot shows the output of both test harnesses. The lower plot shows the difference between these outputs. If the difference is zero, the code verified in the earlier release and the simulation in the current release produce the same results.
See Also
sltest.harness.create | sltest.harness.set | crossReleaseImport (Embedded Coder)