Interface with C++ Classes Using C Function Block
You can use code that you specify in a C Function block to interface directly with C++ classes defined in your custom code.
Instantiate an object of a C++ class defined in your custom code.
Read and write to public data members of the class object.
Call public class methods (class member functions) of the object.
This example demonstrates the use of a C Function block with C++ classes.
Create Source Code Files
Before introducing your custom code, select C++ as the custom code language. In the
Model Configuration Parameters, on the Simulation Target pane, set
Language to C++.
Next, create the header and source files. Create a header file named
adder.h that defines a C++ class adder and its
methods.
#ifndef _ADDER
#define _ADDER

class adder {
private:
    int int_state;
public:
    adder();
    adder(int init_value);
    int add_one(int increment);
    int get_val();
};

#endif /* _ADDER */
Implement the class and its methods in a source file. Create the source file,
adder.cpp.
#include "adder.h"

adder::adder()
{
    int_state = 0;
}

adder::adder(int init_value)
{
    int_state = init_value;
}

int adder::add_one(int increment)
{
    int_state += increment;
    return int_state;
}

int adder::get_val()
{
    return int_state;
}
Configure the C Function Block
To instantiate an object of a C++ class defined in the custom code in your model:
Add a C Function block to the model.
Double-click the C Function block to open the block dialog box.
Define the header and source files:
Define header file — In the block dialog box, under the Simulation tab, expand the Simulation Custom Code section and define the header file in the Headers field by entering
#include
                      "adder.h"
. For more information, see Specify Custom Code. (since R2024a)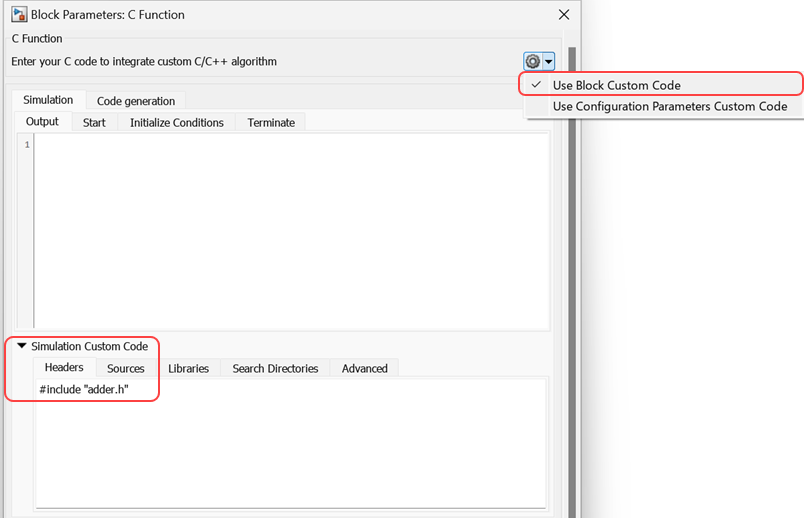
Before R2024a: Click the Configure custom code settings button
 to open the Configuration Parameters window. In
the Simulation Target pane, in the Code
information tab, under the Include headers
pane, define the header file by entering
 #include "adder.h". For more information, see Specify and Configure Custom C/C++ Code.Define source file — In the block dialog box, under the Simulation tab, expand the Simulation Custom Code section and define the source file in the Sources field by entering
adder.cpp. For more information, see Specify Custom Code. (since R2024a)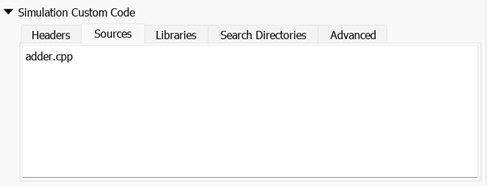
Before R2024a: Click the Configure custom code settings button
 to open the Configuration Parameters window. In
the Code Information tab, under the Source
files pane, define the source file by entering
adder.cpp. For more information, see Specify and Configure Custom C/C++ Code.
For more information, see Enter the External Code into Simulink.
In the Simulink® Editor, on the Modeling tab, click Model Settings to open the Configuration Parameters dialog box. In the Simulation Target pane, set the Language to
C++.Define the class object. In the block dialog box, in the Ports and Parameters table, click Add to define a symbol.
Specify the symbol properties. Set the Scope of the symbol to
Persistent, set the name of the object in the Name column, set the symbol Type by using the following format:Class: <ClassName>
For example, this Ports and Parameters table instantiates an object
of the adder class named obj. The
int_state property of obj is initialized with the
default value of zero.
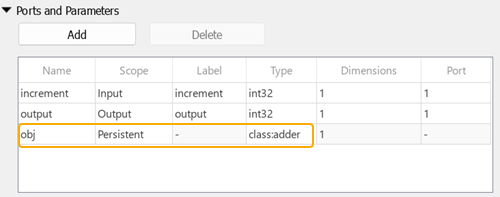
To pass arguments to the class constructor, enclose those arguments in parentheses, separated by commas, following the symbol name in the Name field.
ObjectName(Argument1,Argument2,...)
Parameter and Constant symbols
defined in the Ports and Parameters table for the argument
specification. Such expressions can use C syntax, including expressions like
&p and p[0], where p is a
Parameter or Constant symbol.
Overloaded class constructors are supported. For example, this Ports and Parameters table instantiates an object
of the adder class named obj, and initializes the
int_state property of the object with the value of
10 by passing that value to the constructor.
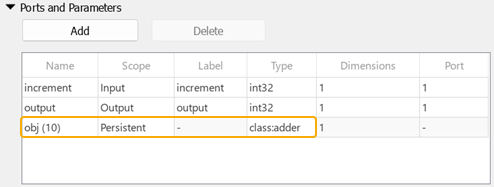
Simulink creates the object at the start of simulation and destroys the object when
simulation ends. During simulation, the object is cached in the block as a block state like
other Persistent symbols. You cannot explicitly call the class
constructor or destructor from the block.
You can use the Output and other code in the block to read and write to public data members of the class object and to call public class methods of the object. Overloaded methods and operators are supported, as are static methods. Default arguments for class methods are supported if they are specified in the header file that defines the class.
Use Start or Initialize Conditions to initialize data members and Terminate to call cleanup methods. The class object is created before the Start code executes and is destroyed after the Terminate code executes. To access properties and methods, use dot notation.
PropertyValue = ClassObjectName.PropertyName;
ReturnValue = ClassObjectName.MethodName(Arguments);
add_one method of
obj. The block passes the block input as an argument to the method and
sends the return value to the block output.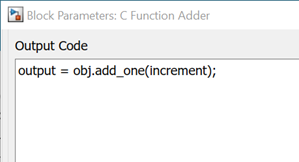
If a class constructor or other class method receives multidimensional array data from Simulink or passes such data to Simulink, specify the correct array layout to achieve the intended results, as for any other custom code function. For more information, see Specify Row-Major and Column-Major Array Layouts in Custom Code.
Limitations
The C Function block cannot be used to directly access all C++ classes. These types of classes are not supported:
Template classes
Standard Template Library (STL) containers
Additionally, these actions are not supported in the code in the C Function block:
Copying and assigning a class object
Accessing class static data members
Accessing multidimensional data members of a class
If the class type is not supported, you can still access C++ class data members and methods indirectly by writing and calling a C-style wrapper function. For more information, see Call C++ Class Methods Using C-Style Wrapper Function from C Function Block.