Customize MATLAB System Icon and Dialog Box Using Mask Editor
The Mask Editor provides a robust way to customize the icon and dialog box of a MATLAB System block. When you use the Mask Editor, all mask definitions are stored in an auxiliary XML file resulting in faster loading of the System object™.
To use the Mask Editor, you first need to define block parameters in a MATLAB System class file. When you launch the Mask Editor for the MATLAB System block, the block parameters are automatically populated using the MATLAB System class file. You can modify these block parameters using the Mask Editor. However, you cannot directly add or remove block parameters from the Mask Editor.
The Mask Editor enables you to:
Enhance a dialog box using a rich set of graphical controls such as panels, group boxes, buttons, list controls, images, or hyperlinks. You can change the values, positions, layouts, prompts, and properties of existing block parameters, or change the type of a block parameter to a compatible type.
Customize a block icon with descriptive text, images, equations, and graphics using the Graphical Icon Editor and mask drawing commands.
Create and Customize MATLAB System Icon and Dialog Box Using Mask Editor
This example shows you how to create and customize the icon and dialog box of a MATLAB System block MaskEditorDialogBox using the Mask Editor.
Create MATLAB System Dialog Box
To create a MATLAB System dialog box:
1. Initialize the block dialog parameters in the MATLAB System class file MaskEditorDialogBox.m.
classdef MaskEditorDialogBox < MaskEditorDialogBoxBase
    % Initialize block dialog parameters.

    % Public, tunable properties
    properties
        %InitialTestValue Initial Test Value
        InitialTestValue = 0

        %FinalTestValue Final Test Value
        FinalTestValue = 32

        UpperLimit = 10

        %LowerLimit Lower Limit
        LowerLimit = 4
    end

    % Public Nontunable
    properties(Nontunable)
        %IC1 First initial condition
        IC1 = 0

        %IC2 Second initial condition
        IC2 = 40

        %IC3 Third initial condition
        IC3 = 100

        %EnforceUpperLimit Enforce Upper Limit
        EnforceUpperLimit (1,1) logical = true

       %Table
          tab { matlab.system.display.Table(tab,...
              {"matlab.system.display.internal.TableColumn('Type','edit','Evaluate',true)", ...
             "matlab.system.display.internal.TableColumn('Type','popup','TypeOptions',{'M','F'})", ...
             "matlab.system.display.internal.TableColumn('Type','edit')",...
             "matlab.system.display.internal.TableColumn('Type','checkbox')"})}...
             = table({'John';'Jacqueline';'Jose'},{'M';'F';'M'},[45;32;34],...
             {'true';'false';'true'},'VariableNames',{'Name','Gender','Age','Vote'})
         p1{mustBePositive} = 10;

       %Sample Rate
        sampleRate {matlab.system.presetMember(sampleRate,{'base','high'},{'double','single'})} = 'base'
    end
end
2. In a Simulink® model, add a Create Custom Blocks Using MATLAB System Block and System objects and associate the MATLAB System class file MaskEditorDialogBox.m with the block.
 load_system("MaskEditorBlockDialog")
 open_system("MaskEditorBlockDialog/MATLAB System")

3. Open the Mask Editor using any of these methods:
Right-click the MATLAB System block and click Edit Mask.
Select the MATLAB System block and press Ctrl + M.
Select System Block > Launch Mask Editor in the MATLAB® Editor of the MATLAB System class file.
When you open the Mask Editor, the block parameters initialized in the MaskEditorDialogBox class are used to create a system mask of the MATLAB System block.
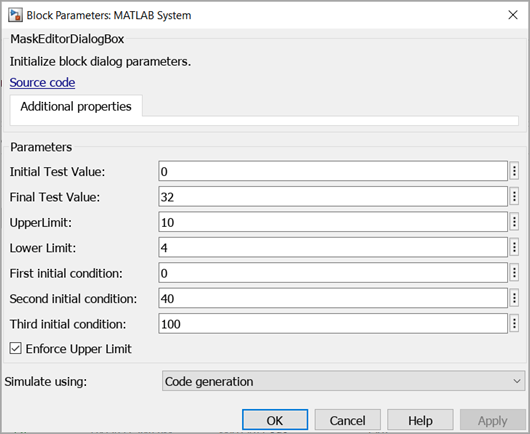
4. Preview the mask dialog box. Click Preview Dialog in the Parameters & Dialog tab of the Mask Editor.

When you preview the mask dialog box, an auxiliary XML file MaskEditorDialogBox_mask.xml is created to store the mask definitions. This XML file is stored in the same location as the MATLAB System class file.
Create Custom Table and Combo Box for System Dialog Box
You can customize custom table properties of the system dialog box using matlab.system.display.Table.
Define the column type as either edit, popup, or checkbox. For popup column type, use the Type Options property to list the popup options. Additionally, you can set the Evaluate option for the column to evaluate any MATLAB expression present in the cell.
   tab { matlab.system.display.Table(tab,...
             {"matlab.system.display.internal.TableColumn('Type','edit','Evaluate',true)", ...
            "matlab.system.display.internal.TableColumn('Type','popup','TypeOptions',{'M','F'})", ...
            "matlab.system.display.internal.TableColumn('Type','edit')",...
            "matlab.system.display.internal.TableColumn('Type','checkbox')"})}...
            = table({'John';'Jacqueline';'Jose'},{'M';'F';'M'},[45;32;34],...
            {'true';'false';'true'},'VariableNames',{'Name','Gender','Age','Vote'})
        p1{mustBePositive} = 10;

Use the matlab.system.presetMember class to create a combo box with base and high as the Sample Rate, and with base as the default value.
sampleRate {matlab.system.presetMember(sampleRate,{'base','high'},{'double','single'})} = 'base'

Note: The custom table and combo box parameters are nontunable.
Customize MATLAB System Dialog Box
You can change the appearance of the dialog box from the Mask Editor in one of these ways:
Create a new tab container and tabs.
Move parameters between containers.
Change the layout of parameters.
Change parameter type.
Change prompts of parameters and containers.
Move parameters from base class to derived class
You can also add other display widgets such as panels, group boxes, buttons, list controls, images, or hyperlinks in a dialog box. These widgets are not dependent on block parameters. Additionally you can write callback code for the parameters defined in the system class file. See Organize Mask Initialization and Callbacks in a MATLAB File for more information.
Create New Tab Container and Tabs
To create a new tab container:
1. Go to the Parameters & Dialog tab of the Mask Editor.
2. Drag the Tab Container control from the Container pane on the left to the location above the row with the prompt Parameters.

3. A new row is created above the Parameters group box container. Enter the Name as SectionGroup0_Section1.
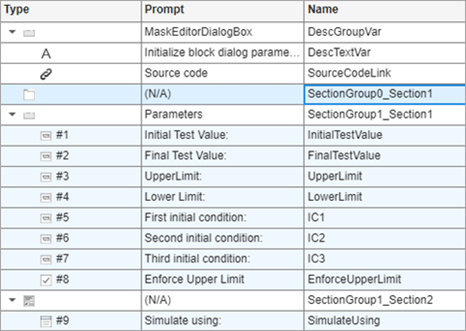
4. To create a tab, click the newly created row and select Tab in the Container pane on the left. A new tab is created within the tab container. In the Prompt column, enter Additional properties and in the Name column, enter Tab1.
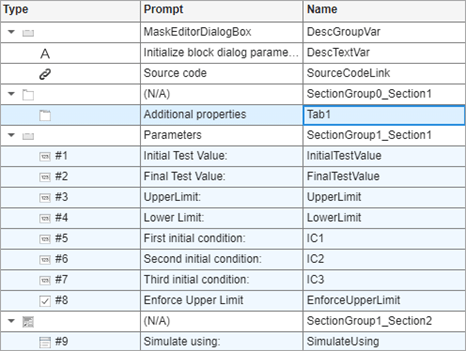
Click Save Mask and check the dialog box of the block. A new tab with the title Additional properties is created.
Move Parameters Between Containers
In the Mask Editor, move the existing parameter named EnforceUpperLimit to the newly created tab.
Drag the row containing the parameter EnforceUpperLimit to the Tab1 row. Click Save Mask.

This action causes the Enforce Upper Limit check box to move to the Additional properties tab in the dialog box.

Change Layout of Parameters
In the Mask Editor, change the layout for the IC3 text box. For example, you can change the location of the prompt that displays in the dialog box.
1. Click the IC3 row in the Parameters and Dialog pane.
2. In the Property Editor pane on the right, in the Layout section, select top from the Prompt Location list.

3. Click Save Mask. In the dialog box, the prompt Third initial condition moves from the left to the top of the text box.

In order to modify the layout of a parameter within a container, select the container row and clear the Align Prompts check box.
Change Parameter Type
In the Mask Editor, change the Type property of the IC3 from edit to dial, and define the minimum and maximum values.
1. Click the IC3 row in the Parameters & Dialog pane.
2. In the Property Editor pane on the right, under Properties, select dial from the Type property list.
3. Enter 0 as the Minimum value and 100 as the Maximum value. Select Linear from the Scale drop-down list. Click Save Mask.
In the dialog box, the IC3 text box is converted to a dial with the specified minimum and maximum values. Choose the required value by rotating the dial.

Change Parameter and Container Prompts
In the Mask Editor, change the prompts of the tab named Additional properties and parameter named IC3.
1. Double-click the text in the Prompt column of the Tab1 row in the Parameters & Dialog pane. Edit the prompt text to Additional conditions.
2. Double-click the text in the Prompt column of the IC3 row in the Parameters & Dialog pane. Edit the prompt text to Third condition:.
3. Click Save Mask. New prompts display in the dialog box.

Move Parameters from Base Class to Derived Class
The Base Class Property parameter enables you to access available parameters from the system object file and to modify the mask by adding parameters inherited from the base class. You can add or remove parameters from the base class, but it is not possible to remove parameters from the derived class. Because of this, the necessary parameters and functionality from the derived class are retained in the mask.
To add parameters from the base class:
1. In the Mask Editor, in the Parameter section of the Controls pane, click Base Class Property.
2. In the Add base class property to mask pane, select the parameters and click Add.

3. Click Save Mask. The base class properties appears in the mask dialog box.

Customize MATLAB System Block Icon
In the Mask Editor, go to the Icon pane to customize the block icon. The Mask Editor displays the values of the block icon that are initialized in the MATLAB System class file. If no values are initialized, the class name is used as the display text for the block icon.
![]()
You have the option to edit the icon using either the Graphical Editor or mask drawing commands. For more information on icon authoring, see Icon Pane.
To customize the block icon, use the list of drawing commands available in the left pane of the Mask Editor. Selecting a drawing command adds the corresponding code in the editor. Here are some ways you can use the drawing commands to edit the icon:
Text — In the Mask Editor, change the input argument of the
disp()function to'New \n Counter'.Color — In the left pane of the Mask Editor, click
color()to add the function in the editor. Enter'blue'as the function input argument. This function changes the drawing color of subsequent mask icon drawing commands.Port Labels — Similarly, use the
port_labelfunction to specify the input and output ports of the System object. Because you previously used thecolorfunction, the port labels will appear in a blue color.
You can also use the Properties available in the right pane to specify attributes such as block frame, icon transparency, icon units, and other settings of the mask icon.
Click Save Mask in the Mask Editor toolstrip. On saving, the Preview section of Icon pane displays the edited block mask icon.
![]()
Migrate Existing Icon and Dialog Box Customizations to Mask Editor
If you previously customized the mask of a MATLAB System block using a MATLAB System class file, then you can migrate these mask definitions to an auxiliary XML file.
1. Launch the Mask Editor. The Mask Editor displays the most recent dialog controls, layout, icon, and ports programmed using the getPropertyGroupsImpl, getInputNamesImpl, getOutputNamesImpl, and getIconImpl methods in the MATLAB System class file.
You must manually move any dynamic icon customizations implemented using logical or conditional programming in the getIconImpl method to the icon code section of the Mask Editor.
2. If you need to modify the mask, use the Mask Editor to edit the existing icon and dialog box customizations.
3. To complete the migration, click Save Mask. On saving the mask:
All icon and dialog box customizations of the MATLAB System block are moved to a new XML file with the name format sysObjectName_mask
.xml. This XML file is stored in the same location as the MATLAB System class file.
The
getPropertyGroupsImpl,getInputNamesImpl,getOutputNamesImpl, andgetIconImplmethods are removed from the MATLAB System class file.
The next time you invoke the Mask Editor, Simulink loads all the icon and dialog box customizations from the sysObjectName_mask.xml file.
Note: When you modify a MATLAB System class associated with a MATLAB System block, such as adding or removing properties or changing parameters from tunable to nontunable, its corresponding mask definition XML file can become outdated. In such cases, a notification banner prompts you to open the Mask Editor and perform Save Mask. This action updates the mask definition in the XML file.