slReloadStudioConfig
Description
slReloadStudioConfig
reloads the Simulink® studio configuration. Use this function after you create or make changes to
JSON files that define context menu customizations.
Note
To view the error and warning messages for the JSON files, run the
slReloadStudioConfig function, enter developer mode using the
slUIDeveloperMode function, and then open a context menu containing your
customization. When you right-click to open the context menu, the software outputs the
error and warning messages in the MATLAB® Command Window.
slReloadStudioConfig( reloads only
the resources at the specified location. Use this syntax to speed up the reload process when
you only want to reload a specific set of customizations.resources)
Examples
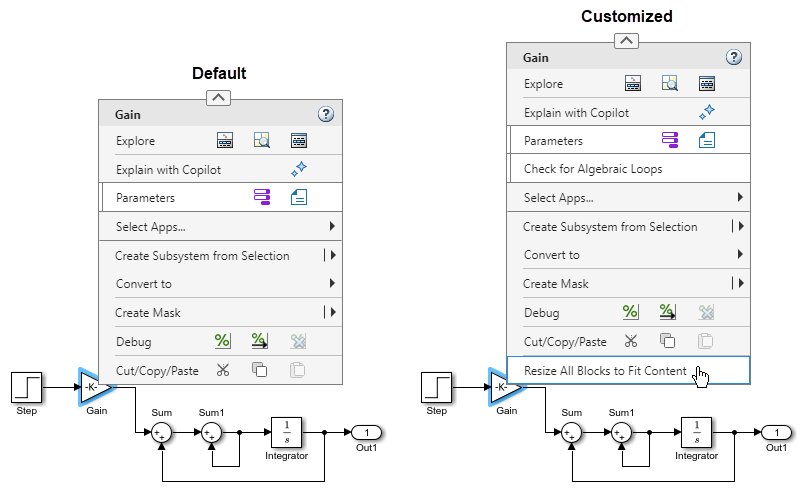
This example shows how to add one menu item to the Simulink® context menu at the bottom of the Focus menu and one to the bottom of the Post-Focus menu. The menu item at the bottom of the Focus menu checks for algebraic loops in the model. This menu item is labeled Check for Algebraic Loops, and is always visible when you open the context menu. The menu item at the bottom of the Post-Focus menu resizes all blocks in the model that display values on their icons to be large enough to show the full value. This menu item is labeled Resize All Blocks to Fit Content, and is only visible when you right-click a block.
The example folder contains the files you need to create this customization. To view the files or to try out the finished customization, run this script. Running the script opens the files and a Simulink model. To see the customized context menus, in the model that opens, right-click the model canvas or a model element. To see the menu item labeled Resize All Blocks to Fit Content, right-click a block.
Define Customization
To write the extensions.json file that defines the customization, take these steps.
1. Not all widgets can be added to the container that you are extending directly. You might have to add containers that house the widgets within the container that you are extending. To determine whether you need to add such containers and which ones, use the container hierarchy in Simulink Context Menu Architecture. Start at the container you are extending and work your way down the hierarchy to the widget you want to add.
In this example, you are adding widgets to the Focus and Post-Focus menus. To do so, extend the RichMenu widget. Working your way down the container hierarchy, you can see that you must take these steps:
Add two
MenuSectionwidgets to theRichMenuwidget.Add a
MenuItemwidget to eachMenuSectionwidget.
2. In a text editor, open a blank file for writing the JSON declarations. To avoid formatting mistakes, consider writing the declarations in an IDE (Integrated Development Environment) equipped to help you format code, for example, Visual Studio® Code.
3. Save the file with the name extensions.json in a folder named resources.
4. To ensure backwards compatibility of your JSON declarations in future releases, add a version number. In the extensions.json file, specify the current version as a JSON key-value pair. Set the key to "version", and the value to the version number specified as a JSON string. The current version number is 1.0.
"mw.schemaVersion": "1.0.0",
5. Specify the extension points at which you want to add widgets. For each of those extension points, create a JSON key-value pair. Set the key to the JSON name of the extension point, specified as a JSON string. Set the value to an empty JSON array literal.
"mw.schemaVersion": "1.0.0",

"mw.simulink.editor.contextMenu.focusMenu:after":[]

"mw.simulink.editor.contextMenu.postFocusMenu:after":[]
6. For each widget you want to add, create a JSON key-value pair. Set the key to a descriptive name for the widget in the myCustomMenus namespace. Set the value to an empty JSON object literal. In a later step, you use these key-value pairs to specify the properties of the new widgets.
"mw.schemaVersion": "1.0.0",

"mw.simulink.editor.contextMenu.focusMenu:after":[]

"mw.simulink.editor.contextMenu.postFocusMenu:after":[]

"myCustomMenus.myMenuSection1":{}

"myCustomMenus.myMenuItem1":{}

"myCustomMenus.myMenuSection2":{}

"myCustomMenus.myMenuItem2":{}
7. In the extension point key-value pairs, specify which widgets to add at each extension point. Only specify widgets that you are directly adding to the container you are extending. If those widgets are containers, do not list their contents.
In this example, you are extending the RichMenu widget by adding one MenuItem widget to the bottom of the Focus menu, and one MenuItem widget to the bottom of the PostFocus menu. In the JSON array literal of the Focus menu extension point, enter a reference to the JSON object literal of the myCustomMenus.myMenuSection1 widget. In the JSON array literal of the Post-Focus menu extension point, enter a reference to the JSON object literal of the myCustomMenus.myMenuSection2 widget. Specify the references as JSON strings containing the hash tag symbol # followed by the keys of the referenced JSON object literals. The references must be enclosed in brackets, even when you only specify one.
"mw.schemaVersion": "1.0.0",

"mw.simulink.editor.contextMenu.focusMenu:after":
    ["#myCustomMenus.myMenuSection1"],

"mw.simulink.editor.contextMenu.postFocusMenu:after":
    ["#myCustomMenus.myMenuSection2"],

"myCustomMenus.myMenuSection1":{}

"myCustomMenus.myMenuItem1":{}

"myCustomMenus.myMenuSection2":{}

"myCustomMenus.myMenuItem2":{}
Do not specify any of the other widgets you are adding in the extension point key-value pairs because those widgets are all contents of the MenuSection widgets. The only widgets you are adding directly to the RichMenu widget are the MenuSection widgets.
8. Specify the properties of the widgets you are adding to the context menu. For each widget, fill in the empty JSON object literal with JSON key-value pairs that set the widget properties. For a list of available properties for each type of widget, see the Properties section on this page.You must specify the values of all properties marked as required. Set the value of the action property to an empty JSON string for now.
For the MenuSection widgets:
Specify that you are adding a menu section by setting the
typevalue to"MenuSection".Specify that you are adding the menu item named
myCustomMenus.myMenuItem1to the menu section namedmyCustomMenus.myMenuSection1. Set theitemsvalue to a reference to the JSON object literal of the menu item:"#myCustomMenus.myMenuItem1".Specify that you are adding the menu item named
#myCustomMenus.myMenuItem2to the menu section namedmyCustomMenus.myMenuSection2. Set theitemsvalue to a reference to the JSON object literal of the menu item:"#myCustomMenus.myMenuItem2".
For the MenuItem widgets:
Specify that you are adding a menu item by setting the
typevalue to"MenuItem".Set the
actionvalue to an empty JSON string for now.The context menu only displays the menu item named
myCustomMenus.myMenuSection2when you right-click a block. In the JSON object literal of the menu item namedmyCustomMenus.myMenuSection2, set thewhenvalue to"selection.isAnyBlock". For morewhenvalues, see the Properties section on this page.The context menu always displays the menu item named
myCustomMenus.myMenuSection1. This is the default behavior. Do not specify awhenvalue for the menu item namedmyCustomMenus.myMenuSection1.
"mw.schemaVersion": "1.0.0",

"mw.simulink.editor.contextMenu.focusMenu:after":
["#myCustomMenus.myMenuSection1"]

"mw.simulink.editor.contextMenu.postFocusMenu:after":
["#myCustomMenus.myMenuSection2"]

"myCustomMenus.myMenuSection1":
{
    "type": "MenuSection",
    "items": ["#myCustomMenus.myMenuItem1"]
}

"myCustomMenus.myMenuItem1":
{
    "type": "MenuItem",
    "action": ""
}

"myCustomMenus.myMenuSection2":
{
    "type": "MenuSection",
    "items": ["#myCustomMenus.myMenuItem2"]
}

"myCustomMenus.myMenuItem2":
{
    "type": "MenuItem",
    "action": "",
    "when": "selection.isAnyBlock"
}
9. Specify widget actions.
Write a MATLAB function named check that checks for algebraic loops in the model, and a MATLAB function named resize that resizes all blocks in the model that display values on their icons to be large enough to show the full value. The functions must accept a callback info object as their sole input argument.
The example folder contains both function files. To view the files, enter these commands in the MATLAB Command Window.
open("addMenuItems/check")
open("addMenuItems/resize")
For each action that you want the menu items to take, create a JSON key-value pair. Set the key to a descriptive name for the action in the myCustomMenus namespace. Set the value to a JSON object literal that defines the action. The Properties section on this page lists the available action properties.
Set the keys to
myCustomMenus.checkForAlgLoopsandmyCustomMenus.resizeBlocks, respectively.In the JSON object literals, set the
typevalue to"Action".To specify the button tooltip, set the
descriptionvalue to"Check current system for algebraic loops"and"Resize all blocks in current system to fit values displayed on block icons", respectively.Set the
callbackvalue to the MATLAB function name, specified as a JSON string. The string must be a valid input to thefevalfunction.
"myCustomMenus.checkForAlgLoops":
{
    "type": "Action",
    "text": "Check for Algebraic Loops",
    "description": "Check current system for algebraic loops",
    "callback": "check"
}
In the JSON object literal of each menu item, set the action value to a reference to the JSON object literal of the action that you want the menu item to take: "#myCustomMenus.checkForAlgLoops" and "#myCustomMenus.resizeBlocks", respectively.
"myCustomMenus.myMenuItem1":
{
    "type": "MenuItem",
    "action": "#myCustomMenus.checkForAlgLoops"
}
10. Add commas between the JSON array literals and object literals, and enclose the JSON declarations in the file in a pair of braces.
The example folder contains a resources folder with the completed extensions.json file. To view the file, enter this command in the MATLAB Command Window.
open("addMenuItems/resources/extensions.json");Implement Customization
To implement the customization, take these steps.
1. Add the parent folder of the resources folder to the MATLAB path. If any callback functions are located outside of the parent folder, add the functions to the MATLAB path as well.
myResources = pwd + "/addMenuItems";
addpath(myResources)
2. Reload the Simulink studio configuration.
slReloadStudioConfig(myResources)
3. To view the customizations, open a Simulink model. For example, open the model included with this example named CustomMenuItemModel. Then, right-click the model canvas or a model element such as a block. To turn the CustomMenuItemModel model into an algebraic loop, uncomment the Sum blocks.
open_system("addMenuItems/CustomMenuItemModel.slx")Warning: The Simulink Preference values for either the 'CacheFolder' or 'CodeGenFolder' are folders which no longer exist. This can occur if either of the folders is deleted after the preference is set. To fix this problem open the Simulink Preferences and specify existing folders for both 'CacheFolder' and 'CodeGenFolder'. The 'CacheFolder' and 'CodeGenFolder' values for this session will revert to 'pwd'.
Input Arguments
Version History
Introduced in R2026a