Python パッケージ コンパイラ アプリを使用した Python パッケージの作成
R2026bサポートされるプラットフォーム: Windows®、Linux®、Mac
この例では、Python パッケージ コンパイラ アプリを使用して、複数の MATLAB® 関数を Python® パッケージにパッケージ化する方法を示します。Python アプリケーションで、四角形からデータを計算するパッケージを呼び出すことができます。
R2025a より前: ライブラリ コンパイラ アプリを使用した Python アプリケーションの作成 (R2024b)に示すように、ライブラリ コンパイラを使用して Python パッケージを作成します。
前提条件
Python パッケージを生成するため、および Python アプリケーションを実行するためのシステム要件を満たしていることを確認します。詳細については、MATLAB Compiler SDK の Python のターゲットの要件を参照してください。
アプリケーションの実行には、エンド ユーザーによる MATLAB Runtime のインストールが必要です。詳細については、MATLAB Runtime のダウンロードとインストールを参照してください。
テスト目的で、MATLAB Runtime の代わりに MATLAB のインストールを使用することができます。
デプロイ可能な MATLAB コードの記述
MATLAB で、パッケージ化対象の MATLAB コードを調べます。この例では、matlabroot
| MATLAB 関数 | getPointCoordinates.m getRectangleArea.mgetRectangleCorners.m getRectangleHeight.mgetRectangleWidth.mmakePoint.mmakeRectangle.mPoint.mRectangle.mrectangleDemo.m |
| Python アプリケーション コード | rectangleDriver.py |
MATLAB コマンド プロンプトで、MATLAB に付属している rectangle フォルダーを作業フォルダーにコピーします。
copyfile(fullfile(matlabroot,"extern","examples", ...
    "compilersdk","python","rectangle"),"rectangle");
新しい rectangle フォルダーに移動します。
MATLAB 関数 rectangleDemo.m を確認します。
この関数は、2 つの Point オブジェクトを作成し、それらの点を頂点として使用して Rectangle オブジェクトを作成してから、その四角形に関するデータを計算して表示します。
function rectangleDemo()
    % RECTANGLEDEMO Construct a rectangle and print information about it

    pointZeroZero = makePoint(0, 0);
    pointThreeFour = makePoint(3, 4);
    rectA = makeRectangle(pointZeroZero, pointThreeFour);
    corners = getRectangleCorners(rectA);
    showPointCoordinates(corners.upperLeft, 'Upper left-hand corner');
    showPointCoordinates(corners.lowerLeft, 'Lower left-hand corner');
    showPointCoordinates(corners.upperRight, 'Upper right-hand corner');
    showPointCoordinates(corners.lowerRight, 'Lower right-hand corner');
    fprintf('Area: %.1f\n', area(rectA));
    fprintf('Height: %.1f\n', height(rectA));
    fprintf('Width: %.1f\n', width(rectA));
end

% This is an auxiliary function. It cannot be called outside rectangleDemo().
function showPointCoordinates(pt, desc)
    coordinates = getPointCoordinates(pt);
    fprintf('%s: (%.1f, %.1f)\n', desc, coordinates.X, coordinates.Y);
end
プロジェクトとコンパイラ タスクの作成
Python パッケージ コンパイラを使用して、関数のコンパイラ タスクを作成します。コンパイラ タスクを使用すると、特定のデプロイ ターゲット用のプロジェクトでファイルをコンパイルできます。
アプリを開くには、[アプリ] タブで、[アプリ] ギャラリーを展開します。[アプリケーションのデプロイ] セクションで、[Python パッケージ コンパイラ] をクリックします。
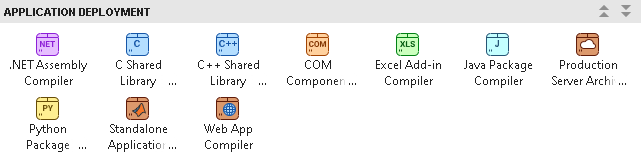
MATLAB コマンド ウィンドウで pythonPackageCompiler 関数を使用してアプリを開くこともできます。
アプリを開くと、[コンパイラ タスクを作成] ダイアログ ボックスに、新規または既存の MATLAB プロジェクトにタスクを追加するように求める指示が表示されます。この例では、[新規プロジェクトを開始し、コンパイラ タスクを作成] を選択し、rectangle フォルダーで RectangleProject という名前の新しいプロジェクトを作成します。MATLAB プロジェクトの作成と使用の詳細については、プロジェクトの作成を参照してください。
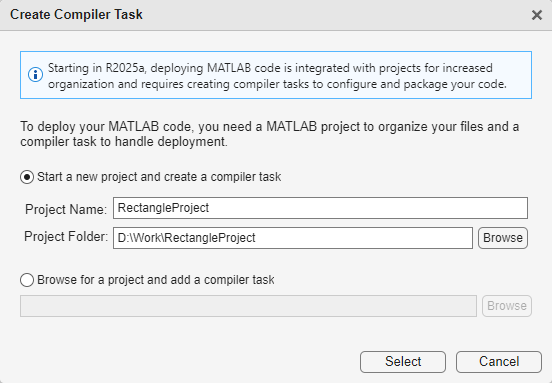
PythonPackage1 という名前の新しいコンパイラ タスクがエディターで開きます。別のデプロイ ターゲットのコードをコンパイルするには、コンパイラ タスク マネージャーを開くか、[タスクの管理] タブに移動して新しいコンパイラ タスクを作成します。
ビルド オプションの指定
パッケージ化の前に Python パッケージとそのインストーラーのオプションを指定して、ビルドとパッケージ化のプロセスをカスタマイズできます。たとえば、MATLAB コードを難読化したり、生成されたインストーラーに MATLAB Runtime を含める方法を指定したりできます。
この例では、コンパイラ タスクの [エクスポートする関数] セクションで、[ファイルの追加] をクリックして rectangle フォルダー内のすべての .m ファイルを選択します。[プロジェクト] パネルのファイルに Design と Exported Function File というラベルが付けられます。
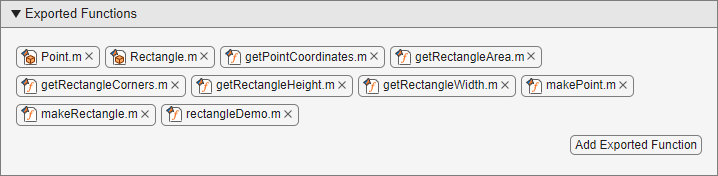
[パッケージ情報] セクションで、文字列 My Python Package を Python パッケージの名前である rectangleLib に置き換えます。
コードの表示と Python パッケージのパッケージ化
コンポーネントのビルドとパッケージ化に関する指示を含むコードを表示するには、[ビルド スクリプトのエクスポート] の横にある矢印をクリックし、[コードの表示] を選択します。右側のウィンドウに、ビルド オプションに対応する compiler.build.pythonPackage と compiler.package.installer 関数を含むデプロイ スクリプトが表示されます。[ビルド スクリプトのエクスポート] ボタンをクリックすると、このコードを MATLAB スクリプト ファイルに変換できます。生成されたビルド スクリプトを実行することは、[ビルドしてパッケージ化] ボタンをクリックすることと同等です。

インストーラーなしで Python パッケージを作成するには、[ビルドしてパッケージ化]、[ビルド] をクリックします。
コンパイラは、プロジェクト フォルダー内の <compiler_task_name>/outputbuild サブフォルダーには Python パッケージが含まれ、package サブフォルダーには Python パッケージのインストーラーと MATLAB Runtime が含まれます。生成ファイルの別の出力場所を選択するには、[出力場所] セクションのパスを更新します。
Python アプリケーションの作成と実行
Python パッケージを作成したら、パッケージ内の MATLAB 関数を呼び出す Python アプリケーションのソース コードを記述します。
この例の rectangleDriver.py という名前の Python アプリケーションは、rectangle フォルダーにあります。
rectangleDriver アプリケーションは次のアクションを実行します。
2 つのクラス
PyPointおよびPyRectangleを定義します。rectangleLib.initializeを使用してパッケージへのハンドルを作成します。パッケージのハンドルを
PyPointクラスとPyRectangleクラスに渡します。PyRectangleオブジェクトを作成し、その面積、高さ、幅を出力します。各頂点を
PyPointオブジェクトとして保存し、その座標を出力します。rectangleDemoMATLAB 関数を呼び出して、別の四角形からデータを作成して表示します。
MATLAB Compiler SDK™ によって生成された Python パッケージを実行するには、MATLAB Runtime をインストールする必要があります。詳細については、MATLAB Runtime のダウンロードとインストールを参照してください。[ビルドしてパッケージ化] を使用してインストーラーを作成した場合、そのインストーラーには、Python パッケージのコンパイルに使用された MATLAB のバージョンと一致するバージョンの MATLAB Runtime が含まれます。
メモ
アプリケーションを MATLAB Runtime ではなく MATLAB に対してテストするには、MATLAB コマンド ウィンドウで、以下のシステム コマンドの前に ! (感嘆符) 演算子を追加します。たとえば、!python rectangleDriver.py です。
システム コマンド プロンプト ウィンドウを開き、生成された Python インストール スクリプト setup.py が含まれているビルド出力フォルダーに移動します。
python コマンドを使用してパッケージをインストールします。詳細については、MATLAB Compiler SDK Python パッケージのインストールとインポートを参照してください。
python -m pip install .プロジェクトのルート フォルダーに移動し、rectangleDriver.py アプリケーションを実行します。
cd D:\Work\rectangle
python rectangleDriver.py
Initializing module and creating a rectangle with corners (-1, 2) and (5, 10)...
Area: 48.0
Height: 8.0
Width: 6.0
Corners:
    upperLeft: (-1.0, 2.0)
    lowerLeft: (-1.0, 10.0)
    upperRight: (5.0, 2.0)
    lowerRight: (5.0, 10.0)

Executing rectangleDemo...
Upper left-hand corner: (0.0, 0.0)
Lower left-hand corner: (0.0, 4.0)
Upper right-hand corner: (3.0, 0.0)
Lower right-hand corner: (3.0, 4.0)
Area: 12.0
Height: 4.0
Width: 3.0
メモ
macOS では、python の代わりに mwpython スクリプトを使用する必要があります。たとえば、mwpython rectangleDriver.py です。
mwpython スクリプトは matlabroot/binmatlabroot は MATLAB または MATLAB Runtime がインストールされている場所です。
参考
Python パッケージ コンパイラ | compiler.build.pythonPackage | mwpython

