Deploy LSTM PyTorch ExportedProgram Model on Host and STM32 Microcontroller
This example shows how to generate C code for a PyTorch ExportedProgram model. The example uses a sequence-to-sequence long short-term memory (LSTM) network that classifies human activities. This example requires Embedded Coder.
This example uses the accelerometer sensor data from a smartphone carried on the body and makes predictions on the activity of the wearer. Wearer movements are classified into one of five categories. For more information about the data set, see Sequence-to-Sequence Classification Using Deep Learning (Deep Learning Toolbox).
In this example, you:
Generate C code directly from an ExportedProgram model and make a time series prediction.
Run the generated code by calling the MEX function on the host computer.
Run the generated code by using processor-in-the-loop (PIL) simulation on an STM32 microcontroller.
You can also deploy this example on these supported STMicroelectronics Discovery boards that use ARM Cortex-M processors:
STM32F746G-Discovery
STM32F769I-Discovery
STM32F4-Discovery
Network Architecture
This example uses an LSTM network that classifies human activities into the categories of walking, dancing, running, sitting, standing, and walking.
The network was trained by using PyTorch and the data collected from a smartphone accelerometer worn on the body. The data set contains time series data where each sequence has three features that correspond to accelerometer readings in three different directions. Each training sample is standardized to 75 data points so the trained network can be deployed onto an STM32 microcontroller.
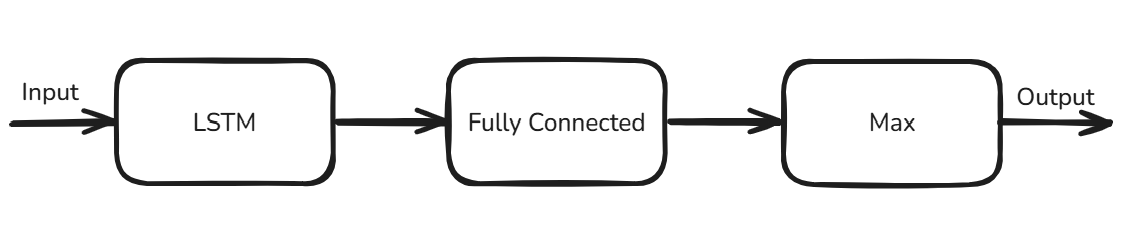
The network has these operators:
LSTM operator — The network uses this operator with 50 hidden units to learn the long-term dependencies in the sequence data.
Fully Connected operator — The network uses this operator to output raw predicting scores.
Max operator — The network uses this operator to convert the raw outputs to classifications of activities.
Load PyTorch Model in MATLAB
The network is exported to a PyTorch ExportedProgram object, then you save the ExportedProgram object into a file named LSTMSeqToSeqModel.pt2. For more information about how to export a PyTorch model, see torch.export.
Use the loadPyTorchExportedModel function to load LSTMSeqToSeqModel.pt2.
seqToSeqModel = loadPyTorchExportedProgram("LSTMSeqToSeqModel.pt2");Loading the model. This may take a few minutes.
Use the summary function to inspect the input and output specifications of the model.
summary(seqToSeqModel);
               Input Specifications
    __________________________________________

    Input    Name         Size          Type
    _____    _____    ____________    ________

      1      "in1"    "1 x 75 x 3"    "single"


             Output Specifications
    _______________________________________

    Output     Name       Size       Type
    ______    ______    ________    _______

      1       "out1"    "1 x 75"    "int32"
The mInvoke_torch Entry-Point Function
Examine the mInvoke_torch entry-point function. The mInvoke_torch function loads a PyTorch ExportedProgram model file by using the loadPyTorchExportedProgram function. It then performs prediction by passing the PyTorchExportedProgram object to the invoke function.
type("mInvoke_torch.m")function out = mInvoke_torch(network, input)
% Copyright 2025 The MathWorks, Inc.
%#codegen
persistent net;
if isempty(net)
net = loadPyTorchExportedProgram(network);
end
out = net.invoke(input);
end
Generate MEX Function
Next, generate a MEX function to run on your host platform.
Create a code configuration object for a MEX function.
cfg = coder.config("mex");Load the test data and prepare the input data.
load("HumanActivityTest.mat");
network = "LSTMSeqToSeqModel.pt2";
input = reshape(permute(single(XData{1}), [2 1]), [1, 75, 3]);
Use the codegen command to generate a MEX function.
codegen -config cfg -args {coder.Constant(network), input} mInvoke_torch
Code generation successful.
Run Generated MEX Function
Call mInvoke_torch_mex on the input to get the predicted human activities.
YPred = mInvoke_torch_mex(network, input);
Compare the predictions with the test data by using a plot.
activity_labels = {"dancing", "running", "sitting", "standing", "walking"};

figure
plot(YPred,".-")
hold on
plot(YData{1})
hold off
xlabel("Time Step")
ylabel("Activity")
title("Predicted Activities")
legend(["Predicted" "Test Data"])

yticks(0:4)
yticklabels(activity_labels)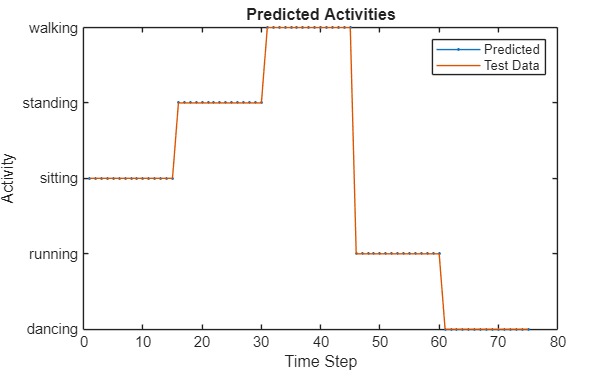
The predictions from the MEX function and the test data match.
Generate Code and Run PIL Simulation Using STMicroelectronics
Next, deploy the model to hardware. This example uses a STMicroelectronics® STM32F746G-Discovery board. This board is an ARM Cortex®-M7-based microcontroller. You must connect the hardware board to the host computer by using a USB type A to Mini-B cable.
Set Code Configuration Parameters
Create a coder.EmbeddedCodeConfig object cfg for generating a static library.
cfg = coder.config("lib","ecoder",true);
To enable PIL-based execution, set VerificationMode to "PIL".
cfg.VerificationMode = "PIL";
Because the target hardware is bare metal, we need to disable constants serialization. Set LargeConstantGeneration to KeepInSourceFiles.
cfg.LargeConstantGeneration = "KeepInSourceFiles";
To specify the target hardware, create a coder.Hardware object. Assign this object to the Hardware property of the code configuration object.
cfg.Hardware = coder.hardware("STM32F746G-Discovery");
Set up a serial PIL communication interface.
cfg.Hardware.PILInterface = "Serial";
To determine the COM port for serial communication, follow steps 2 through 4 in Code Verification and Validation with PIL and Monitoring and Tuning (STM32 Microcontroller Blockset). Then, set the PILCOMPort property to the COM port.
cfg.Hardware.PILCOMPort = "COM4";
The default stack size is much larger than the memory available on the hardware this example uses. Set the stack size to a smaller value, such as 512 bytes.
cfg.StackUsageMax = 512;
To view the build log at the command line, enable verbose build.
cfg.Verbose = 1;
Generate PIL Executable
Use the codegen command to generate code and the PIL executable.
codegen -config cfg -args {coder.Constant(network), input} mInvoke_torch
Run Generated PIL Executable
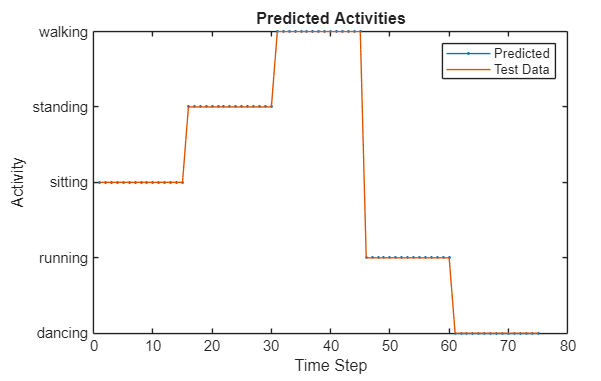
Call mInvoke_torch_pil on the input to get the predicted human activities.
YPred = mInvoke_torch_pil(network, input);
Compare the predictions with the test data by using a plot.
activity_labels = {"dancing", "running", "sitting", "standing", "walking"};

figure
plot(YPred,".-")
hold on
plot(YData{1})
hold off
xlabel("Time Step")
ylabel("Activity")
title("Predicted Activities")
legend(["Predicted" "Test Data"])

yticks(0:4)
yticklabels(activity_labels)
See Also
Functions
codegen|loadPyTorchExportedProgram|summary|inputSpecifications|outputSpecifications|invoke