Configure Simulink Coder for ROS 2 Node Generation
Simulink® Coder™ enables automated C++ code generation for ROS 2 nodes from Simulink models, streamlining the deployment and testing of robotics algorithms across platforms. This topic shows you how to configure Simulink Coder settings for ROS 2 and deploy the generated node to a local or remote target. By following this workflow, you can prototype algorithms, validate them in simulation, and seamlessly deploy them to real hardware or virtual environment, without writing any C++ code.
Prerequisites
To prepare your environment for generating and deploying ROS 2 nodes from Simulink, install the following products:
ROS Toolbox
Simulink
Simulink Coder
For simulation workflows in virtual environment, set up Docker using instructions listed in Install and Set Up Docker for ROS, ROS 2, and Gazebo.
Select ROS Network for Code Generation
Open a Simulink model and select Robot Operating System (ROS) from the Apps tab. This opens the Robot Operating System (ROS) dialog box to select the ROS network for code generation.
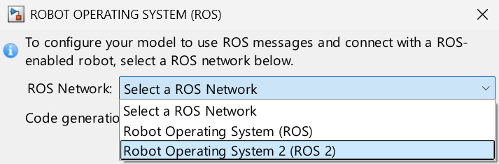
Set the ROS Network to Robot Operating System 2 (ROS 2), which adds the ROS tab in the toolstrip, that contains the options to configure Simulink Coder for code generation.

Specify Deployment Target
Select one of these deployment targets from the Deploy to drop-down, based on your development stage and hardware requirements.
Localhost — Enables rapid prototyping and iterative tuning using host compute with a short edit-build-run loop.
Remote Device — Enables standalone execution on embedded, robotic, and edge platforms in real-world environments.
If you are working with a remote target device, click Deploy to > Manage Remote Device to configure the remote connection from the Connect to ROS Device dialog by setting these credentials.
Device address: IP address of remote device
Username: 'user'
Password: 'password'
ROS 2 folder: /opt/ros/jazzy
ROS 2 workspace: /home/user/ros2_ws_test
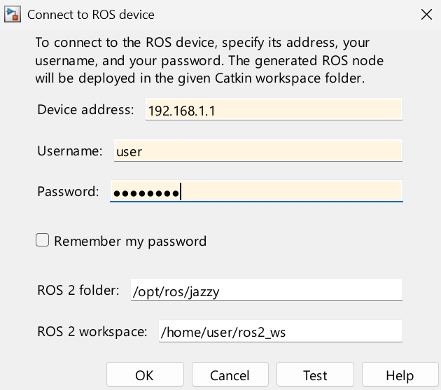
ROS 2 folder is the location of the ROS 2 installation on the ROS 2 device. If you do not specify this folder, the settings test tries to determine the correct folder for you. For more information, see Configure Connection with ROS 2 Device.
To check connectivity between the ROS 2 network and target device, click the Test Connection option .
Specify Deployment Type
Select the appropriate deployment type based on the type of node you want to deploy:
Standard Node — Generate code for ROS 2 standard nodes and deploy to local and remote hardware. For more information, see Generate Standalone ROS 2 Node from Simulink.
Component Node — Generate code for ROS 2 component nodes and deploy to local and remote hardware. For more information, see Generate a ROS 2 Component Node from Simulink.
ROS 2 Control Plugin — Generate code for ros2_control plugin and deploy to local and remote hardware. For more information, see Generate ros2_control Plugin from Simulink.
Specify Deployment Options
Simulink Coder supports automated code generation workflows that produce ROS 2-compliant packages and executables based on your selected deployment configuration.
From the ROS tab, select the required build action under the Deploy section:
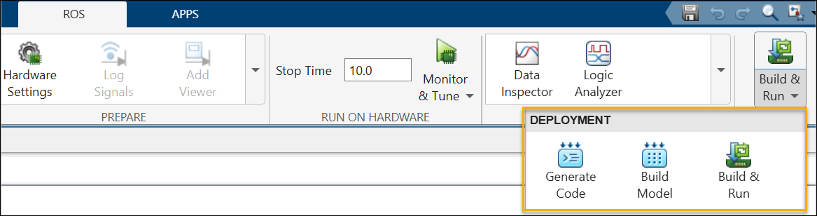
| Deployment Option | When to Use |
|---|---|
| Generate Code | To manually integrate the generated ROS 2 package with an existing ROS 2 workspace or copy it to a target device for further build and deployment. |
| Build Model | To build the ROS 2 node executable on the target (local or remote) without launching it, to verify compilation or prepare for later manual execution. |
| Build & Run | To deploy and auto-launch the ROS 2 node either on a physical device, such as Jetson, or in a simulated ROS 2 network, such as Docker with Gazebo. |
Code Generation and Deployment Behavior
Simulink Coder produces different outputs depending on the selected deployment target and build action. These outputs consist of four artifact types that appear in different combinations.
ROS package source code — Contains the automatically generated C++ implementation of ROS 2 nodes derived from the model for integration within a ROS 2 workspace.
Built executable — Provides the compiled ROS 2 node binary ready to run on the selected deployment target.
TGZ archive — Packages the generated source code and related files into a portable archive for transfer, extraction, and build in a ROS 2 environment.
Shell script — Automates extraction of the TGZ archive, placement of the package into a ROS 2 workspace, and compilation of the generated node using
colcon build.
| Deployment Target | Deployment Option | Artifacts Generated | Build Location | Execution |
|---|---|---|---|---|
| Localhost | Generate Code | ROS package source code and shell script | Not applicable (no built executable) | Not applicable (no built executable) |
| Localhost | Build Model | ROS package source code, shell script, and built executable | Host | Executable does not run automatically |
| Localhost | Build & Run | ROS package source code, shell script, and built executable | Host | Executable runs automatically If you kill the
executable, you can rerun the already built executable by
calling the |
| Remote Device | Generate Code | ROS package source code, shell script, and TGZ archive | Not applicable (no built executable) | Not applicable (no built executable) |
| Remote Device | Build Model | ROS package source code, shell script, TGZ archive, and built executable | Remote Device | Executable does not run automatically |
| Remote Device | Build & Run | ROS package source code, shell script, TGZ archive, and built executable | Remote Device | Executable runs automatically If you kill the
executable, you can rerun the already built executable by
calling the |
Run and Verify Deployed ROS 2 Node
Select Build & Run from the Deploy tab to generate, compile, and launch the node on the target device or inside a containerized environment such as Docker.
On the target terminal or Docker shell, source the required ROS 2 setup files:
source /opt/ros/<distro>/setup.bash
source ~/ros2_ws/install/setup.bash
Enter the ROS 2 distribution supported by your MATLAB® release in the
<distro>field, such asjazzy.Verify the deployed node using these commands:
ros2 node list
ros2 topic list
If expected topics do not appear, refer to the troubleshooting steps listed in Troubleshoot ROS 2 Communication Across Remote Networks.
For Docker-based simulation workflows, run the above commands inside the container after sourcing the mounted workspace.
See Also
ros2device | Publish | Subscribe