.NET アプリケーションでの Parallel Computing Toolbox プロファイルの指定
この例では、MATLAB® Runtime のユーザー データ インターフェイスを使用して、.NET アプリケーションで Parallel Computing Toolbox™ クラスターのプロファイルを指定する方法を説明します。
詳細については、MATLAB Runtime のユーザー データ インターフェイスの使用を参照してください。
手順 1: Parallel Computing Toolbox コードの記述
MATLAB で
sample_pct.mを作成します。このコード例では、Parallel Computing Toolbox の既定のプロファイルに定義されたクラスターを使用します。
function speedup = sample_pct (n)
warning off all;
tic
if(ischar(n))
    n=str2double(n);
end
for ii = 1:n
   (cov(sin(magic(n)+rand(n,n))));
end
time1 =toc;
parpool;
tic
parfor ii = 1:n
   (cov(sin(magic(n)+rand(n,n))));
end
time2 =toc;
disp(['Normal loop time: ' num2str(time1) ...
    ', parallel loop time: ' num2str(time2) ]);
disp(['parallel speedup: ' num2str(1/(time2/time1)) ...
    ' times faster than normal']);
delete(gcp);
disp('done');
speedup = (time1/time2);
入力
400を指定して関数を実行します。a = sample_pct(400)
次は出力の例であり、既定のプロファイルが
localに設定されていると仮定しています。Starting parallel pool (parpool) using the 'local' profile ... Connected to the parallel pool (number of workers: 6). Normal loop time: 2.5651, parallel loop time: 1.6371 parallel speedup: 1.5668 times faster than normal Parallel pool using the 'local' profile is shutting down. done ans = 1.5668
手順 2: Parallel Computing Toolbox プロファイルの設定
MATLAB Compiler SDK™ でビルドされた .NET コンポーネントを使用して MATLAB Runtime のユーザー データ インターフェイスにアクセスするには、MATLAB から直接 mcruserdata を設定する必要があります。MATLAB Compiler SDK でビルドされた C および C++ アプリケーション向けにあるような、mcruserdata にアクセスする Java® API はありません。
MATLAB から mcruserdata を設定するには、init 関数を作成します。この別個の MATLAB 関数は、setmcruserdata を使用して Parallel Computing Toolbox プロファイルを 1 回設定します。その後、Parallel Computing Toolbox を使用するために他の関数を呼び出します。
次の init_sample_pct 関数を作成します。
function init_sample_pct
% Set the Parallel Computing Toolbox Profile:
if(isdeployed)
    % Let the USER select the cluster profile.
    [profile, profpath] = uigetfile('*.mlsettings');
    setmcruserdata('ParallelProfile', fullfile(profpath, profile));
end
既存のプロファイルを .mlsettings ファイルにエクスポートするには、parallel.exportProfile (Parallel Computing Toolbox) 関数を使用します。以下に例を示します。
parallel.exportProfile('local','mylocalsettings');
ヒント
アプリケーションでプロファイルを変更する必要がある場合は、parallel.importProfile (Parallel Computing Toolbox) と parallel.defaultClusterProfile (Parallel Computing Toolbox) を使用します。詳細については、クラスターの検出とクラスター プロファイルの使用 (Parallel Computing Toolbox)を参照してください。
手順 3: 関数のコンパイル
次の情報を使用して、.NET アセンブリ コンパイラ アプリまたは compiler.build.dotNETAssembly で .NET コンポーネントをビルドします。
| フィールド | 値 |
|---|---|
| ライブラリ名 | netPctComp |
| クラス名 | NetPctClass |
| コンパイル対象ファイル | sample_pct.m および init_sample_pct.m |
たとえば、compiler.build.dotNETAssembly を使用している場合は、以下を入力します。
buildResults = compiler.build.dotNETAssembly( ...
{'sample_pct.m','init_sample_pct.m'}, ...
'AssemblyName','netPctComp', ...
'ClassName','NetPctClass');
詳細については、MWArray .NET アセンブリの生成と .NET アプリケーションのビルドの手順を参照してください。
メモ
Parallel Computing Toolbox の GPU 機能を使用している場合は、PTX ファイルと CU ファイルを手動で追加しなければなりません。
コンパイラ アプリを使用している場合は、[カスタム要件] セクションで [ファイルの追加] をクリックします。
関数
compiler.buildを使用している場合は、AdditionalFilesオプションを使用します。mccコマンドを使用している場合は、-aオプションを使用します。
手順 4: .NET アプリケーションのビルドおよび実行
Microsoft® Visual Studio® を開き、DotNETPCT という名前の C# コンソール アプリを作成します。
MATLAB 関数にアクセスする .NET アプリケーションのソース コードを記述します。
この例のサンプル C# アプリケーションを次に示します。
using System;
using MathWorks.MATLAB.NET.Utility;
using MathWorks.MATLAB.NET.Arrays;
using netPctComp;
namespace PctNet
{
    class Program
    {
        static void Main(string[] args)
        {
            try
            {
                NetPctClass A = new NetPctClass();
                // Initialize the PCT setup
                A.init_sample_pct();
                double var = 400;
                MWNumericArray out1;
                MWNumericArray in1 = new MWNumericArray(var);
                out1 = (MWNumericArray)A.sample_pct(in1);
                Console.WriteLine("The speedup is {0}", out1);
                Console.ReadLine();
                        // Wait for user to exit application
            }
            catch (Exception exception)
            {
                Console.WriteLine("Error: {0}", exception);
            }

        }
    }
}
メモ
このサンプル コードは、Microsoft Visual Studio 2019 を使用して記述されたものです。
Visual Studio で、アセンブリを生成またはインストールしたフォルダーにあるアセンブリ ファイル netPctComp.dll への参照を追加します。
MWArray API への参照を追加します。
| MATLAB がシステムにインストールされている場合 | |
| MATLAB Runtime がシステムにインストールされている場合 | |
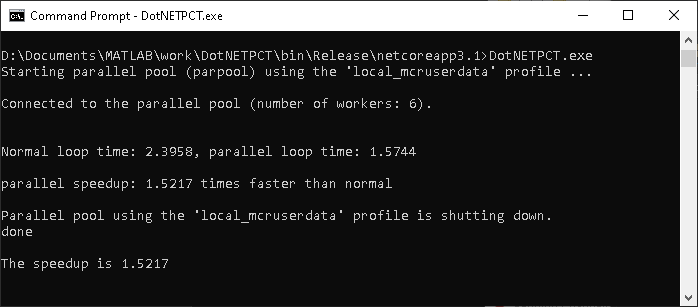
Visual Studio で DotNETPCT アプリケーションをビルドして実行します。
DotNETPCT アプリケーションにより、使用するクラスターのプロファイルを選択するように求められます。.mlsettings ファイルを選択すると、アプリケーションは以下のような出力を表示します。
参考
getmcruserdata | setmcruserdata
トピック
- MATLAB Runtime のユーザー データ インターフェイスの使用
- クラスターの検出とクラスター プロファイルの使用 (Parallel Computing Toolbox)