Categorize Models in Hierarchy as Components or Units
When testing your model-based software architecture, there are different testing requirements for different levels of the architecture. The dashboard helps you to focus on the models that require unit testing so you can assess their testing quality. You can use labels to classify the models in your projects as units or components, then use the dashboard to see the hierarchy. For more information on how to analyze the testing requirements for a unit, see Explore Status and Quality of Testing Activities Using Model Testing Dashboard.
Units
A unit is a functional entity in your software architecture that you can execute and test independently or as part of larger system tests. Software development standards, such as ISO 26262-6, define objectives for unit testing. Unit tests typically must cover each of the requirements for the unit and must demonstrate traceability between the requirements, the tests, and the unit. Unit tests must also meet certain coverage objectives for the unit, such as modified condition/decision coverage (MC/DC).
By default, the dashboard analyzes all models inside your project folder and considers Simulink® models as units.
You can use a trace view to see the units and components in your project. For more information, see Explore Traceability Information Using Trace Views. If you want to exclude certain models from the dashboard, specify which models are units or components by labeling them in your project and configuring the dashboard to recognize the label, as shown in Specify Models as Components and Units.
Components
A component is an entity that integrates multiple testable units together.
By default, the dashboard analyzes all models inside your project folder and considers System Composer™ architecture models as components. Supported architectures include System Composer architecture models, System Composer software architecture models, and AUTOSAR architectures.
You can use a trace view to see the units and components in your project. For more information, see Explore Traceability Information Using Trace Views. If you want to exclude certain models from the dashboard, specify which models are units or components by labeling them in your project and configuring the dashboard to recognize the label, as shown in Specify Models as Components and Units.
Specify Models as Components and Units
You can control which models appear as units and components by labeling them in your project and configuring the dashboard to recognize the labels.
Open a project. For this example, in the MATLAB® Command Window, enter:
This example project already has component and unit models configured.openExample("slcheck/ExploreTestingMetricDataInModelTestingDashboardExample"); openProject("cc_CruiseControl");
Create a project label category that will contain your testing architecture labels. On the Project tab, in the Environment section, click Settings. Then, in the Labels section, click New Category. Type a name for the category, for example,
Testing Interfaceand then click OK.Create a label for the units. Click the category that you created and select New Label. Enter the label name
Software Unit.Create a label for the components. Click the category that you created and select New Label. Enter the label name
Software Component.Close the Project Settings dialog box by clicking OK.
For more information on how to create project label categories and labels, see Create and Manage Labels.
Label the models in the project as components and units. In the project pane, right-click a model, click Add Label and choose the category and label. For this example, in the
modelsfolder, apply these labels to these models:cc_CruiseControl— Testing Interface > Software Componentcc_ControlMode— Testing Interface > Software Unitcc_DriverSwRequest— Testing Interface > Software Unitcc_LightControl— Testing Interface > Software Unitcc_TargetSpeedThrottle— Testing Interface > Software Unit
For more information on how to add project labels, see Add Labels to Project Files.
Open the Dashboard window by using one of these approaches:
On the Project tab, in the Tools section, click Model Testing Dashboard.
On the Project tab, in the Tools section, click Model Design Dashboard.
In the Dashboard tab, click Options.
In the Project Options dialog box, in the Classification section, specify the category and labels that you created for the components and units. For the component interface, set Category to
Testing Interfaceand Label toSoftware Component. For the unit interface, set Category toTesting Interfaceand Label toSoftware Unit.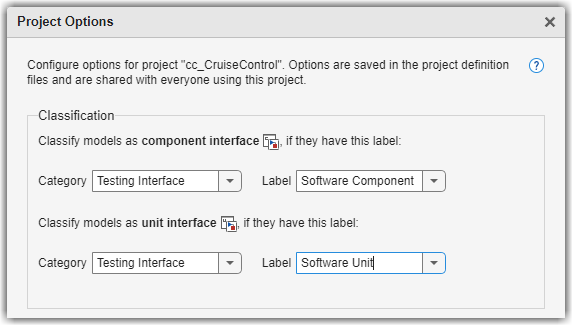
Click Apply. The dashboard updates the list of artifacts in the Project panel.
To open a dashboard for a unit or component, click the name of the unit or component in the Project panel. The dashboard shows the metric results for the unit or component you select.