Create Columns and Rows in Safety Analysis Manager Spreadsheets
R2026bTo create spreadsheets in the Safety Analysis Manager, you must create columns and rows and fill the resulting cells with content. The column type determines the content that you can use in the cells. You can create rows and columns interactively or programmatically.
Create or Open a Spreadsheet
To create a new spreadsheet, use one of these approaches:
To create an empty spreadsheet, click New > Empty Spreadsheet.
To create a spreadsheet from an MLDATX template file, click New > From Template File.
New spreadsheets that you create without using a template contain one row and one column.

To open an existing spreadsheet, in the File section, click Open. Alternatively, if you are already in a spreadsheet, press Ctrl+O. You must select an MLDATX spreadsheet file.
Create and Delete Spreadsheet Rows
To add a row to a spreadsheet, use one of these methods:
In the Spreadsheet section, click Add Row. The spreadsheet adds the new row below the selected row.
Right-click a row and select Insert Before or Insert After.
Retrieve the
Spreadsheetobject of the spreadsheet and add rows by using theaddRowfunction.
Rows automatically adjust to the height of the content in their cells.
Tip
If you select more than one row and click Add Row or use the context menu, the spreadsheet adds an equal number of rows to the spreadsheet. For example, if you select three rows and click Add Row, the spreadsheet adds three rows.
To delete a row, click the index for one or more rows and, in the
Edit section, click Delete. Alternatively,
retrieve the row by using the getRow
function and delete rows by using the deleteRow function.
Spreadsheets must have at least one cell. If a spreadsheet has only one row, you cannot delete it.
Reorder Rows
To reorder the rows:
Create Spreadsheet Columns
To add a new column, use one of these methods:
In the Spreadsheet section, click Add Column . If you select a column and click Add Column, the spreadsheet adds the new column to the right of the selected column.
Right-click the column and select Insert Before or Insert After.
Retrieve the
Spreadsheetobject of the spreadsheet and add columns by using theaddColumnfunction.
You can adjust the width of the columns manually.
Tip
If you select more than one column and click Add Column or use the context menu, the spreadsheet adds an equal number of columns to the spreadsheet.
To delete a column, click the column label for one or more columns and, in the
Edit section, click Delete. Alternatively,
delete columns by using the deleteColumn function on the Spreadsheet object.
You can create four types of columns:
Text — The column accepts text in the cell values as a string scalar.
Checkbox — The column accepts a logical in the cell values. The values display as a check box.
Enumeration — The column accepts a value specified in an enumeration class defined on the path. You select the value from a drop-down list in each cell.
Derived — The column produces values derived from a formula. You can specify the formula to retrieve values from other cells or the base workspace.
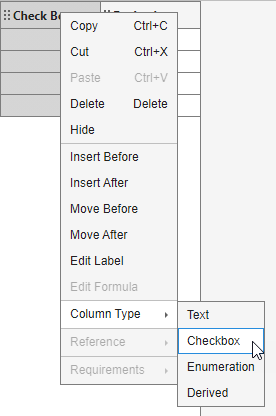
By default, adding a column creates a text column. To add other kinds of columns, click Add Column and select the column type.
Create Check Box Columns
Check box column cells accept logical values. To create a new check box column:
Open an existing spreadsheet or create a new spreadsheet.
In the Spreadsheet section, click Add Column > Checkbox.
After creating a check box column, selecting the cell sets its value to true, and clearing it sets it to false.
Create Enumeration Columns
To create an enumeration column, define an enumeration class definition file on path. See Define Enumeration Classes. Then, create an enumeration column and assign the enumeration class to the column. The entries in the column are limited to the entries in the class definition.
For example, to create an enumeration column that specifies a day out of the week:
In a new MATLAB® file, define an enumeration class named
Weekdays.classdef Weekdays enumeration Sunday, % First day of the week Monday, % Second day of the week Tuesday, % Third day of the week Wednesday, % Fourth day of the week Thursday, % Fifth day of the week Friday, % Sixth day of the week Saturday % Seventh day of the week end end
Save the class definition on your file path with the name
Weekdays.m.In the Spreadsheet section, click Add Column > Enumeration.
In the Enumeration Class window, enter
Weekdaysand click OK.
In the column, expand the available values. If you point to the value, the list displays the comment that you include on the right of the value in the class definition file (since R2026a).
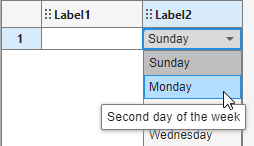
To set the cell value, click the value.
Create Derived Columns
Derived columns use MATLAB code to retrieve information from the spreadsheet and adjust the column cell values. The information that you retrieve is read-only.
Suppose you have a spreadsheet with two text columns, Label1 and Label2, and you want to create a column that takes the strings in those columns and creates a new string. Create a derived column.
In the Spreadsheet section, click Add Column > Derived Value.
Right-click the column label and click Edit Formula.
Retrieve the adjacent values of the column cells, concatenate the strings, and assign the new string to the cell. To retrieve values of cells in other columns, use the
sfa_columnValueoperator.sfa_columnValueretrieves the values from the column with the specified label. After retrieving the cell values, assign the concatenation of the strings to the derived cells by using thesfa_derivedValuekeyword.x = sfa_columnValue("Label1"); y = sfa_columnValue("Label2"); sfa_derivedValue = x + " " + y;
Close the Column Formula Editor window. The column now creates a new string by using the adjacent cell values in the Label1 and Label2 columns.
To edit the column formula programmatically, use the setColumnFormula function.
Adjust Column Types and Visibility
You can adjust the types, labels, orientation, and visibility of columns.
Change the Column Type
To change a column type, right-click the column label, click Column Type, then select the column type.
Note
If you change the column type, the cells that contain Requirements Toolbox™ links in that column do not display. Changing the column type replaces the cells with new cells. Consequently, the links exist, but they have an invalid source or destination depending on the link direction. To restore the cells and the links, undo the column type change.
Edit Column Labels
To update column labels, right-click the column label and click Edit
Label. Enter the new label in the Column Label window. Alternatively,
edit the column label by using the setColumnLabel function.
Reorder Columns
To reorder the columns, use one of these methods:
Drag and drop the column by clicking and holding the grip icon .
Right-click the column label and select Move Before or Move After.
Hide Columns
Since R2024a
By default, columns are visible in Safety Analysis Manager spreadsheets. To hide columns, use one of these methods:
In the Spreadsheet section, click View Columns, and clear the columns that you want to hide.
Right-click the column label and click Hide.
Hidden columns retain their index, and you can still access their content by using programmatic options.
If you create a template from a spreadsheet that has hidden columns, the template also hides the same columns (since R2026a).
See Also
Spreadsheet | SpreadsheetCell | SpreadsheetRow

