Design a Road Intersection Programmatically using MATLAB Scene Authoring Functions
This example shows how to create a simple road intersection programmatically using road layouts, lanes, lane boundaries, and lane markings.
To run this example, you must:
Have an Automated Driving Toolbox® license.
Have a RoadRunner® license and the product is installed.
Have created a RoadRunner project folder.
The steps to construct a road intersection are:
Load lane markings from the Asset Library
Add horizontal and vertical roads
Create driving lanes on the horizontal and vertical roads
Add lane markings to the lanes
Start RoadRunner Programmatically
To use MATLAB® scene authoring functions to control RoadRunner programmatically, use the roadrunner object. By default, roadrunner opens RoadRunner from the default installation folder for the platform you are using (either Windows® or Linux®). These are the default installation locations by platform:
Windows – C:\Program Files\RoadRunner R20NNx\bin\win64
Linux, Ubuntu® – /usr/local/RoadRunner_R20NNx/bin/glnxa64
R20NNx is the MATLAB version for the release you are using.
If your RoadRunner installation is at a different location than the default location, use MATLAB settings API to customize the default value of the RoadRunner installation folder.
Access Scene Authoring APIs in MATLAB
Create a roadrunner object, specifying the path to an existing project. For example, this code shows the path to a project, on a Windows machine, located at "C:\RR\MyProject". This code assumes that RoadRunner is installed in the default location, and returns an object, rrApp, that provides functions for performing basic tasks such as opening, closing, and saving scenes and projects.
If you are opening RoadRunner from MATLAB for the first time, or if you have changed the RoadRunner installation location since you last opened it from MATLAB, you can use the roadrunnerSetup function to specify new default project and installation folders to use when opening RoadRunner. You can save these folders between MATLAB sessions by selecting the Across MATLAB sessions option from the corresponding drop down.
rrApp = roadrunner(ProjectFolder="C:\RR\MyProject"); Create a new scene in RoadRunner by using the newScene function, specifying the roadrunner object rrApp.
newScene(rrApp)
Create a RoadRunner authoring API object, rrAPI, that references the object for the current RoadRunner instance rrApp. The rrApi object enables you to programmatically author scenes, such as by adding and modifying road and lane components, using MATLAB.
rrApi = roadrunnerAPI(rrApp);
Extract the Scene object for your scene from the Scene property of the authoring API object rrApi. The extracted Scene object enables you to specify the scene in which to add scene components, such as roads and lanes.
scn = rrApi.Scene;
Extract the Project object for your RoadRunner project from the Project property of the authoring API object rrApi. The extracted Project object enables you to specify the project folder for the current RoadRunner session from which to retrieve asset objects. You can use the asset objects to assign markings to the lanes in your scene.
prj = rrApi.Project;
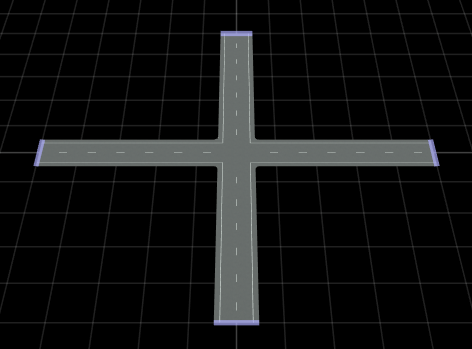
Create a Horizontal Road
Use the addLineArcRoad function to add a new road with a line-arc horizontal curve type to the scene. Specify the position of the road by specifying the positions of its control points along the X- and Y- axes of the RoadRunner local coordinate system. Set the control points of the road to -50 and 50 on the X- axes, respectively.
controlPoints1 = [-50 0; 50 0];
rrHorizontalRoad = addLineArcRoad(scn,controlPoints1);
Add Lanes and Lane Markings to the Horizontal Road
Extract the reference lane of the road from the ReferenceLane property of the road object rrHorizontalRoad. The reference lane defines the center lane, or reference line, of a road in a RoadRunner scene. This lane has no width and serves as the basis for positioning all other lanes, which RoadRunner arranges outward from the reference line.
refHLane = rrHorizontalRoad.ReferenceLane;
Use the getAsset function to extract a lane marking style object, which represents the DashedSingleWhite.rrlms asset, from the project prj. To define the marking profile of the reference lane, first extract the lane marking profile object refLaneMarkingProfile of the reference lane object refHLane. Then, extract the lane marking span object refLaneSpan, which represents the span on which to place the lane marking, from the Spans property of the lane marking profile object refLaneMarkingProfile. Lastly, set the LaneMarkingStyle property of the extracted span object to mark the reference lane with the dashed single white marking style.
dashedWhiteMarkingStyle = getAsset(prj,"<PROJECT>/Assets/Markings/DashedSingleWhite.rrlms","LaneMarkingStyle");
refHLaneMarkingProfile = refHLane.LaneMarkingProfile;
refHLaneSpan = refHLaneMarkingProfile.Spans;
refHLaneSpan.LaneMarkingStyle = dashedWhiteMarkingStyle;
Use the extracted reference lane object refHLane to add a driving lane on each side of the reference lane of the road using the addLaneToLeft and addLaneToRight functions. Then, use the LaneType and TravelDirection properties of the added lanes to specify the type and travel direction of each lane.
horizontalLane1 = addLaneToLeft(refHLane);
horizontalLane1.LaneType = "Driving";
horizontalLane1.TravelDirection = "Forward";
horizontalLane2 = addLaneToRight(refHLane);
horizontalLane2.LaneType = "Driving";
horizontalLane2.TravelDirection = "Backward";
Extract the solid single white marking style object solidWhiteMarkingStyle, and mark the boundaries of the driving lanes.
solidWhiteMarkingStyle = getAsset(prj,"<PROJECT>/Assets/Markings/SolidSingleWhite.rrlms","LaneMarkingStyle");
horLane1MarkingProfile = horizontalLane1.LaneMarkingProfile;
horLane1Span = horLane1MarkingProfile.Spans;
horLane1Span.LaneMarkingStyle = solidWhiteMarkingStyle;
horLane2MarkingProfile = horizontalLane2.LaneMarkingProfile;
horLane2Span = horLane2MarkingProfile.Spans;
horLane2Span.LaneMarkingStyle = solidWhiteMarkingStyle;
Add Shoulder Lanes to the Horizontal Road
Add one shoulder lane to the left of the first horizontal lane and another shoulder lane to the right of the second horizontal lane.
shoulderLane1 = addLaneToLeft(horizontalLane1);
shoulderLane1.LaneType = "Shoulder";
shoulderLane2 = addLaneToRight(horizontalLane2);
shoulderLane2.LaneType = "Shoulder";
Extract the width profile for the shoulder lane by specifying the WidthProfile property of the lanes. By specifying a width of 1.25 m at the start and end of the final node of the width profile, the width profile uniformly modifies the shoulder lanes to a width of 1.25 m.
shoulderLane1WidthProfile = shoulderLane1.WidthProfile;
shoulderLane1NodeEnd = shoulderLane1WidthProfile.Nodes(1);
shoulderLane1NodeEnd.EndWidth = 1.25;
shoulderLane1NodeStart = shoulderLane1WidthProfile.Nodes(2);
shoulderLane1NodeStart.StartWidth = 1.25;
shoulderLane2WidthProfile = shoulderLane2.WidthProfile;
shoulderLane2NodeEnd = shoulderLane2WidthProfile.Nodes(1);
shoulderLane2NodeEnd.EndWidth = 1.25;
shoulderLane2NodeStart = shoulderLane2WidthProfile.Nodes(2);
shoulderLane2NodeStart.StartWidth = 1.25;
Create a Vertical Road
Use the addLineArcRoad function to add another new road with a line-arc horizontal curve type to the scene. Specify the position of the road by specifying the positions of its control points along the X- and Y- axes of the RoadRunner local coordinate system. Set the control points of the road to 50 and -50 on the Y- axes, respectively.
controlPoints2 = [0 50; 0 -50];
rrVerticalRoad = addLineArcRoad(scn,controlPoints2);
Add Lanes and Lane Markings to the Vertical Road
Extract the reference lane of the road from the ReferenceLane property of the road object rrVerticalRoad. The reference lane defines the center lane, or reference line, of a road in a RoadRunner scene. This lane has no width and serves as the basis for positioning all other lanes, which RoadRunner arranges outward from the reference line.
refVLane = rrVerticalRoad.ReferenceLane;
Use the getAsset function to extract a lane marking style object, which represents the DashedSingleWhite.rrlms asset, from the project prj. To define the marking profile of the reference lane, first extract the lane marking profile object refLaneMarkingProfile of the reference lane object refVLane. Then, extract the lane marking span object refLaneSpan, which represents the span on which to place the lane marking, from the Spans property of the lane marking profile object refLaneMarkingProfile. Lastly, set the LaneMarkingStyle property of the extracted span object to mark the reference lane with the dashed single white marking style.
dashedWhiteMarkingStyle = getAsset(prj,"<PROJECT>/Assets/Markings/DashedSingleWhite.rrlms","LaneMarkingStyle");
refVLaneMarkingProfile = refVLane.LaneMarkingProfile;
refVLaneSpan = refVLaneMarkingProfile.Spans;
refVLaneSpan.LaneMarkingStyle = dashedWhiteMarkingStyle;
Use the extracted reference lane object refVLane to add a driving lane on each side of the reference lane of the road using the addLaneToLeft and addLaneToRight functions. Then, use the LaneType and TravelDirection properties of the added lanes to specify the type and travel direction of each lane.
verticalLane1 = addLaneToLeft(refVLane);
verticalLane1.LaneType = "Driving";
verticalLane1.TravelDirection = "Forward";
verticalLane2 = addLaneToRight(refVLane);
verticalLane2.LaneType = "Driving";
verticalLane2.TravelDirection = "Backward";
Use the solid single white marking style object dashedWhiteMarkingStyle extracted above, and mark the boundaries of the driving lanes.
for verticalLane1spanIndex = 1:numel(verticalLane1.LaneMarkingProfile.Spans)
    if (verticalLane1spanIndex == 2)
        continue;
    end
    verticalLane1Span = verticalLane1.LaneMarkingProfile.Spans(verticalLane1spanIndex);
    verticalLane1Span.LaneMarkingStyle = solidWhiteMarkingStyle;
end

for verticalLane2spanIndex = 1:numel(verticalLane2.LaneMarkingProfile.Spans)
    if (verticalLane2spanIndex == 2)
        continue;
    end
    verticalLane2Span = verticalLane2.LaneMarkingProfile.Spans(verticalLane2spanIndex);
    verticalLane2Span.LaneMarkingStyle = solidWhiteMarkingStyle;
end
Add Shoulder Lanes to the Vertical Road
Add one shoulder lane to the left of the first vertical lane and another shoulder lane to the right of the second vertical lane.
shoulderLane3 = addLaneToLeft(verticalLane1);
shoulderLane3.LaneType = "Shoulder";
shoulderLane4 = addLaneToRight(verticalLane2);
shoulderLane4.LaneType = "Shoulder";
Extract the width profile for the shoulder lane by specifying the WidthProfile property of the lanes. By specifying a width of 1.25 m at the start and end of the final node of the width profile, the width profile uniformly modifies the shoulder lanes to a width of 1.25 m.
shoulderLane3WidthProfile = shoulderLane3.WidthProfile;
shoulderLane3NodeEnd = shoulderLane3WidthProfile.Nodes(1);
shoulderLane3NodeEnd.EndWidth = 1.25;
shoulderLane3NodeStart = shoulderLane3WidthProfile.Nodes(2);
shoulderLane3NodeStart.StartWidth = 1.25;
shoulderLane4WidthProfile = shoulderLane4.WidthProfile;
shoulderLane4NodeEnd = shoulderLane4WidthProfile.Nodes(1);
shoulderLane4NodeEnd.EndWidth = 1.25;
shoulderLane4NodeStart = shoulderLane4WidthProfile.Nodes(2);
shoulderLane4NodeStart.StartWidth = 1.25;
See Also
roadrunnerAPI | Scene | Road | Lane