Get Started with RoadRunner Viewer
R2026bRoadRunner Viewer enables you to visualize and annotate simulation data in 3D using MATLAB®. When visualizing simulation data using RoadRunner Viewer, you can:
Import 3D meshes, such as roads, vehicles, and props into the viewer scene graph.
Draw 3D primitives, such as points, lines, and triangles.
Add annotations, such as text and image overlays.
Modify the camera position and orientation.
You can use RoadRunner Viewer features for tasks such as viewing and replaying simulations from MATLAB and Simulink®, drawing primitives to display the mount positions of vehicle sensors, and adding text overlays to display variables in the viewer scene graph. You can use RoadRunner Viewer to visualize 3D simulations without opening RoadRunner Scenario.
RoadRunner Viewer displays simulations in the scene graph, the 3D canvas into which you add meshes, primitives, and overlays.
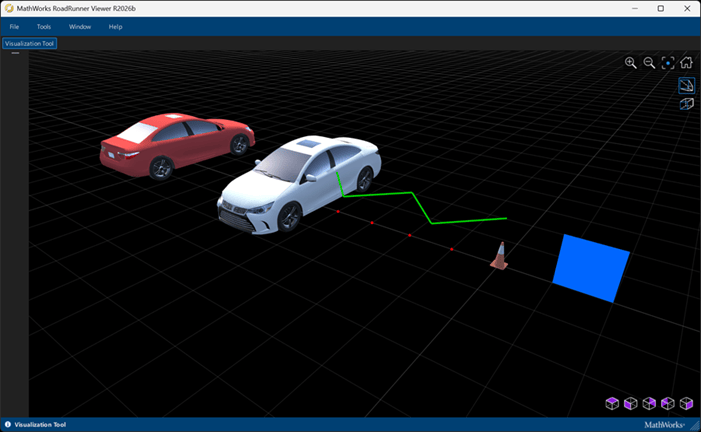
To use RoadRunner Viewer, you must have these products installed:
RoadRunner R2026b Update 2 or later
MATLAB R2026b or later
Automated Driving Toolbox™ R2026b or later
Open RoadRunner Viewer from MATLAB
To use the RoadRunner Viewer functions, you must first add the path of the folder containing the RoadRunner API to your MATLAB session. By default, the location of the RoadRunner API on Windows® and Linux® is:
Windows —
C:\Program
                                Files\RoadRunner\R20NNx\roadrunner\bin\win64\Tools\MATLAB\api
Linux, Ubuntu® —
/usr/local/RoadRunner/R20NNx/roadrunner/bin/glnxa64/Tools/MATLAB/api
R20NNx
In MATLAB, after adding the path to your RoadRunner API folder, open RoadRunner Viewer and create a roadrunnerViewer
object. The roadrunnerViewer object represents the RoadRunner Viewer application, and you can use it to import and visualize simulation
data.
By default, MATLAB automatically creates an Assets folder in your current
working folder when you open RoadRunner Viewer. The Assets folder contains the files you want
to use in the viewer, such as 3D meshes, materials, and images. To add objects to the
viewer, the path you specify must be relative to this Assets folder.
If you already have a project in another location with an Assets
folder that you want to use, you can specify the ProjectFolder
argument to the desired project folder path.
addpath("C:\Program Files\RoadRunner\R2026b\roadrunner\bin\win64\Tools\MATLAB\api")
myProject="C:\users\MyProject"
rrViewer = roadrunnerViewer(ProjectFolder=myProject);
Add 3D Meshes, 3D Primitives, and Overlays
To visualize scenarios in RoadRunner Viewer, you can import 3D meshes from your project, such as scenes, roads, vehicles, and sensors. RoadRunner Viewer enables you to add or remove 3D meshes and modify their position, orientation, and scale transforms.
To import a 3D mesh into RoadRunner Viewer, use the addMeshNode function and specify the
path to a 3D mesh file, such as an .fbx file. The function creates a
NodeNode
object to modify the color and transforms of the 3D mesh in the scene graph. Import the
Sedan.fbx 3D
mesh.
sedan = addMeshNode(rrViewer,Filepath="Vehicles/Sedan.fbx");To create annotations and custom visualizations for your simulation, you can draw 3D
primitives, such as points, lines, and triangles, in the RoadRunner Viewer scene graph. You can use 3D primitives to highlight actor
trajectories and road lanes, indicate sensor locations, or outline the locations of
expected events during simulation. To add primitives to the scene graph, you must first
use the addPrimitive function to, create a PrimitiveCollectionPrimitiveCollection object,
pc.
pc = addPrimitive(rrViewer);
drawPoints, drawLines, and
drawTriangles functions to draw points, lines, and triangles,
respectively. Specify your PrimitiveCollection object,
pc, to store the primitives in it. Then, to visualize the
primitives in the scene graph, use the drawnow
function.points = [0 0 0; 1 0 0; 2 0 0; 3 0 0; 4 0 0]; drawPoints(pc,points,[1.0 0.0 0.0],8.0) linePoints = [0 0 1; 1 1 1; 2 0 1; 3 1 1; 4 0 1]; drawLines(pc,linePoints,[0 0.8 0],3.0) triVerts = [-2 0 0; -1 0 0; -2 0 1]; drawTriangles(pc,triVerts,[0 0.4 1]) drawnow(rrViewer)
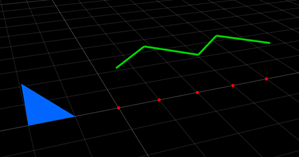
To create more complex primitive shapes from 3D meshes, use the
drawTrianglesFromMesh function. Draw a 3D primitive in the shape
of the Sedan.fbx mesh. Offset the new 3D primitive from
sedan by 5 m by extracting the LocalTransform
property of sedan and setting the fourth element to
5.
xform = sedan.LocalTransform;
xform(1,4) = 5;
drawTrianglesFromMesh(pc,"Vehicles/Sedan.fbx",xform,[0 1 0])
drawnow(rrViewer)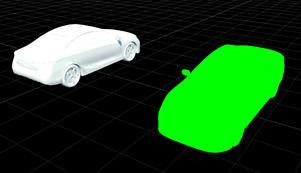
RoadRunner Viewer also enables you to add custom text and image overlays during simulation. You can use text and image overlays to display annotations, such as the variables used during simulation or descriptions of events. You can also use overlays to display warning or error icons, such as for an impending crash between two vehicles.
To create text and image overlays in RoadRunner Viewer, use the addTextOverlay and
addImageOverlay functions to create a TextOverlayImageOverlay
img = addImageOverlay(rrViewer);
txt = addTextOverlay(rrViewer);
Text property of the
TextOverlay object to the desired string of text. To specify an
image to display in the scene graph, set the ImagePath property of
the ImageOverlay object to the path to an image file. The path you
specify must be relative to the Assets
folder.txt.Text = "Hello World!"; img.ImagePath = "MyImageFolder/customImage.png";
Update RoadRunner Viewer Scene Graph
When you create and modify 3D primitives or overlays, the RoadRunner Viewer scene graph does not automatically display the changes.
Instead, RoadRunner Viewer queues drawing commands and property changes until the next
function call that returns a value. To update the RoadRunner Viewer scene graph and view changes to 3D primitives and overlays, use
the drawnow
function.
Modify the style and position of the text overlay txt, and then
display the changes in the scene graph using the drawnow
function.
txt.Style = "background: rgba(0,0,0,0.7); color: white; font-size: 16px;";
txt.Position = [0.01 0.01];
txt.Size = [0.25 0.05];
drawnow(rrViewer)
pause(2)
txt.Style = "background: rgba(0,100,0,0.8); color: white; font-size: 16px;";
txt.Position = [0.1 0.1];
drawnow(rrViewer)
Remove Objects and Clear Scene Graph
To remove a collection of 3D primitives from the scene graph, use the reset function
to clear the PrimitiveCollection object. The
reset function removes all 3D primitives from the specified
PrimitiveCollection. Note that you cannot specify single
primitives or primitive types within a primitive collection to clear. For example,
if your PrimitiveCollection contains points, lines, and
triangles, you cannot specify for RoadRunner Viewer to remove only the points.
Clear the primitives from your scene graph, and use the drawnow
function to display the changes.
reset(pc)
drawnow(rrViewer)
To remove individual 3D meshes from the scene graph, use the removeMeshNodeNode object of the mesh you want to remove.
removeMeshNode(rrViewer,Node=sedan)
To clear the RoadRunner Viewer scene graph of all objects, primitives, and overlays, specify
your roadrunnerViewer object to the reset
function.
reset(rrViewer)
Modify Camera
You can programmatically modify the position and orientation of the camera in
RoadRunner Viewer. Use a Camera object to
specify the position and orientation of the viewer camera. To programmatically modify
the RoadRunner Viewer camera, extract the Camera property from your
roadrunnerViewer object.
viewerCam = rrViewer.Camera;
To change the position of the RoadRunner Viewer camera, modify the Transform property of
cam.
This code modifies the transform matrix so the camera points down at the RoadRunner Viewer origin from a height of 100 meters. The eye
function creates a 3-by-3 identity matrix that represents the camera orientation. This
orientation points the camera straight down.
camOrientation = eye(3);
camHeight = [0; 0; 100];
cam.Transform = [camOrientation camHeight;[0 0 0 1]];
To update the RoadRunner Viewer scene graph to show the new camera position, use the
drawnow function.
drawnow(rrViewer)
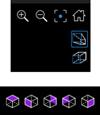
You can also interactively modify the camera position by using mouse controls and keyboard shortcuts, or the camera control and view direction buttons in the RoadRunner Viewer user interface.
Further Exploration
RoadRunner provides several example files that show how to use RoadRunner Viewer in MATLAB. By default, the location of the example files on Windows and Linux is:
Windows —
C:\Program
                                Files\RoadRunner\R20NNx\roadrunner\bin\win64\Tools\MATLAB\api\viewer\examples
Linux, Ubuntu —
/usr/local/RoadRunner/R20NNx/roadrunner/bin/glnxa64/Tools/MATLAB/api/viewer/examples
R20NNxopen function and specify the path to the
example file you want to open.
Limitations
RoadRunner Viewer does not support interactively modifying 3D meshes, primitives, or overlays in the scene graph using the viewer user interface.
RoadRunner Viewer does not display animations for 3D meshes, such as walk cycles for character assets.
If you want to simulate a scenario that uses actor meshes from RoadRunner Scenario, you must export the scenario to an ASAM OpenSCENARIO® format.
See Also
roadrunnerAPI | roadrunnerViewer | PrimitiveCollectiondrawnow | close
Topics
- Set Up MATLAB Environment for RoadRunner Authoring Functions
- Simulate a RoadRunner Scenario Using MATLAB Functions (RoadRunner Scenario)
- Define Scenario Logic (RoadRunner Scenario)

