Create Python Package Using Python Package Compiler App
Supported platforms: Windows®, Linux®, Mac
This example shows how to use the Python Package Compiler app to package multiple MATLAB® functions into a Python® package. You can call the package in a Python application that computes data from a rectangle.
Before R2025a: Create a Python package using the Library Compiler as shown in Create Python Application Using Library Compiler App (R2024b).
Prerequisites
Verify that you have met the system requirements for generating Python packages and running Python applications. For details, see MATLAB Compiler SDK Python Target Requirements.
End users must have an installation of MATLAB Runtime to run the application. For details, see Download and Install MATLAB Runtime.
For testing purposes, you can use an installation of MATLAB instead of MATLAB Runtime.
Write Deployable MATLAB Code
In MATLAB, examine the MATLAB code that you want to package. This example uses these files in
matlabroot
| MATLAB Functions | getPointCoordinates.m
getRectangleArea.mgetRectangleCorners.m
getRectangleHeight.mgetRectangleWidth.mmakePoint.mmakeRectangle.mPoint.mRectangle.mrectangleDemo.m |
| Python Application Code | rectangleDriver.py |
At the MATLAB command prompt, copy the rectangle folder that ships
with MATLAB to your working folder.
copyfile(fullfile(matlabroot,"extern","examples", ...
    "compilersdk","python","rectangle"),"rectangle");
Navigate to the new rectangle folder.
Examine the MATLAB function rectangleDemo.m.
The function creates two Point objects, creates a
Rectangle object using the points as corners, and then calculates
and displays data about the
rectangle.
function rectangleDemo()
    % RECTANGLEDEMO Construct a rectangle and print information about it

    pointZeroZero = makePoint(0, 0);
    pointThreeFour = makePoint(3, 4);
    rectA = makeRectangle(pointZeroZero, pointThreeFour);
    corners = getRectangleCorners(rectA);
    showPointCoordinates(corners.upperLeft, 'Upper left-hand corner');
    showPointCoordinates(corners.lowerLeft, 'Lower left-hand corner');
    showPointCoordinates(corners.upperRight, 'Upper right-hand corner');
    showPointCoordinates(corners.lowerRight, 'Lower right-hand corner');
    fprintf('Area: %.1f\n', area(rectA));
    fprintf('Height: %.1f\n', height(rectA));
    fprintf('Width: %.1f\n', width(rectA));
end

% This is an auxiliary function. It cannot be called outside rectangleDemo().
function showPointCoordinates(pt, desc)
    coordinates = getPointCoordinates(pt);
    fprintf('%s: (%.1f, %.1f)\n', desc, coordinates.X, coordinates.Y);
end
Create Project and Compiler Task
Create a compiler task for your function using the Python Package Compiler. Compiler tasks allow you to compile files in a project for a specific deployment target.
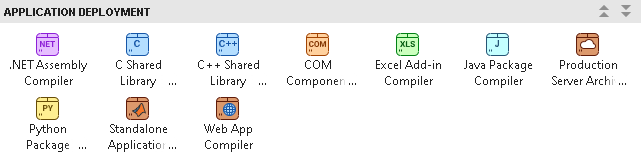
To open the app, on the Apps tab, expand the Apps gallery. In the Application Deployment section, click Python Package Compiler.
You can also open the app using the pythonPackageCompiler
function at the MATLAB Command Window.
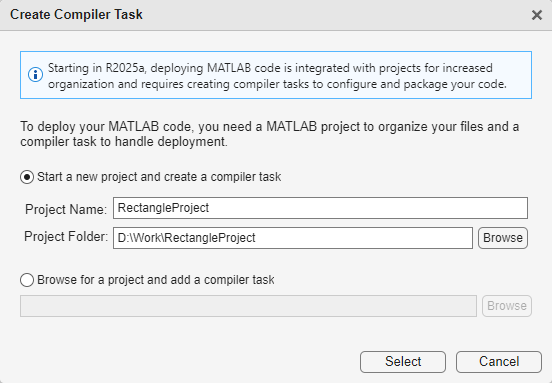
After you open the app, the Create Compiler Task dialog box
prompts you to add a task to a new or an existing MATLAB project. For this example, select Start a new project and create
a compiler task and create a new project named
RectangleProject in the rectangle folder. For more information on creating and using MATLAB projects, see Create Projects.
A new compiler task named PythonPackage1 opens in the Editor. You
can compile code for other deployment targets by opening the Compiler Task Manager or going to the Manage Tasks tab and creating a new compiler task.
Specify Build Options
You can specify options for the Python package and its installer before packaging to customize the building and packaging process. For instance, you can obfuscate the MATLAB code or specify the method of including MATLAB Runtime in the generated installer.
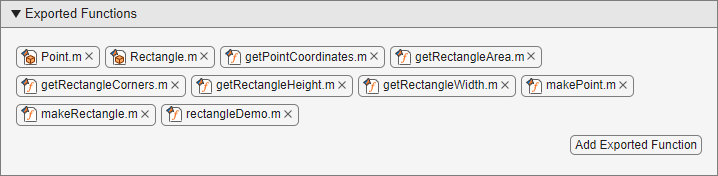
For this example, in the Exported Functions section of the
compiler task, click Add File and select all of the
.m files in the rectangle folder. In the
Project panel, the files now have the labels Design and
Exported Function File.
In the Package Info section, replace the string My
Python Package with the name for your Python package, rectangleLib.
View Code and Package Python Package
To view code that contains instructions on building and packaging your component,
click the arrow next to Export Build Script and select
Show Code. On the right, a window displays a deployment script
with the compiler.build.pythonPackage and compiler.package.installer functions that correspond to your build
options. You can convert this code to a MATLAB script file by clicking the Export Build Script
button. Running the generated build script is equivalent to clicking the Build
and Package button.
![]()
To create the Python package without an installer, click Build and Package > Build.
The compiler generates files in the
<compiler_task_name>/outputbuild subfolder contains the
Python package, and the package subfolder contains an
installer for your Python package along with MATLAB Runtime. To choose a different output location for the generated files, update the
paths in the Output Locations section.
Create and Run Python Application
After creating the Python package, you write source code for a Python application that calls the MATLAB functions in the package.
A Python application for this example named rectangleDriver.py
is included in the rectangle folder.
The rectangleDriver application performs these actions.
Defines two classes,
PyPointandPyRectangle.Creates a handle to the package using
rectangleLib.initialize.Passes the package handle to the
PyPointandPyRectangleclasses.Creates a
PyRectangleobject and prints its area, height, and width.Saves each corner as a
PyPointobject and prints its coordinates.Calls the
rectangleDemoMATLAB function to create and display data from a different rectangle.
To run a Python package generated by MATLAB Compiler SDK™, you must install MATLAB Runtime. For details, see Download and Install MATLAB Runtime. If you created an installer using Build and Package, the installer contains a version of MATLAB Runtime that matches the version of MATLAB used to compile the Python package.
Note
To test your application against MATLAB rather than MATLAB Runtime, precede the following system commands with the !
(bang) operator in the MATLAB command window. For example, !python
rectangleDriver.py.
Open a system command prompt window and navigate to the build output folder that
contains your generated Python installation script, setup.py.
Install the package using the python command. For more details,
see Install and Import MATLAB Compiler SDK Python Packages.
python -m pip install .Navigate to the project root folder and run the rectangleDriver.py
application.
cd D:\Work\rectangle
python rectangleDriver.py
Initializing module and creating a rectangle with corners (-1, 2) and (5, 10)...
Area: 48.0
Height: 8.0
Width: 6.0
Corners:
    upperLeft: (-1.0, 2.0)
    lowerLeft: (-1.0, 10.0)
    upperRight: (5.0, 2.0)
    lowerRight: (5.0, 10.0)

Executing rectangleDemo...
Upper left-hand corner: (0.0, 0.0)
Lower left-hand corner: (0.0, 4.0)
Upper right-hand corner: (3.0, 0.0)
Lower right-hand corner: (3.0, 4.0)
Area: 12.0
Height: 4.0
Width: 3.0
Note
On macOS, you must use the mwpython script instead of
python. For example, mwpython
rectangleDriver.py.
The mwpython script is located in the
matlabroot/binmatlabroot is the location of your MATLAB or MATLAB Runtime installation.
See Also
Python
Package Compiler | compiler.build.pythonPackage | mwpython