Generate an Excel File
This example shows how to generate an Excel® file for a system under test (SUT). The generated spreadsheet extracts data from the model or test harness. After you create the spreadsheet, you can optionally edit it to change or add other data. Then, you can import the data from the file into Simulink® Test™ as a test case. The wizard can also create a test case from an existing Excel file.
For generating an Excel file, the Create Test from Spreadsheet wizard parses the SUT for test attributes and generates a template spreadsheet and a test case that contains these types of data:
Inputs — The root input ports of the model
Parameters — The named parameters in the model
Comparison signals (baseline data) — The logged signals and output ports
You use the wizard to filter and edit the attributes needed for testing. The resulting spreadsheet has separate column sets for inputs, parameters, and baseline data. If your test requires multiple iterations, the wizard creates a separate sheet in the same file for each iteration. You can expand the spreadsheet to add time-based signal data, tolerances, and parameter overrides.
Open the Model, Test Manager, and Create Test from Spreadsheet Wizard
open_system("coordinate_transform_test")
sltest.testmanager.view
In the Test Manager, select New > Test from Spreadsheet.
On the Data page, select Create a test template file for specifying data and click Next.

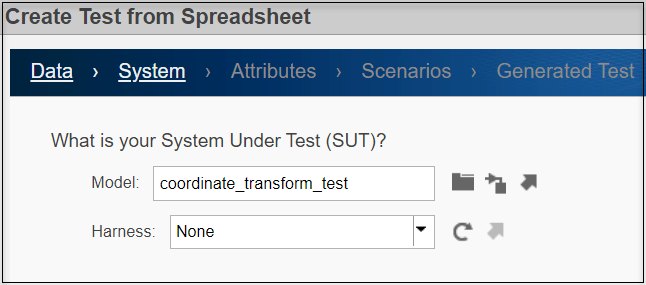
Specify the SUT and Test Attributes
On the System page, ensure that Model is coordinate_transform_test and Harness.is None. Click Next.
On the Attributes page, select the test attribute categories that you want to include in the spreadsheet. For this example, select the Inputs and Parameters check boxes and the Yes, include all attributes in the spreadsheet radio button.
If you change the SUT while you are using the wizard, click Refresh to synchronize the attribute lists with the SUT.
If you do not want to use all the attributes in a category as is, select No, I want to filter and edit the attributes. Then when you click Next, the wizard displays the Inputs and Parameters tabs. If you had selected Comparison signals on the Attributes page, the wizard also displays the Comparison tab. In the Comparison tab, you can select the signals and tolerances to use for the baseline comparisons. To specify different tolerances for each signal, open and edit the spreadsheet after the wizard generates the spreadsheet
Click Next to go to the Scenarios page.

Specify Scenarios
On the Scenarios page, enter 1 as the number of test scenarios and ensure the base name for the sheets in the spreadsheet is Scenario.
If you enter a number greater than 1 for Specify the number of test scenarios, the wizard generates each scenario as a separate sheet in the spreadsheet. The Test Manager uses each sheet as a separate iteration.
Click Next to go to the Generated Test page.

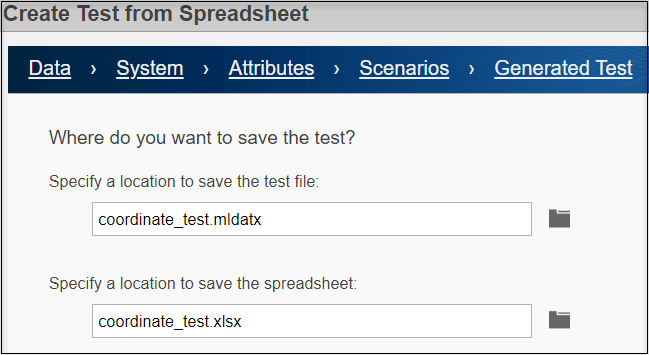
Generate Test
On the Generated Test page, specify coordinate_test.mldatx as the test file name and the coordinate_test.xlsx as the Excel spreadsheet name. Click Done to create the test and generate the test and Excel files in the working directory.
The wizard creates the two files:
Excel spreadsheet — The spreadsheet includes columns for inputs, parameters, and comparison signals. Input and comparison signals have different time bases. The wizard generates an identical sheet for each test scenario. Complete the spreadsheet with specific values, such as parameter overrides, to uniquely define each scenario. To view the Excel file, open
coordinate_test.xlsx. For more information on the file format, see Microsoft Excel Import, Export, and Logging Format.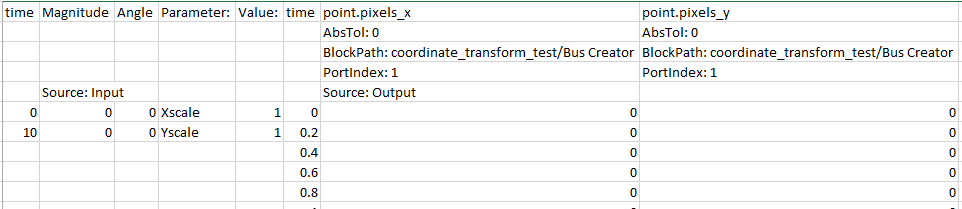
Test file — The test case imports the Excel spreadsheet and creates the test case. The resulting test case in the Test Manager has the Create Test Case from External File option selected. The Parameter Overrides and Inputs sections include data from the file.

You cannot edit the fields in the spreadsheet in the Test Manager. To change these fields, edit the spreadsheet using Excel. If you change one or more parameters and selected Comparison on the Attributes page of the wizard, capture the baseline again by clicking Capture in the Baseline Criteria section of the Test Manager.