Control LED Status Using ThingSpeak TalkBack on Raspberry Pi
This example shows how to use the Simulink® Support Package for Raspberry Pi® Hardware to fetch and execute commands from a ThingSpeak™ TalkBack queue and use them to change the status of an LED onboard a Raspberry Pi hardware board.
Use the TalkBack Read and TalkBack Write blocks from the support package to set different TalkBack API modes. You can also use the ThingSpeak TalkBack web interface to write LED_ON and LED_OFF commands to the TalkBack queue. The status of the onboard Raspberry Pi LED changes from on to off every five seconds. You can store up to 8000 commands in the list. Each time the Raspberry Pi reads the command list, it reads a single command and removes the latest command from the list.
Prerequisites
For more information on how to use the Simulink Support Package for Raspberry Pi Hardware to run a Simulink model on Raspberry Pi hardware, see Get Started with Simulink Support Package for Raspberry Pi Hardware.
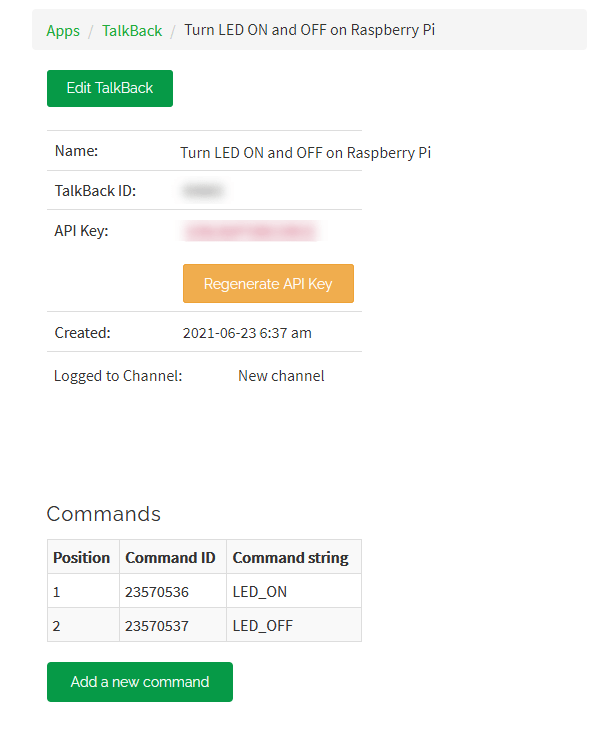
Set up a new TalkBack. Go to ThingSpeak TalkBack web interface and follow these steps.
a. Select Apps > TalkBack > New TalkBack.
b. Enter a valid Name for the TalkBack.
c. Set Log to Channel to New channel.
d. Click Save TalkBack. A new TalkBack is created.

Required Hardware
Raspberry Pi hardware board
Configure Simulink Model and Calibrate Parameters
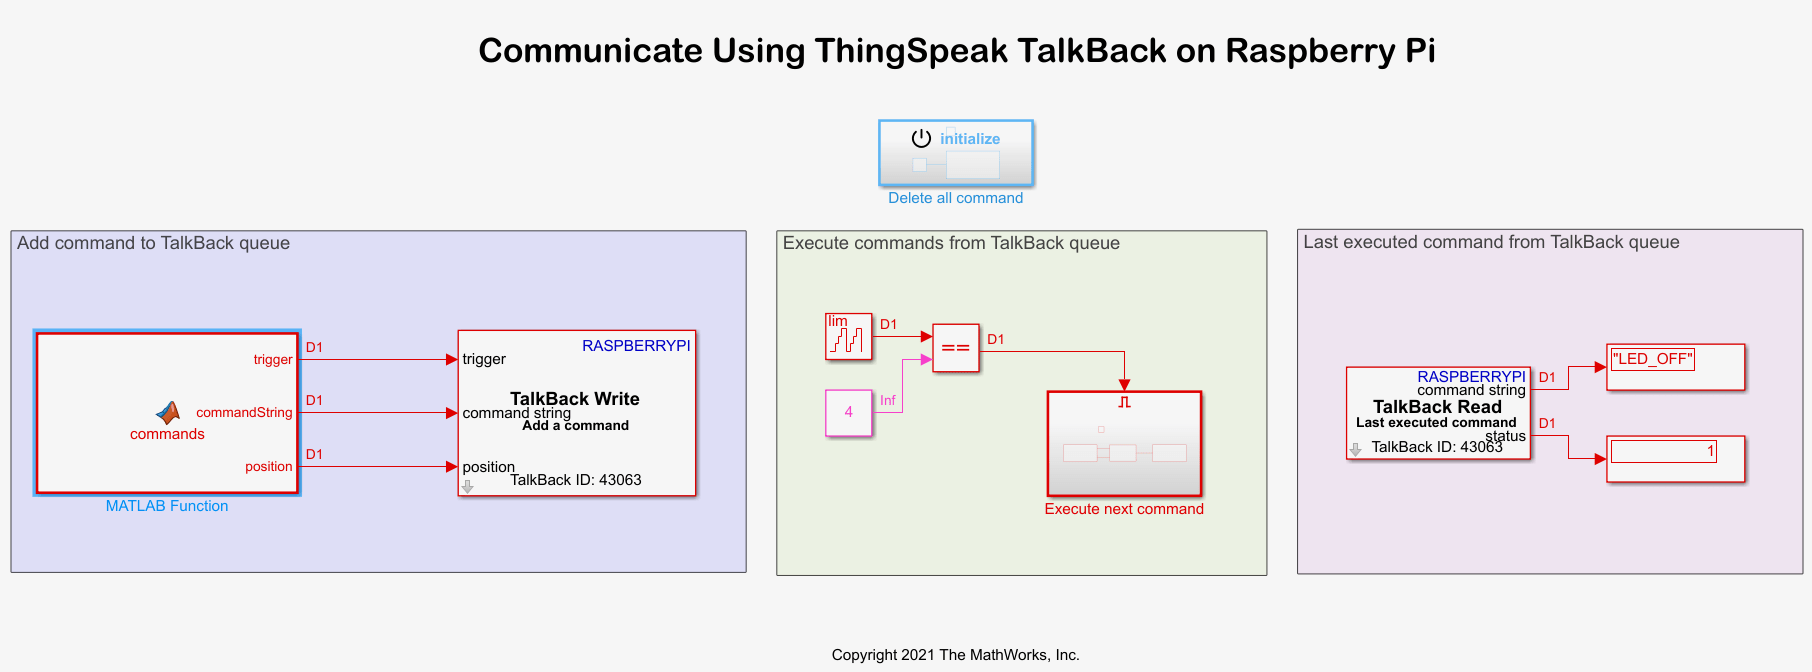
Open the raspberrypi_thingspeak_talkback Simulink model.
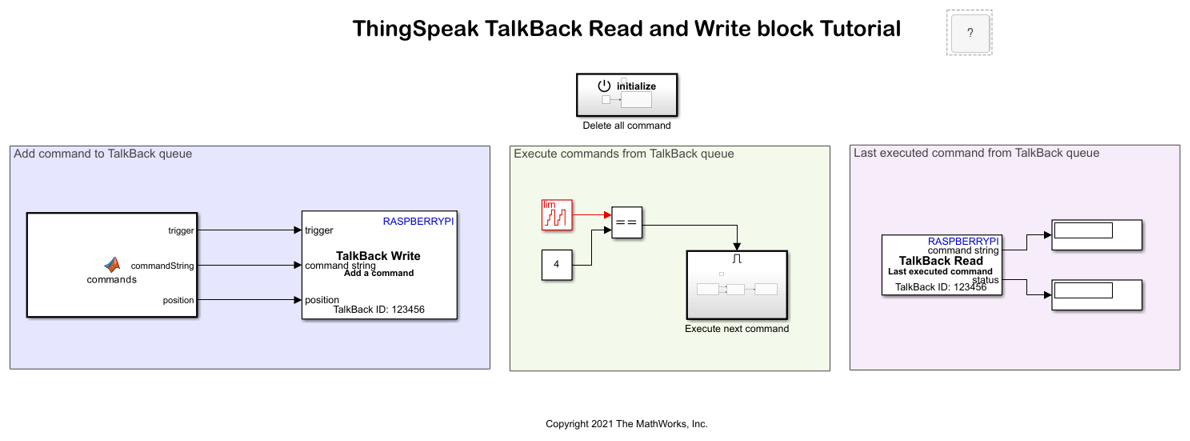
Delete All Commands
The Delete all command subsystem deletes all the commands in the TalkBack queue before the Simulink model runs. The trigger input to this block is set to 1 using a Constant block.
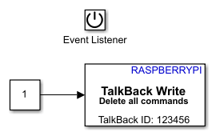
Configure these parameters in the Block Parameters dialog box of the TalkBack Write block.
Set TalkBack API to
Delete all commands.Enter the TalkBack ID and API key parameters from the ThingSpeak TalkBack web interface.
Add Command to TalkBack Queue
The commands function in the MATLAB Function block adds a command to the TalkBack queue at every sampling interval. When you set the trigger to 1, the function adds the LED_ON and LED_OFF commands to the TalkBack queue. When you set the trigger to 0, the function does not add any command to the TalkBack queue. The function also specifies the position at which these commands are written to the TalkBack queue.
Configure these parameters in the Block Parameters dialog box of the TalkBack Write block.
Set TalkBack API to
Add a command.Enter the TalkBack ID and API key parameters from the ThingSpeak TalkBack web interface.
Select Specify position.
Execute Commands from TalkBack Queue
The command function in the MATLAB Function block executes every command in the TalkBack queue after five seconds. The TalkBack Write block compares the value you set in the Counter Limited block and the Constant block. When these values match, block triggers the Execute Next Command subsystem.
Configure these parameters in the Block Parameters dialog box of the Counter Limited block.
Set Upper limit to
4.Set Sample time to
1.
Configure these parameters in the Block Parameters dialog box of the Constant block.
Set Constant value to
4.
Configure these parameters in the Block Parameters dialog box of the Relational Operator block.
Set Relational operator to
==.
In the Execute next command subsystem, the TalkBack Read blocks reads the commands in the TalkBack queue. The block then converts the commands to their corresponding logical values. For example, the block converts the LED_ON command to true and the LED_OFF to false. These logical values either turn on or turn off the LED onboard the Raspberry Pi hardware board, respectively.
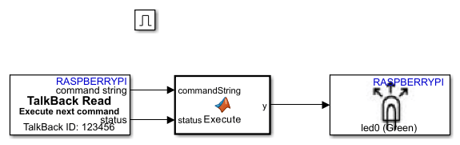
Configure these parameters in the Block Parameters dialog box of the TalkBack Read block.
Set TalkBack API to
Execute next command.Enter the TalkBack ID and API key parameters from the ThingSpeak TalkBack web interface.
Set Command length to
10.Set Sample time to
-1.
The Raspberry Pi LED block is configured to its default parameters.
Last Executed Command from TalkBack Queue
In the Last Executed Command from TalkBack Queue area, the TalkBack Read block reads the last command executed in the TalkBack queue and displays the corresponding status. This list shows the different status values that the block outputs.
0 — Indicates a failure in the TalkBack command execution or no TalkBack command present in the queue.
1 — Indicates a successful TalkBack command execution.
2 — Indicates the command string is truncated.
3 — Indicates the command is appended with zeros only when the Command type parameter is set to ASCII vector.
Configure these parameters in the Block Parameters dialog box of the TalkBack Read block.
Set TalkBack API to
Last executed command.Enter the TalkBack ID and API key parameters from the ThingSpeak TalkBack web interface.
Set Command length to
10.Set Sample time to
-1.
Run Simulink Model
1. On the Hardware tab of the Simulink model, in the Mode section, select Run on board and then click Monitor & Tune. Initially, all the commands in the TalkBack queue are deleted. In the ThingSpeak TalkBack web interface, observe the commands in the queue.
2. After five seconds, observe that the LED you configured in the LED block glows on the Raspberry Pi hardware. The Command String and Status Display blocks display LED_ON and 1, respectively.

3. After 10 seconds, observe that the LED does not glow on the Raspberry Pi hardware. The Command String and Status Display blocks display LED_OFF and 1, respectively.
You can also run the Simulink model in normal mode simulation and in the Connected IO mode, provided you have connected the host machine to the internet.
1. To run this Simulink model in normal mode simulation, on the Simulation tab of the model, click Run.
2. To run this Simulink model in the Connected IO mode, on the Hardware tab of the model, in the Mode section, select Connected IO and then click Run with IO.
See Also
You can also select a web site from the following list:
Americas
- América Latina (Español)
- Canada (English)
- United States (English)
Europe
- Belgium (English)
- Denmark (English)
- Deutschland (Deutsch)
- España (Español)
- Finland (English)
- France (Français)
- Ireland (English)
- Italia (Italiano)
- Luxembourg (English)
- Netherlands (English)
- Norway (English)
- Österreich (Deutsch)
- Portugal (English)
- Sweden (English)
- Switzerland
- United Kingdom (English)