Define Custom Document Interface for Microsoft PowerPoint
This example shows how to define a custom document interface to enable linking to requirements in Microsoft® PowerPoint® presentations.
Open Example Model
For the purposes of this example tutorial, you will link objects in the slvnvdemo_powerwindowController.slx model with slides in the powerwindowController.pptx PowerPoint presentation. Open the Simulink® model slvnvdemo_powerwindowController.slx.
open_system('slvnvdemo_powerwindowController');Set Up Requirements Manager to Work with Links
In the Apps tab, open Requirements Manager.
In the Requirements tab, ensure Layout > Requirements Browser is selected.
In the Requirements Browser, in the View drop-down menu, select
Links.

Store Links Externally
In the slvnvdemo_powerwindowController model, configure the settings to store links externally. In the Requirements tab, select Link Settings > Default Link Storage. This will open the Requirements Settings dialog box. Under the heading Default storage mode for traceability data select Store externally (in a separate *.slmx file). Alternatively, evaluate this code.
rmipref('StoreDataExternally',true);Create and Register a Stubbed Custom Document Interface
The file rmidemo_pp.m in the current working directory contains the document interface to enable linking to requirements in Microsoft PowerPoint files. Register the custom document interface by evaluating this code.
rmi register rmidemo_pp
This instructs RMI to recognize the filename extensions .ppt and .pptx as supported files and to use the methods defined here for RMI functionality.
Create the First Link
Right-click the background of the
slvnvdemo_powerwindowControllerexample model. In the context menu, select Requirements at This Level > Open Outgoing Links Dialog... to bring up the Outgoing Links dialog box.Click New to create a new link.
Expand the Document type drop-down list. Select Microsoft PowerPoint at the bottom of the list.
Use the Browse button to locate
powerwindowController.pptx.Enter a Description label, like Example Presentation.
Click OK to save the new link and close the dialog.
Alternatively, you can evaluate this code to create the link. This code fills in the link destination information first, then uses the rmi function to create links.
firstReq = rmi('createempty');
firstReq.reqsys = 'rmidemo_pp';
firstReq.doc = 'powerwindowController.pptx';
firstReq.description = 'Example presentation';
rmi('set','slvnvdemo_powerwindowController', firstReq);
Navigation to the Document
Navigation to the PowerPoint document is provided with functions in the rmidemo_pp.m file.Implementation of this and all other methods requires detailed knowledge of the APIs available in the application that manages the requirements documents. For this Microsoft PowerPoint example you will use COM API. You will use the actxserver command in MATLAB® to create a connection with the PowerPoint application. Then, you will use calls like Application.Presentations.Open(FILENAME) to manipulate the PowerPoint application via the rmidemo_pp methods. See Microsoft's Developer Reference pages for information on which PowerPoint Objects and Methods are available via COM API.
The rmidemo_pp.m file contains functions to find the correct .pptx file.
Return to the Simulink model for slvnvdemo_powerwindowController. Right-click the Simulink diagram background and navigate to Requirements at This Level again from the context menu. Notice the new navigation shortcut at the top of the submenu. When you click this new shortcut, MATLAB opens the PowerPoint file.

You can navigate to the link the same way as before, or by evaluating this code: rmi('view','slvnvdemo_powerwindowController', 1)
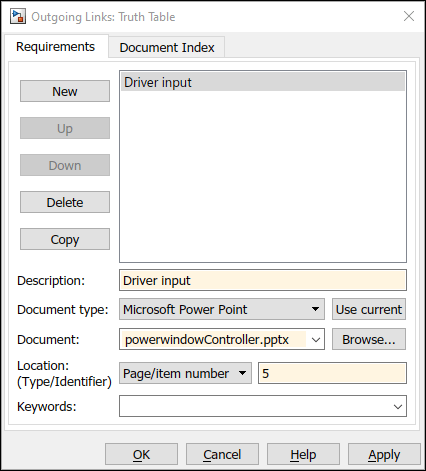
Implement Navigation to a Given Slide Number
Suppose you want to link the Truth Table block that connects to the driver input of the control subsystem block to the corresponding slide number 5 in the PowerPoint presentation. Navigate to the Truth Table block or evaluate this code.
rmidemo_callback('locate','slvnvdemo_powerwindowController/Truth Table')
Right-click the block, select Requirements > Open Outgoing Links Dialog... to bring up the Outgoing Links dialog box.
Click New to create a new link.
Specify the document type and filename as before.
Enter Driver input into the Description field.
Enter 5 into the Location/Identifier input field.
Click OK to save the new link.

If you navigate this link from the Simulink diagram, the document will open as before, but it will now scroll down to 5th slide. The helper goToSlide method along with code in the NavigateFcn function open the correct slide.
function goToSlide(hDoc, slideNum)
  disp(['Opening slide #' num2str(slideNum)]);
  hDoc.Slides.Item(slideNum).Select;
end
Navigate to the link by selecting the Truth Table block, right-clicking and selecting Requirements > 1. "Driver input". The PowerPoint presentation window should scroll down to the 5th slide.
Alternatively, create the link by evaluating this code. This code fills in the link destination information first, then uses the rmi function to create links.
secondReq = rmi('createempty');
secondReq.reqsys = 'rmidemo_pp';
secondReq.doc = 'powerwindowController.pptx';
secondReq.description = 'Driver input';
secondReq.id = '#5';
rmi('set','slvnvdemo_powerwindowController/Truth Table', secondReq);
You can navigate to the link the same way as before, or by evaluating this: rmi('view','slvnvdemo_powerwindowController/Truth Table', 1)
Linking and Navigation to Slide ID
Linking to a stored slide number can be problematic: links may get stale when you modify the document. For example, duplicate the first slide in our presentation:

Now all the other slides shift down by one. Navigation from the Driver Input Truth Table block will bring up the wrong slide. You need to use a different location type, other than Page/Item number.
Select the same
Truth Tableblock which connects to thedriverinput of thecontrolsubsystem. This code navigates to theTruth Tableblock.
rmidemo_callback('locate','slvnvdemo_powerwindowController/Truth Table')
Right-click the block, select Requirements > Open Outgoing Links Dialog... to bring up the Outgoing Links dialog box.
Click New to create a new link.
Select
Named Itemfrom the Location (Type/Identifier) drop-down list.Enter
260into the Location input field.Click OK to save the modified link.
"260" is a persistent ID for the Driver Input slide (more on this below).
Now, after this change, navigation from the Driver Input Truth Table block will bring up the correct slide, even after its order number changes.
Unfortunately, one cannot see slide IDs in the PowerPoint application UI. To find out the ID for the 5th slide, you can use the COM API:
>> hApp = actxGetRunningServer('powerpoint.application');
>> hDoc = hApp.ActivePresentation;
>> hDoc.Slides.Item(5).SlideID
ans =
  260
More user-friendly solutions to this problem are covered in the sections below.
Alternatively, you can create the link using this code. This code fills in the link destination information first, then uses the rmi function to create links.
betterLink = rmi('createempty');
betterLink.reqsys = 'rmidemo_pp';
betterLink.doc = 'powerwindowController.pptx';
betterLink.description = 'Driver input - better link';
betterLink.id = '@260';
rmi('set','slvnvdemo_powerwindowController/Truth Table', betterLink);
You can navigate to the link destination the same way as before, or evaluate this: rmi('view','slvnvdemo_powerwindowController/Truth Table', 1)
Linking Using Document Index Tab
As shown above, you can create persistent links that do not become stale after slides in linked presentation are re-ordered, but you do not have easy access to persistent SlideID values in PowerPoint. One possible solution is to select a desired slide in the Document Index tab of the Outgoing Links dialog. The content of the Document Index tab is controlled by the ContentsFcn method in the custom document interface file. you can provide implementation for this method, such that the persistent SlideID value is stored by RMI when creating a link, instead of the volatile SlideNumber value.
The ContentsFcn methods returns three arrays:
labelsto use for Document Index list items and navigation shortcutsdepthsto indicate the hierarchical relationship of listed items (unused in this example)locationsto use for stored unique IDs
The ContentsFcn implementation relies on this PowerPoint API call to populate location values:
hDoc.Slides.Item(k).SlideID
This ensures persistent navigation information even after slide order changes. Note that you use @ as a prefix for locations values, to indicate that the number that follows stores the Named Item location value instead of slide (page) number location value.
Use the Document Index tab in the Outgoing Link Editor to create a link.
Navigate to the
Truth Table1block which connects to thepassengerinput of thecontrolsubsystem block. This code navigates to theTruth Table1block.
rmidemo_callback('locate','slvnvdemo_powerwindowController/Truth Table1')
Right-click the block, select Requirements > Open Outgoing Links Dialog... to bring up the Outgoing Links dialog box.
Click New to create a new link.
Specify
Microsoft PowerPointas the Document type.Specify
powerwindowController.pptxas the Document from the Browse menu.Leave the Description input.
Instead of specifying Location manually, switch to the Document Index tab, locate the line that corresponds to Passenger Inputs slide, and double-click the line.
Notice that the remaining input fields are automatically filled with the correct information.
Click OK to save the new link.

Navigate to the link by right-clicking the Truth Table1 block and selecting Requirements > 1."Passenger Input consists of a vector with three elements in powerwindowController.pptx". This link should work correctly even after slides are shifted or re-ordered.
Alternatively you can create the link by evaluating this code. The link ID is created the same way as in the previous section, where a persistent ID is set. This code fills in the link destination information first, then uses the rmi function to create links.
indexLink = rmi('createempty');
indexLink.reqsys = 'rmidemo_pp';
indexLink.doc = 'powerwindowController.pptx';
indexLink.description = 'Passenger input - linked via Index tab';
indexLink.id = '@259';
rmi('set','slvnvdemo_powerwindowController/Truth Table1', indexLink);
Navigate to the link the same way as above, or evaluate this code: rmi('view','slvnvdemo_powerwindowController/Truth Table1', 1)
Link to the Current Slide in PowerPoint
An even better way to support robust persistent links is via Selection Linking Shortcuts. The RMI API allows you to define the SelectionLinkFcn function for linking with the current object in the current document. In the next step of our tutorial, you will automate linking to the current slide in the currently open PowerPoint presentation.
The Requirements section of the context menus display a shortcut for linking with the current slide in PowerPoint.
In your copy of the PowerPoint presentation example, navigate to slide 6 titled
Top or bottom of the window frame is reached.In the Simulink diagram, right-click the
endstopblock.
rmidemo_callback('locate','slvnvdemo_powerwindowController/endstop')
Right-click the block and select Requirements > Link to Slide in PowerPoint from the context menu.

The RMI will automatically create a link to the SlideID that corresponds to the current location in the active presentation. The RMI will try to use the header text of the target slide as a label for the new link.
To navigate to the link, right-click the endstop block again and select Requirements > 1."Top or bottom of the window frame is rea...". The PowerPoint program should open to the correct slide.
Alternatively, you can create the link using this code. The link ID is created the same way as in the previous section, where a persistent ID is set. This code fills in the link destination information first, then uses the rmi function to create links.
selectionLink = rmi('createempty');
selectionLink.reqsys = 'rmidemo_pp';
selectionLink.doc = 'powerwindowController.pptx';
selectionLink.description = 'Endstop signal - selection link';
selectionLink.id = '@261';
rmi('set','slvnvdemo_powerwindowController/endstop', selectionLink);
You can navigate to the link the same way as above, or you can evaluate this code: rmi('view','slvnvdemo_powerwindowController/endstop', 1)
Create Bidirectional Links
As a final step of this tutorial you will extend the SelectionLinkFcn function to optionally insert a hyperlink in the current slide, for navigation from PowerPoint to the linked object in Simulink.
The rmidemo_pp custom document interface allows automated insertion of Simulink navigation controls into linked slides, when you use Link to Slide in PowerPoint shortcut in the context menu for Simulink objects. To activate this feature, in the Simulink model select the Requirements tab. Then select Link Settings > Linking Options. Alternatively, evaluating this code will open this dialog box: rmi_settings_dlg.
Under the When creating selection-based links heading, make sure that Modify destination for bidirectional linking is checked. Alternatively, this code will set these settings.
origMcState = rmipref('UnsecureHttpRequests', true);
origTwoWayPref = rmipref('BiDirectionalLinking', true);
Beginning in R2019a, MATLAB's embedded HTTP service is activated on a secure port 31515, but not on an unsecure port 31415. Because our navigation URLs cannot use the secure port without certificate installation, you should also select the Enable external connectivity at MATLAB startup checkbox at the bottom of this tab.
To try this out, repeat the selection linking procedure for the obstacle signal input block, to associate it with the corresponding slide in the example presentation.
Navigate to slide 7 in
powerwindowController.pptx(make it the active slide).Navigate to the
obstacleblock in the Simulink model.
rmidemo_callback('locate','slvnvdemo_powerwindowController/obstacle')
Right-click the block and select Requirements > Link to Slide in PowerPoint from the context menu.
You should now see a new RMI icon inserted at the top-left corner of the slide.

Follow Microsoft PowerPoint's instructions to follow the link, and it should highlight the corresponding block in the slvnvdemo_powerwindowController model.
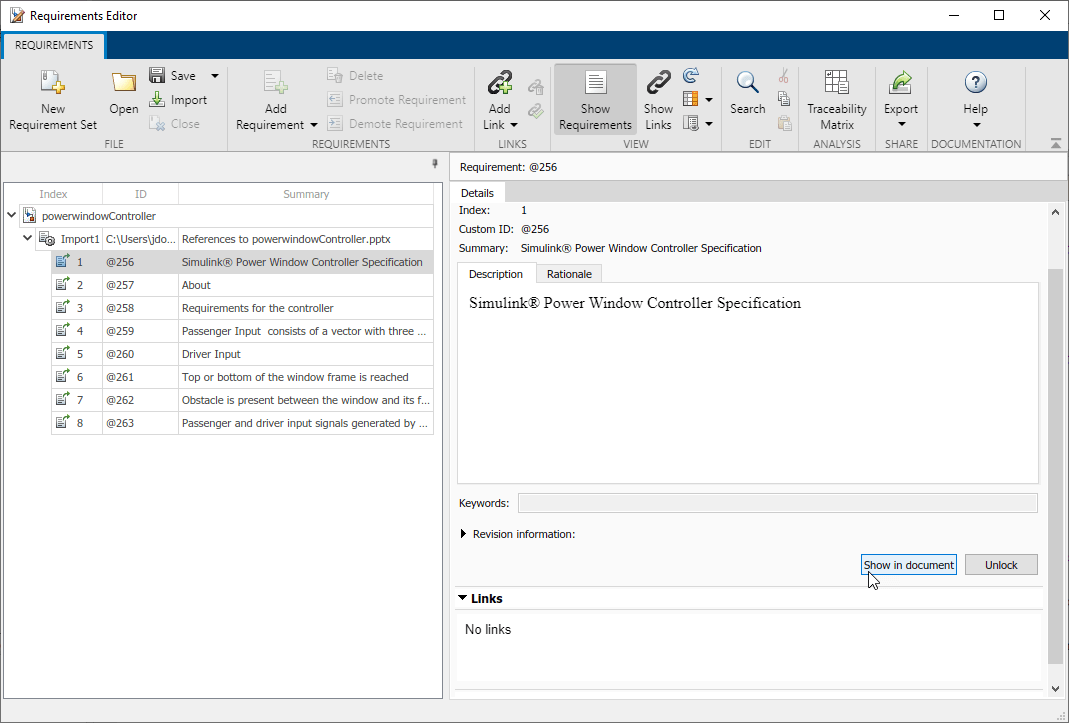
Importing Items from PowerPoint Document into Requirements Toolbox
Requirements Toolbox™ includes document import capability, if your custom document interface includes all the needed pieces. Using the customization file rmidemo_pp.m and slreq.import API, you can automatically pull in the contents as objects of type slreq.Reference or slreq.Requirement, and save into .slreqx file. Refer to slreq.import for further information.
Because our custom document type definition does not provide implementation for HtmlViewFcn, only plain-text import will work.
Make sure the document is open in PowerPoint before you run the slreq.import command. The importer will display the number of imported items, which for our case corresponds to the number of slides. Use slreq.editor command to bring-up the Requirements Editor. Expand the document node to browse imported items. Click "Show in document" button to navigate from imported reference to original item in source document.

Alternatively, follow these steps to import the requirements from the command line.
Make sure that the
powerwindowController.pptxdocument is open before import:
rmi('view','slvnvdemo_powerwindowController', 1)
Import the requirements using:
slreq.import('rmidemo_pp','AsReference', true, 'RichText', false)
View the requirements in the Requirements Editor with
slreq.editor
Where to Go from Here
As opposed to linking to a Slide as a whole, you may want to modify the SelectionLinkFcn implementation to link to a specific text or picture in the slide. Refer to Microsoft's Developer Reference pages for information on how to adjust the anchoring and appearance of Simulink navigation controls. For example, instead of inserting an icon with a hyperlink, you may want to attach a hyperlink to the selected text on the current slide.
If you need to link to a Search text pattern, irrespective of which slide includes the stored text, you can extend the declaration of supported location types to include the ? character:
docInterface.LocDelimiters = '#@?';
You should then provide an additional case for switch(locationStr(1)) in the NavigateFcn method. The corresponding findText helper queries the PowerPoint Presentation object for all TextFrame items in all Slides and selects the item with the matching text.
The custom document interface template supports other methods, depending on your needs. For example, to have your custom links covered by Requirements Consistency Checking, consider implementing these methods:
IsValidDocFcnIsValidIdFcnIsValidDescFcn
To adjust the way your links are displayed in generated reports, you can use:
CreateURLFcnUrlLabelFcnDocDateFcnDetailsFcnHtmlViewFcn
If your application is not file-based, but uses a proprietary database to store requirements documents, you must mark the custom document interface as "not a file":
docInterface.IsFile = 0;
and provide a specialized implementation for BrowseFcn. This is the function that gets called when you click the Browse button in the Outgoing Links dialog.
rmi('edit','slvnvdemo_powerwindowController');
Unregister the rmidemo_pp custom document interface,
rmi unregister rmidemo_pp
You can also select a web site from the following list:
Americas
- América Latina (Español)
- Canada (English)
- United States (English)
Europe
- Belgium (English)
- Denmark (English)
- Deutschland (Deutsch)
- España (Español)
- Finland (English)
- France (Français)
- Ireland (English)
- Italia (Italiano)
- Luxembourg (English)
- Netherlands (English)
- Norway (English)
- Österreich (Deutsch)
- Portugal (English)
- Sweden (English)
- Switzerland
- United Kingdom (English)